Cleaning the Fixing Roller of the Printer
If the printed paper has smudge marks, clean the fixing roller using the following procedure.
 |
Letter size plain paper is required to clean the fixing roller. Have Letter size plain paper ready.
|
1
Load Letter size plain paper in the multi-purpose tray.
2
Make sure that the printer is online.
If the printer is not online, press [  ] (
] ( Online).
 ] (
] ( Online).
3
Press [  ] (
] ( Utility).
 ] (
] ( Utility).
4
Select [Cleaning] using [  ] and [
  ], and then press [OK].
 ] and [
  ], and then press [OK].
5
Select the size of the paper loaded in the multi-purpose tray using [  ] and [
  ], and then press [OK].
 ] and [
  ], and then press [OK].
6
Select [Yes] using [  ], and then press [OK].
 ], and then press [OK].
|
→
|
<Insert paper to be used for cleaning page.> is displayed on the display.
|

7
Press [  ] (
] ( Online).
 ] (
] ( Online).
 |
→
|
The cleaning paper is printed.
|
|
→
|
<Set cleaning paper and press the Online key.> is displayed on the display.
|
|
Next, clean the fixing roller using the printed cleaning page.
|
8
If any paper is loaded in the multi-purpose tray, remove it.
9
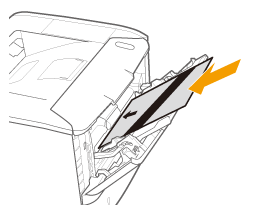
Load the cleaning page with the printed side face-up and the arrow mark going into the multipurpose tray first.

10
Press [  ] (
] ( Online).
 ] (
] ( Online).
|
→
|
The paper is fed into the printer slowly, and the printer starts cleaning the fixing roller.
|

|
NOTE
|
||
Cleaning timeIt takes approximately 57 seconds.
The front or back of the printed paper has smudge marks even after performing the above procedure.Perform the cleaning again. When doing so, do not use the cleaning paper output but load A4/Letter blank paper in the multi-purpose tray, and then perform the cleaning.
|