Installing SD Card
SD card is installed in the main board of the printer unit using the following procedure.
|
IMPORTANT
|
||
When using the "Encrypted Secured Print" function whose security is reinforced for data
|
 |
We recommend that an encrypted secured print be used when printing secured print jobs.
|
Before installing SD card
If the SD card is write-protected, release the protection, and then insert the card.
|
NOTE
|
A Phillips screwdriver is required.Have a screwdriver ready that matches the size of the screws for the slot cover.
|
1
Turn the printer OFF, and then disconnect the cables or cords from the printer.
|
|
Shut down the printer before turning it OFF.
For details on the procedure for shutting down the printer, see "Turning the Printer ON/OFF."
|
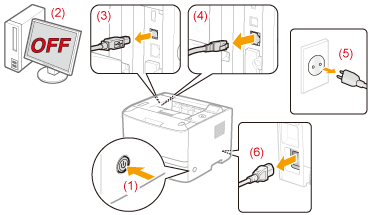
<How to disconnect the cable or cord>
|
USB cable*
|
(2) Turn the computer OFF.
(3) Disconnect the cable from the printer.
|
|
LAN cable*
|
(4) Disconnect the cable from the printer.
|
|
Power cord
|
(5) Disconnect the power plug from the AC power outlet.
(6) Disconnect the cord from the printer.
|
|
*
|
Whether the cable is connected or not varies depending on your environment.
|
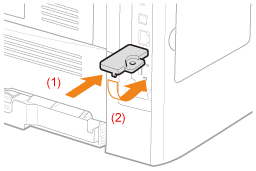
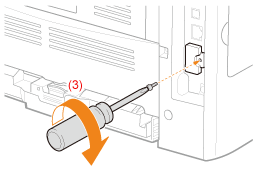
2
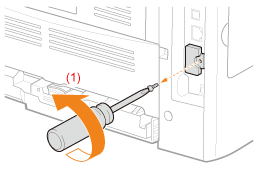
Remove the slot cover.
|
(1)
|
Remove the screw.
|
|
|
 |
|
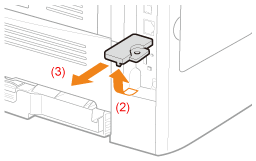
(2)
|
Remove the slot cover.
|
|
(3)
|
Remove the cover in the direction of the arrow.
|
|
|
 |
3
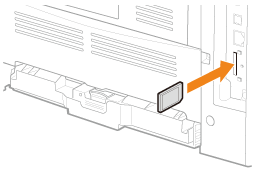
Install SD card.
Install the SD card in the SD card slot until it clicks.
4
Attach the slot cover.
|
(1)
|
Attach the slot cover.
|
|
(2)
|
Close the cover.
|
|
|
 |
|
(3)
|
Attach and fasten the screw.
|
|
|
 |
5
Hard reset or restart the printer.
If <Formatting SD Card?> appears in the display after the printer starts, the SD card is being formatted.
Wait for a moment until the format is completed.
|
IMPORTANT
|
If <Formatting SD Card?> does not appear in the displayPerform [Format] in [SD Card Maintenance] in the common Setup menu.
|
6
Connect all the interface cables.
|
NOTE
|
||||
Setting after the SD card is installedPerform the following procedure after the SD card is installed.
For details on the procedure for Macintosh, see "Setting the Printer Options."
|
|
Next, perform the following procedures.
|