Restricting the Users Who Can Print
This section describes the procedure for specifying the settings using the Remote UI. To specify the settings using FTP Client, see "FTP Client."
1
Start the Remote UI, and then log in as Administrator.
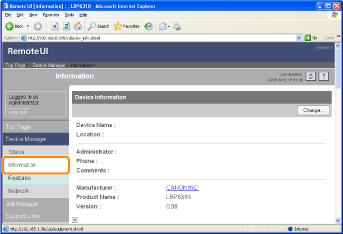
2
Select [Information] from the [Device Manager] menu.
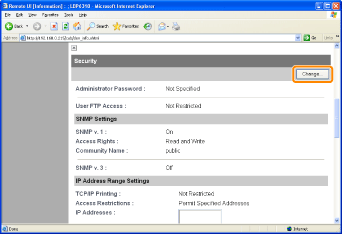
3
Click [Change] under [Security].
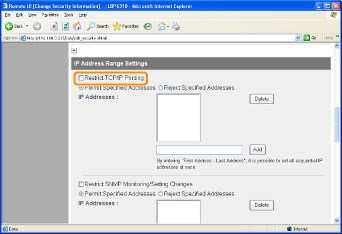
4
Select the [Restrict TCP/IP Printing] check box.
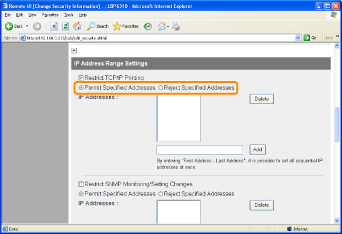
5
Select [Permit Specified Addresses] or [Reject Specified Addresses].
|
[Permit Specified Addresses]
|
Only users specified in [IP Addresses] can perform printing.
|
|
[Reject Specified Addresses]
|
Users specified in [IP Addresses] cannot perform printing.
|
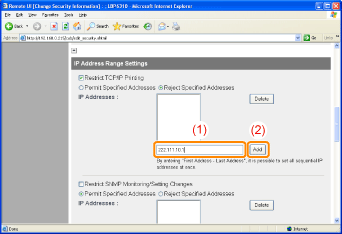
6
Set the IP address.
|
(1)
|
Enter the IP address of a computer for which you permit or reject printing.
|
||
|
(2)
|
Click [Add].
|
You can also enter IP addresses as follows.
|
Input Example of the IP Addresses
|
Method for Entering IP Addresses
|
|
AAA.BBB.CCC.15-AAA.BBB.CCC.18
|
If you want to enter the IP addresses of consecutive numbers, place "-" (hyphen) between the address of the smallest number and that of the largest number.
The example on the left is equivalent to entering addresses from AAA.BBB.CCC.15 to AAA.BBB.CCC.18.
|
|
AAA.BBB.CCC.*
|
Entering "*" (asterisk) is equivalent to entering the numbers from 0 to 255.
The example on the left is equivalent to entering addresses from AAA.BBB.CCC.0 to AAA.BBB.CCC.255.
|
 |
You can set IP addresses of up to 255 characters.
|
|
<Counting example of the number of characters>
"192.168.0.215" = 13 characters
"192.168.0.215-192.168.0.218" = 27 characters
|
|
NOTE
|
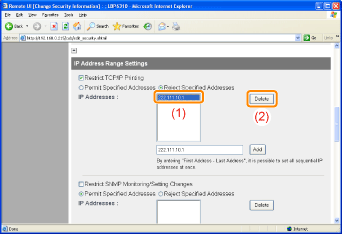
||||
When deleting a set IP address
 |
7
Click [OK].
