Saving Frequently Used Printing Preferences (Adding/Editing/Deleting a "Profile")
Adding a "Profile"
1
Display the setting screen of the printer driver.
2
Specify the printing preferences in the [Page Setup], [Finishing], [Paper Source], and [Quality] sheets.
The contents specified here is registered in "Profiles."
For more details on the settings, see Help.
3
Click [Add].
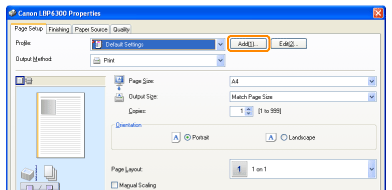
 If you cannot click [Add] If you cannot click [Add] |
4
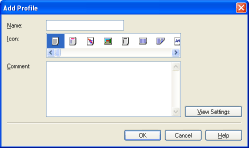
Specify information about a "Profile."
|
[Name]
|
Enter the name for "Profiles." Up to 31 characters can be entered.
|
|
[Icon]
|
You can select the icon for the "Profile."
|
|
[Comments]
|
Enter the comment for the "Profile." Up to 255 characters can be entered.
|
|
[View Settings]
|
Display the [View Settings] dialog box. You can check the current printer driver settings.
|
5
Click [OK] to register the "Profile."
|
→
|
The setting screen of the printer driver reappears.
Make sure that the name of the added "Profile" is in [Profile].
|
|
For details on the procedure for using a "Profile", see "Selecting a "Profile"."
|
Editing an Added "Profile"
You can change information about an added "Profile" or export a "Profile" as a file.
1
Display the setting screen of the printer driver.
2
Click [Edit].
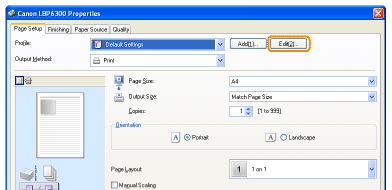
 If you cannot click [Edit] If you cannot click [Edit] |
3
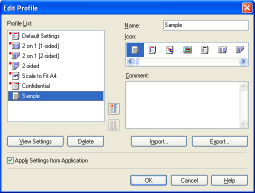
Edit information about a "Profile."
For more details on the settings, see Help.
4
Click [OK].
|
→
|
The setting screen of the printer driver reappears.
|
Deleting an Added "Profile"
1
Display the setting screen of the printer driver.
2
Click [Edit].

 If you cannot click [Edit] If you cannot click [Edit] |
3
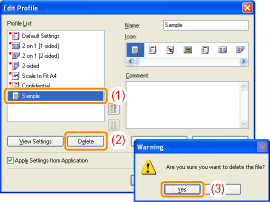
Delete a "Profile."
|
(1)
|
Select a "Profile" you want to delete.
|
||
|
(2)
|
Click [Delete].
|
||
|
(3)
|
Click [Yes].
|
4
Click [OK].
|
→
|
The setting screen of the printer driver reappears.
|
 "
"