Monitoring/Controlling Devices by SNMP (SNMP Settings)
You can monitor and control the printer by using SNMP support devices such as computers connected to networks. This printer supports SNMPv1, and SNMPv3 with enhanced security and authentication features.
1
Start the Remote UI, and then log in as Management Mode.
2
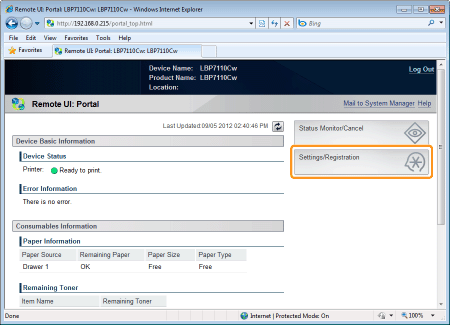
Click [Settings/Registration].
3
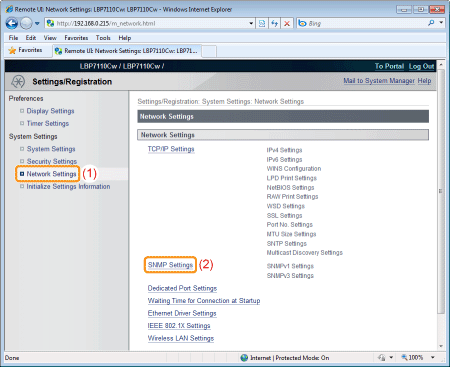
Display the [SNMP Settings] page.
|
(1)
|
Select [Network Settings].
|
|
(2)
|
Click [SNMP Settings].
|
4
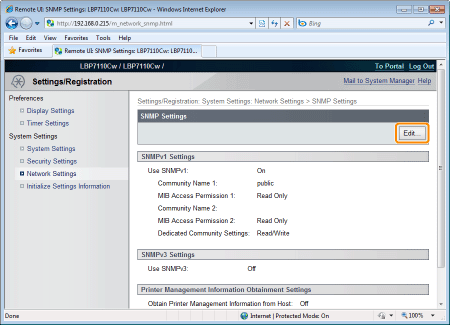
Click [Edit].
5
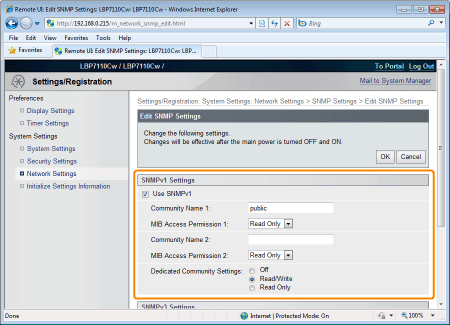
Configure the SNMPv1 protocol.
|
[Use SNMPv1]
|
Select the check box to use the SNMPv1 protocol.
|
|
[Community Name 1]
|
Specify an SNMPv1 community name. You can enter up to 32 single-byte alphanumeric characters. The default value is [public].
|
|
[MIB Access Permission 1]
|
Specify the MIB access authority of [Community Name 1]. When both reading and writing are permitted, you can access the printer from a computer on the network and change settings.
[Read/Write]
Both reading and writing are permitted.
[Read Only]
Reading only is permitted.
|
|
[Community Name 2]
|
Specify an SNMPv1 community name. You can enter up to 32 single-byte alphanumeric characters.
|
|
[MIB Access Permission 2]
|
Specifies the MIB access authority of [Community Name 2]. When both reading and writing are permitted, you can access the printer from a computer on the network and change settings.
[Read/Write]
Both reading and writing are permitted.
[Read Only]
Reading only is permitted.
|
|
[Dedicated Community Settings]
|
Specify a dedicated community and its MIB access right.
[Off]
The dedicated community is deactivated.
[Read/Write]
Both reading and writing are permitted.
[Read Only]
Reading only is permitted.
|
6
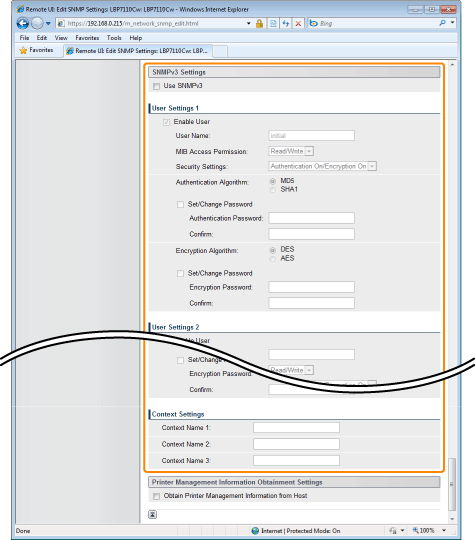
Configure the SNMPv3 protocol.
 |
To specify SNMPv3, you need to activate SSL features in advance.
|
|
[Use SNMPv3]
|
Select the check box to use the SNMPv3 protocol.
|
[User Settings 1]/[User Settings 2]/[User Settings 3]
|
[Enable User]
|
Select the check box if you want to register/edit user information or enable the registered user information.
|
|
[User Name]
|
Enter the user name to be used for the SNMPv3 protocol. You can enter up to 32 single-byte alphanumeric characters.
|
|
[MIB Access Permission]
|
Specify the MIB access authority. When both reading and writing are permitted, a user can access the printer from a computer on the network and change settings.
[Read/Write]
Both reading and writing are permitted.
[Read Only]
Reading only is permitted.
|
|
[Security Settings]
|
Specify the security settings.
[Authentication On/Encryption On]
Both authentication and encryption are adopted.
[Authentication On/Encryption Off]
Only authentication is adopted.
[Authentication Off/Encryption Off]
Neither authentication nor encryption is adopted.
|
|
[Authentication Algorithm]
|
Select the algorithm to be used for authentication.
[MD5]
MD5 is used.
[SHA1]
SHA1 is used.
To set or change the authentication passwordSelect the [Set/Change Password] check box, and then enter the password to [Authentication Password] and [Confirm].
You can enter 6 to 16 single-byte alphanumeric characters.
|
|
[Encryption Algorithm]
|
Select the encryption algorithm.
[DES]
DES is used.
[AES]
AES is used.
To set or change the encryption passwordSelect the [Set/Change Password] check box, and then enter the password to [Encryption Password] and [Confirm].
You can enter 6 to 16 single-byte alphanumeric characters.
|
[Context Settings]
|
[Context Name 1]
|
Enter a context name to be used in the SNMPv3 protocol. You can enter up to 32 single-byte alphanumeric characters.
|
|
[Context Name 2]
|
|
|
[Context Name 3]
|
7
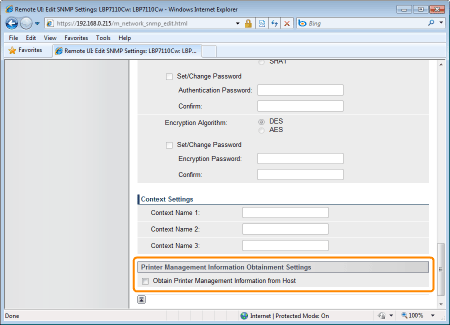
Specify whether or not to obtain the printer management information as needed.
|
[Obtain Printer Management Information from Host]
|
Select the check box if you want to periodically obtain the printer management information such as print applications and ports from host computers on the network by using SNMP.
|
8
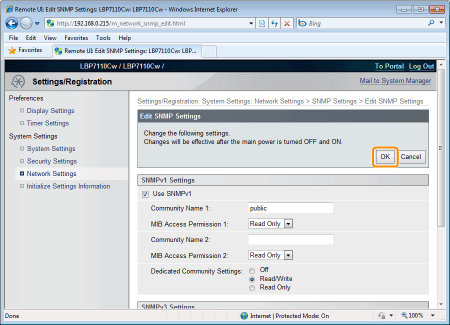
Click [OK].
9
Restart the printer.
Turn the printer OFF, make sure that the Main Power indicator is off, wait for 10 seconds or longer, and then turn it ON again.
|
→
|
After the printer is restarted, the settings become effective.
|
