
Loading Paper in the Paper Drawer
Load the paper that you usually use in the paper drawer. When you want to print on paper that is not loaded in the paper drawer, load the paper in the multi-purpose tray. Loading Paper in the Multi-Purpose Tray
|
Make sure to load paper in landscape orientationPaper cannot be loaded in portrait orientation. Make sure to load the paper in landscape orientation. |
 |
Follow the procedure below when loading paper into the optional Cassette Feeding Unit or Cassette Module. |
1
Grip the handle, and pull out the paper drawer until it stops.

2
When loading paper into the paper drawer for the first time, or when changing the paper size, adjust the position of the paper guides.
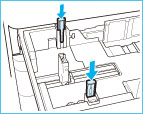
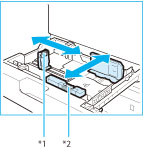 | 1 | Slide the paper guide on the left while squeezing it on the top to align it with the mark for the desired paper size. | |
2 | Slide the paper guide at the front while squeezing it on the top to align it with the mark for the desired paper size. |
*1 Paper Guide on Left
*2 Paper Guide at Front

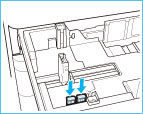
Slide the paper guides until they click into place. If the paper guides are not aligned correctly, the paper size will not correctly appear on the display. It is also necessary to adjust the paper guides correctly to avoid causing a paper jam, dirty prints, or making the inside of the machine dirty.

When using inch paper, remove the A4 feeder attachment attached to the paper drawer and store it in the storage space. When using A or B series paper, make sure to attach the A4 feeder attachment to the paper drawer. And then, select the paper series that you are going to use in <Menu>  <Common Settings> <Paper Series Settings for Auto Recognition in Drawer>. (See Paper Series Settings for Auto Recognition in Drawer)
 | A/B Series |
 | Inch Series |
3
Prepare the paper to load.
 | Open the packaging for the paper, and remove the paper stack. | |
 |
Before loading paper, always fan the sheets several times, and align the edges to facilitate feeding.
4
Load the paper stack into the paper drawer.
 | 1 | Make sure that the paper size setting of the paper drawer matches the size of the paper to load in the paper drawer. | |
2 | Load the paper stack against the right wall of the paper drawer. | ||
3 | Gently push the paper drawer back into the machine. |
Paper which is curled must be straightened out before loading it into the paper drawer. You will not be able to make copies or print if you load paper that exceeds the load limit line (  ), or if the paper drawer is not completely pushed into the machine.
), or if the paper drawer is not completely pushed into the machine.Make sure that the height of the paper stack does not exceed the load limit line ( ).
).Always check that the paper drawers are in place.
5
When loading paper into the paper drawer for the first time, or when changing the paper size, attach a paper size label to the paper drawer.
When not loading envelopes to a paper drawer, store the envelope feeder attachment in the storage area of the paper drawer. For information on storing the envelope feeder attachment, see "Getting Started". Manuals Included with the Machine
The paper size labels included with the machine contain paper sizes not supported by the machine.
6
If the paper has been changed, register the type of the loaded paper.
Register the type of paper you loaded in the paper drawer in <Paper Settings>. For more information, see Specifying Paper Type in the Paper Drawer.
When changing the paper size or type
The factory default settings for paper size and type are <A4> and <Plain 2>, respectively. If you load a different size or type of paper into the machine, make sure to change the settings. If you do not change the settings, the machine cannot print properly.
The factory default settings for paper size and type are <A4> and <Plain 2>, respectively. If you load a different size or type of paper into the machine, make sure to change the settings. If you do not change the settings, the machine cannot print properly.