Performing the Configuration Using the Printer's Control Panel (When You First Set it Up)
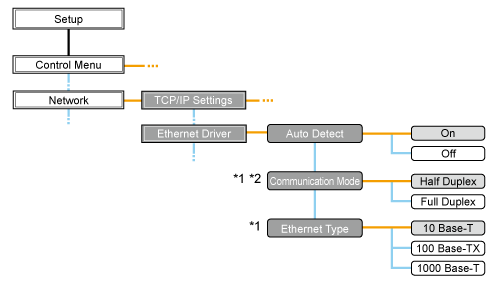
When configuring the interface using the printer's control panel, use the following menu hierarchy.

|
*1
|
[Communication Mode] and [Ethernet Type] are displayed when [Auto Detect] is set to [Off].
|
|
*2
|
[Communication Mode] appears only when [Ethernet Type] is set to a setting other than [1000 Base-T].
|
 |
Pressing [
 ] ( ] ( Settings) displays the common Setup menu. Settings) displays the common Setup menu. indicates that the procedure is performed by pressing [ indicates that the procedure is performed by pressing [  ] or [ ] or [  ] on the control panel. ] on the control panel.  indicates that the procedure is performed by pressing [OK] on the control panel. indicates that the procedure is performed by pressing [OK] on the control panel. |
|
IMPORTANT
|
After performing the configurationTo enable the settings, perform a hard reset or restart the printer.
For details on a hard reset, see "Canceling All the Jobs (Hard Reset)." To go back up the hierarchyPress [
 ] ( ] ( Back). Back). About the control panelFor details on the control panel, see "Control Panel."
|
1
Press [  ] (
] ( Settings), select [Network] using [
  ] and [
  ], and then press [OK].
 ] (
] ( Settings), select [Network] using [
  ] and [
  ], and then press [OK].
 When the message is displayed, press [OK].
 |
You can specify the settings when the printer is either online (the
 Online indicator is on) or offline (the Online indicator is on) or offline (the  Online indicator is off). Online indicator is off). |
2
Select [Ethernet Driver] using [  ] and [
  ], and then press [OK].
 ] and [
  ], and then press [OK].
3
Configure the Ethernet driver.
 |
This printer can detect the communication method and Ethernet type automatically. Normally, set [Auto Detect] to [On].
If you want to fix the communication method and Ethernet type, set [Auto Detect] to [Off]. |
 |
If you are using a hub, match the settings for the hub and the printer. For the settings of the hub you are using, consult your network administrator.
|
(Example)
Hub settings
Communication mode: Full duplex
Ethernet type: 10 Base-T
Printer settings
[Auto Detect]: [Off]
[Communication Mode]: [Full Duplex]
[Ethernet Type]: [10 Base-T]
When detecting the Ethernet driver automatically (Default)
|
(1)
|
Select [Auto Detect] using [
 ] and [ ] and [  ], and then press [OK]. ], and then press [OK]. |
|
(2)
|
Select [On] using [
 ] and [ ] and [  ], and then press [OK]. ], and then press [OK]. |
When detecting the Ethernet driver manually
|
(1)
|
Select [Auto Detect] using [
 ] and [ ] and [  ], and then press [OK]. ], and then press [OK]. |
||||
|
(2)
|
Select [Off] using [
 ] and [ ] and [  ], and then press [OK]. ], and then press [OK]. |
||||
|
(3)
|
Select [Communication Mode] using [
 ] and [ ] and [  ], and then press [OK]. ], and then press [OK]. |
||||
|
(4)
|
Select an Ethernet communication method appropriate for your network environment using [
 ] and [ ] and [  ], and then press [OK]. ], and then press [OK].
|
||||
|
(5)
|
Select [Ethernet Type] using [
 ] and [ ] and [  ], and then press [OK]. ], and then press [OK]. |
||||
|
(6)
|
Select an Ethernet type appropriate for your network environment using [
 ] and [ ] and [  ], and then press [OK]. ], and then press [OK]. |
4
Perform a hard reset or restart the printer.
After performing a hard reset or restarting the printer, the settings are effective.
|
NOTE
|
For details on a hard reset |