Registering a Profile for Printing
If you have registered frequently used settings as "profiles," you can apply the settings by simply selecting them from the [Profile] list.
1.
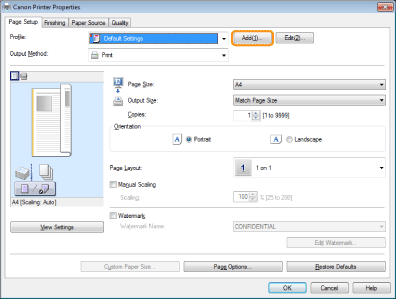
Specify the desired settings in the printer driver screen → click [Add].

Click the tabs for the [Page Setup], [Finishing], [Paper Source], and [Quality] tabs, and then specify the desired items.
For instructions on how to specify the print settings, see "Printing" or "Configuring the Default Print Settings."
For information on available printing functions, see "Printing Functions" or the online help (see "Viewing the Online Help").
2.
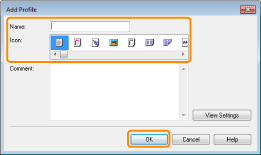
Set [Name] and [Icon] → click [OK].

Enter additional information in [Comment] if necessary.
|
NOTE
|
|
To edit or delete a profile, in the printer driver screen, click [Edit] at the right of [Profile]. However, pre-defined profiles cannot be modified.
If you cannot select a profile, display the printer properties dialog box from [Control Panel], click the [Profile] tab, and then check whether [Allow Profile Selection] and [Allow Setting Addition] are selected. For details about how to display the printer properties dialog box, see "Setting the Printer Options."
The display may vary according to the operating system, as well as the type and version of the printer driver.
|