Setting AirPrint
The settings required for using AirPrint can be configured remotely using the Remote UI. It is necessary to log in with administrator privileges to configure the settings.
Configuring Settings Using the Remote UI
1.
Start the Web browser and log in as an administrator.
http://<IP address or host name of the machine>/
For more information, see "Remote UI."
2.
Click [Settings/Registration] → select [Network Settings] in <Preferences> → click [AirPrint Settings].
If you are using a mobile device, such as an iPad, iPhone, or iPod touch, read "click" as "tap" in this section.
3.
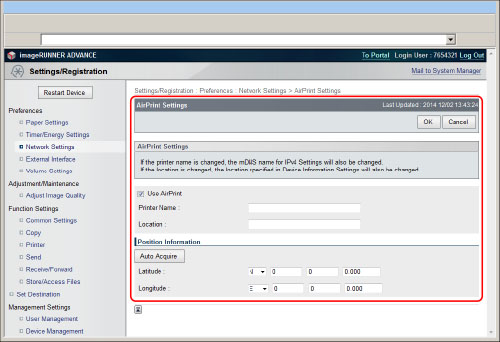
Specify the required settings → click [OK].

|
[Use AirPrint]:
|
Select this check box.
|
|
[Printer Name]:
|
Enter the name of the machine. If an mDNS name has already been registered in [mDNS Settings] ([Network Settings] in [Preferences] (Settings/Registration)), the registered name is displayed.
|
|
[Location]:
|
Enter the location of the machine. If a location has already been registered in [Device Information Settings] ([Device Management] in [Management Settings] (Settings/Registration)), the registered name is displayed.
|
|
[Latitude]:
|
Enter the latitude of the location where the machine is installed.
|
|
[Longitude]:
|
Enter the longitude of the location where the machine is installed.
|
|
[Auto Acquire]:
|
Automatically sets the latitude and longitude of the location where the machine is installed.
|
|
IMPORTANT
|
|
If you select [Use AirPrint], the following settings are enabled.
[Settings/Registration] → [Network Settings] in <Preferences> → [HTTP Settings] → [Use HTTP]
[Settings/Registration] → [Network Settings] in <Preferences> → [IPP Print Settings] → [Use IPP]
[Settings/Registration] → [Network Settings] in <Preferences> → [DNS Settings (IPv4)] → [Use mDNS]
[Settings/Registration] → [Network Settings] in <Preferences> → [DNS Settings (IPv6)] → [Use mDNS]
[Settings/Registration] → [Network Settings] in <Preferences> → [Network Link Scan Settings] → [Use Network Link Scan]
|
|
NOTE
|
|
If you change a printer name that has been previously set, you may become unable to print from a Macintosh. This is because the mDNS name used for IPv4/IPv6 is changed. In this case, add the machine to the Macintosh again.
Entering the printer name makes it easier to identify multiple printers that support AirPrint.
|
Configuring Settings from the Touch Panel Display
1.
Press  (Settings/Registration).
 (Settings/Registration).
2.
Press [Log In] → enter the System Manager ID and System PIN → press  (Log In/Out).
 (Log In/Out).
3.
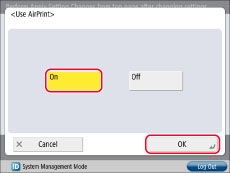
Press [Preferences] → [Network] → [Use AirPrint].
4.
Press [On] → [OK].

|
IMPORTANT
|
|
If you press [On], the following settings are enabled.
[Preferences] (Settings/Registration) → [Network] → [TCP/IP Settings] → [Use HTTP]
[Preferences] (Settings/Registration) → [Network] → [TCP/IP Settings] → [IPP Print Settings]
[Preferences] (Settings/Registration) → [Network] → [TCP/IP Settings] → [DNS Settings] → [mDNS Settings] → [Use IPv4 mDNS]
[Preferences] (Settings/Registration) → [Network] → [TCP/IP Settings] → [DNS Settings] → [mDNS Settings] → [Use IPv6 mDNS]
[Preferences] (Settings/Registration) → [Network] → [TCP/IP Settings] → [Use Network Link Scan]
|
5.
Press [Device Position Information Settings] → specify the latitude and longitude of the machine → press [OK].

|
IMPORTANT
|
|
The printer name and location can be checked by following the procedures below.
To check the printer name, see the value for the mDNS name in [mDNS Settings] ([Network] in [Preferences] (Settings/Registration)).
To check the location, see the value for the location in [Device Information Settings] ([Device Management] in [Management Settings] (Settings/Registration)).
|