Using an Advanced Space on the Network
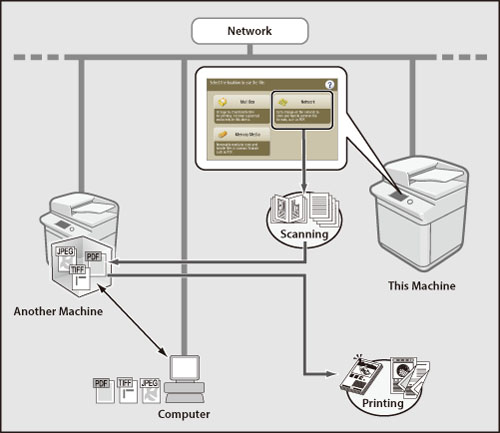
You can save originals scanned from the machine to the Advanced Space of another imageRUNNER ADVANCE series machine that is opened externally on the network. You can also recall files saved to an Advanced Space on the network and print them from the machine.
Benefits of Using a Network
File sharing environment available without installing a server
A network location refers to the Advanced Space of another imageRUNNER ADVANCE series machine on the network that can be accessed by this machine. You can use the network to enable easy file sharing.
Document management using generic data formats
You can perform document management by converting document data scanned with the machine into file formats (PDF, XPS, JPEG, TIFF, or OOXML) that can be used on a computer.
Opening the Advanced Space Externally
The following two methods are available.
|
Type
|
Features
|
|
[By SMB]
|
You can open the Advanced Space on the machine externally by using the shared file system of the SMB protocol.
|
|
[By WebDAV]
|
You can open the Advanced Space on the machine externally using the WebDAV server.
|
|
Required Condition
|
|
The Network function can be used on this machine.
(To print a PDF file) The PS Printer Kit or Direct Print Kit (for PDF/XPS) is activated (if you are using the imageRUNNER ADVANCE C3320).
(To print an XPS file) The Direct Print Kit (for PDF/XPS) is activated (if you are using the imageRUNNER ADVANCE C3320).
|
This section describes the procedure for scanning a document, saving it to an Advanced Space open on the network using SMB, and then printing the data from the Advanced Space.
Follow the procedures below.
Opening an Advanced Space on the Network (Settings for the Machine to Open)
Advanced Space Settings
SMB Server Settings
Using an Advanced Space on the Network (Settings on the Machine)
Network Place Settings
Protocol for External Reference
Scanning and Storing Originals on the Network
Printing Files Stored on the Network
Opening an Advanced Space on the Network (Settings for the Machine to Open)
1.
Follow the procedures below to open the Advanced Space externally using SMB.
Press  (Settings/Registration) → [Function Settings] → [Store/Access Files] → [Advanced Space Settings] → [Open to Public].
(Settings/Registration) → [Function Settings] → [Store/Access Files] → [Advanced Space Settings] → [Open to Public].Select [By SMB] → press [On].
2.
Follow the procedures below to check whether writing from external is prohibited.
Press (Settings/Registration) → [Function Settings] → [Store/Access Files] → [Advanced Space Settings] → [Prohibit Writing from External].
(Settings/Registration) → [Function Settings] → [Store/Access Files] → [Advanced Space Settings] → [Prohibit Writing from External].Select [Off] → press [OK].
3.
Follow the procedures below to set the SMB server.
Press (Settings/Registration) → [Preferences] → [Network] → [SMB Server Settings].
(Settings/Registration) → [Preferences] → [Network] → [SMB Server Settings].Set [Use SMB Server] to 'On' → enter [Server Name] and [Workgroup Name].
The settings for the machine to open the Advanced Space on the network for are specified.
Using an Advanced Space on the Network (Settings on the Machine)
1.
Follow the procedures below to specify Network Place settings.
Press (Settings/Registration) → [Function Settings] → [Store/Access Files] → [Network Settings] → [Network Place Settings].
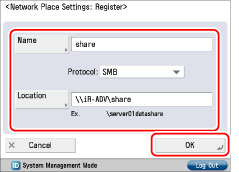
(Settings/Registration) → [Function Settings] → [Store/Access Files] → [Network Settings] → [Network Place Settings].Press [Register] → enter the name, and the host name or IP address for the external reference.
Select [SMB] → press [OK].
2.
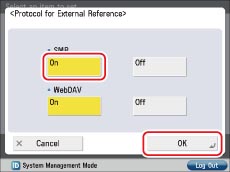
Follow the procedure below to specify [Protocol for External Reference].
Press (Settings/Registration) → [Function Settings] → [Store/Access Files] → [Network Settings] → [Protocol for External Reference].
(Settings/Registration) → [Function Settings] → [Store/Access Files] → [Network Settings] → [Protocol for External Reference].Select [On] for [SMB] → press [OK].
The settings for the machine to send documents to an Advanced Space on the network are specified.
Scanning and Storing Originals on the Network
1.
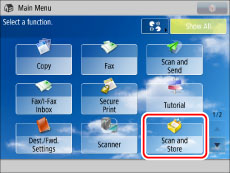
Place your originals on the platen glass or in the feeder → press [Scan and Store].
|
NOTE
|
|
If the Main Menu screen is not displayed, press [Main Menu].
|
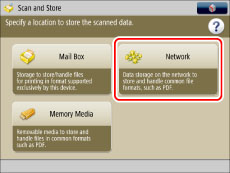
2.
Press [Network].
3.
Select the desired storage location.
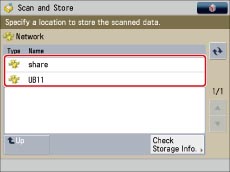
If the Log In screen is displayed, enter the user name and password → press [OK].
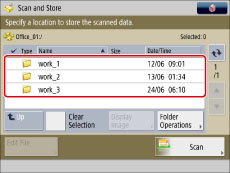
4.
Select the folder to store the file.
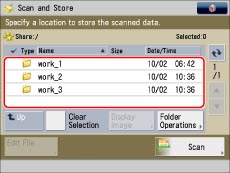
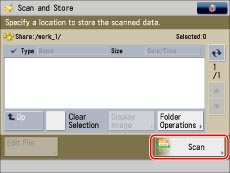
5.
Press [Scan].
6.
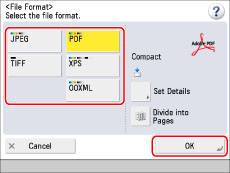
Press [File Format].
7.
Select the desired file format → press [OK].
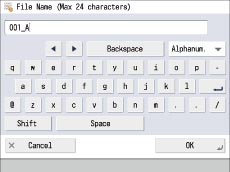
8.
Press [File Name] → enter a file name.
9.
Press  (Start).
(Start).When scanning is complete, the scanned data is stored in the specified Advanced Space.
Printing Files Stored on the Network
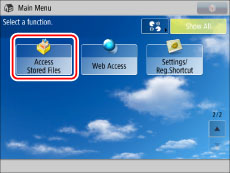
1.
Press [Access Stored Files].
|
NOTE
|
|
If the Main Menu screen is not displayed, press [Main Menu].
|
2.
Press [Network].
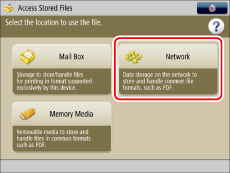
3.
Select the desired storage location.
If the Log In screen is displayed, enter the user name and password → press [OK].
4.
Browse to the folder where the file you want to print is stored.
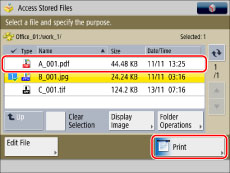
5.
Select the file that you want to print → press [Print].
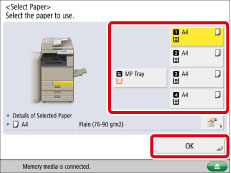
6.
If the Select Paper screen is displayed, select the paper type → press [OK].
7.
Press [Start Printing].
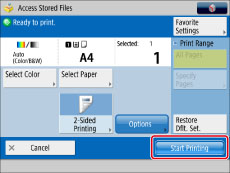
The file stored in the Advanced Space is printed.
Reference Information
By WebDAV
If you want to open the Advanced Space on the machine externally using the WebDAV server, follow the procedure below.
Using an Advanced Space on the Network (Settings for the Machine to Open)
Select [ON] for [Use WebDAV Server].
(1)Press (Settings/Registration) → [Preferences] → [Network] → [TCP/IP Settings].
(Settings/Registration) → [Preferences] → [Network] → [TCP/IP Settings].(2) Select [On] for [Use WebDAV Server] → press [OK].
Set [Open to Public] to 'By WebDAV'.
(1)Press (Settings/Registration) → [Function Settings] → [Store/Access Files] → [Advanced Space Settings] → [Open to Public].
(Settings/Registration) → [Function Settings] → [Store/Access Files] → [Advanced Space Settings] → [Open to Public].(2) Select [By WebDAV] → press [OK].
Set [Prohibit Writing from External] to 'Off'.
(1)Press (Settings/Registration) → [Function Settings] → [Store/Access Files] → [Advanced Space Settings] → [Prohibit Writing from External].
(Settings/Registration) → [Function Settings] → [Store/Access Files] → [Advanced Space Settings] → [Prohibit Writing from External].(2) Select [Off] → press [OK].
Preparations for Using an Advanced Space on the Network (Settings on the Machine)
Press [Network Place Settings].
(1)Press (Settings/Registration) → [Function Settings] → [Store/Access Files] → [Network Settings] → [Network Place Settings].
(Settings/Registration) → [Function Settings] → [Store/Access Files] → [Network Settings] → [Network Place Settings].(2) Press [Register] → enter the name, and the host name or IP address for the external reference. Select [WebDAV] for the protocol → press [OK].
Set [Protocol for External Reference] to 'WebDAV'.
(1)Press (Settings/Registration) → [Function Settings] → [Store/Access Files] → [Network Settings] → [Protocol for External Reference].
(Settings/Registration) → [Function Settings] → [Store/Access Files] → [Network Settings] → [Protocol for External Reference].(2) Select [On] for [WebDAV] → press [OK].
File Formats Allowed for Storing
You can set the file formats allowed for storing in the Advanced Space.
Setting File Formats Allowed for Storing on an Advanced Space on the Network (Settings for the Machine to Open)
(1)Press (Settings/Registration) → [Function Settings] → [Store/Access Files] → [Advanced Space Settings] → [File Formats Allowed for Storing].
(Settings/Registration) → [Function Settings] → [Store/Access Files] → [Advanced Space Settings] → [File Formats Allowed for Storing].(2) Set the file formats allowed for storing → press [OK].
|
[Printable Formats Only]:
|
You can store files in pdf, jpg, jpe, jpeg, tif, or tiff format.
|
|
[Common Office Formats]:
|
In addition to file formats for [Printable Formats Only], you can store files in doc, xps, docx, docm, rtf, xls, xlsx, xlsm, csv, ppt, pptx, pptm, txt, iwd, iwt, iws, or lnk format.
|
|
[All]:
|
There are no restrictions on the file formats for storing in the Advanced Space. In addition to the file formats for [Printable Formats Only] and [Common Office Formats], you can store files in various formats.
|