TX REPORT
This report can be printed automatically after documents are sent. You can also set the machine to print a TX Report only when a transmission error occurs, and adjust the TX Report setting to print the first part of the document as part of the report to remind you of the document's contents.
An optional product is required to use the Fax function. For information on the optional products required to use the Fax function, see "Optional Products Required for Each Function."
The items printed for the report and a description of each item are indicated below.
JOB NO.
The four digit number, that is automatically assigned when the document is accepted for sending, is printed.
DEPT. ID
If Department ID Management is set, the Department ID is printed.
ST. TIME
The date and time (in 24-hour notation) at which the document started to transmit are printed.
SHEETS
The number of pages that were sent is printed.
FILE NAME
The name given to the document when the send settings were specified is printed.
TX INCOMPLETE
If the transmission has been interrupted, the name and address of the destination are printed.
TRANSACTION OK
If the transmission completed successfully, the name and address of the destination are printed.
ERROR
If a sending error occurs, the name and address of the destination are printed.
|
NOTE
|
|
If an image is not attached, <TX IMAGE SET NOT TO DISPLAY> appears below the title.
If there is no destination for TX INCOMPLETE, TRANSACTION OK, or ERROR, "---" is printed.
If a field exceeds its display capacity, only those characters that fit in the display are printed.
A list of fax, e-mail, I-fax, and file server transmissions is printed on the TX Report. However, even if <Report with TX Image> is set to 'On', if the document was sent using the Encrypted PDF mode, the original will not be displayed.
Send jobs originating from the fax driver are omitted from this report.
|
Printing the TX Report
1.
Press  (Settings/Registration).
 (Settings/Registration).
2.
Press [Function Settings] → [Send] → [Common Settings].
3.
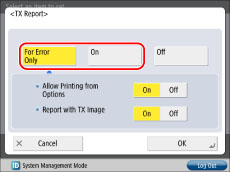
Press [TX Report].
4.
Press [For Error Only] or [On].

Press [Off] if you do not want to print the report.
To set whether to print for each job sent in [Options] for [Fax] and [Scan and Send], press [On] for <Allow Printing from Options>.
If you want to print part of the sent document on the TX Report, press [On] for <Report with TX Image>.
|
NOTE
|
|
Even if <Report with TX Image> is set to 'On', the contents of the sent document are not printed on the report if the document was sent using the Encrypted PDF mode.
|
5.
Press [OK].
|
NOTE
|
|
If the fax board is installed or the Remote Fax Kit is activated, the results of fax transmissions are printed. In addition, a Fax TX Report is printed with the TX Report, if [Fax TX Report] in [Function Settings] (Settings/Registration) is set to 'For Error Only' or 'On'. (See "FAX TX REPORT/FAX ERROR TX REPORT.")
|