When the waste toner container nears capacity, a message appears on the touch panel display.
In this case, you should prepare a new waste toner container.
Even if you do not replace the waste toner container immediately, you can perform printing for a while. The number of prints you can make depends on the content you print.
Replacing the Waste Toner Container
When the waste toner container is full, a screen with instructions on how to replace the waste toner container appears on the touch panel display. Follow the procedure described below to replace the waste toner container.
 WARNING WARNING |
|
Do not burn or throw used waste toner containers into open flames. Also, do not store waste toner containers in places exposed to open flames, as this may cause the toner to ignite, resulting in burns or a fire.
If you accidentally spill or scatter toner, carefully wipe up the loose toner with a damp, soft cloth and avoid inhaling any toner dust. Do not use a vacuum cleaner that is not equipped with safety measures to prevent dust explosions to clean up loose toner. Doing so may cause damage to the vacuum cleaner or result in a dust explosion due to static discharge.
|
|
CAUTION |
|
If toner is ingested, consult a physician immediately.
If toner gets onto your hands or clothing, wash it off immediately with cold water. Washing it off with warm water will set the toner, and make it impossible to remove the toner stains.
|
|
IMPORTANT
|
|
Your local authorized Canon dealer will dispose of used waste toner containers.
Used toner cannot be reused. Do not mix new and used toner together.
Use only waste toner containers intended for use with this machine.
Do not replace the waste toner container before the message prompting you to replace it appears on the touch panel display.
|
|
NOTE
|
|
If the waste toner container must be replaced during a print job, the remaining prints are made after the new waste toner container is installed.
|
1.
Press  .
.
.2.
Open the waste toner cover.
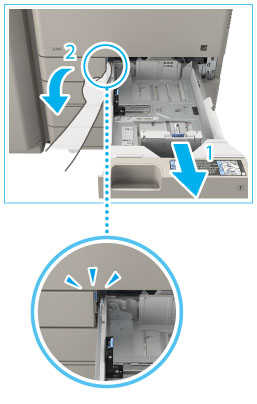
3.
Remove the waste toner container.
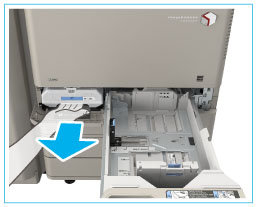 |
1. Grip the handle, and pull out the waste toner container slowly until the entire handle on top can be seen. |
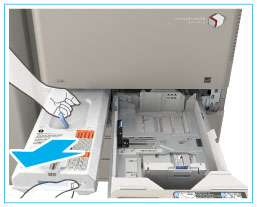 |
2. Grip the handle on top, and remove the waste toner container. |
 WARNING WARNING |
|
Be careful not to drop the waste toner container when you pull it out. Doing so may cause injury.
|
4.
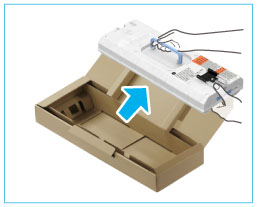
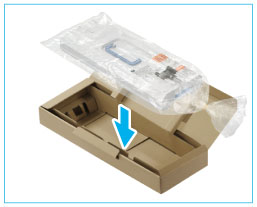
Prepare a new waste toner container, and store the removed waste toner container.
|
NOTE
|
|
Use the bag in the box for the new waste toner container.
|
3.
Insert the new waste toner container into the main unit.
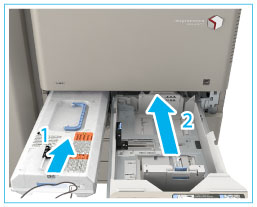 |
1. Insert the waste toner container with the Canon logo on top of the container towards the back of the machine, and push it in to load it. |
2. Close the waste toner cover and the paper drawer 1. |
|
CAUTION |
|
When closing the cover of the waste toner container and the cassette 1, be careful not to get your fingers caught, as this may result in personal injury.
|