
Specifying the Settings for the Paper Loaded in the Multi-Purpose Tray
In the Printer Status Window, you need to configure the paper settings according to the paper loaded in the multi-purpose tray. Make sure to change the paper settings when you load a different paper from the previously loaded paper.
|
|
|
If the settings do not match the size and type of loaded paper, a paper jam or printing error may occur.
|
1
Select the machine by clicking  in the system tray.
in the system tray.
2
Select [Options]  [Device Settings] [Paper Source Settings].
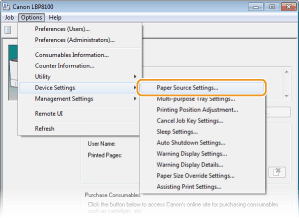
3
Specify the paper settings in [Multi-purpose Tray], and click [OK].
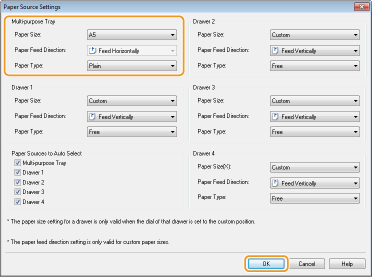
[Paper Size]
Select the paper size matching the loaded paper.
Select the paper size matching the loaded paper.

About [Free]
When you select the [Free] setting, the paper size for a print job is automatically registered to memory on completion of the print job.
[Paper Feed Direction]
When using custom size paper, select the paper feed direction (paper orientation) for the paper loaded in the multi-purpose tray.
When using custom size paper, select the paper feed direction (paper orientation) for the paper loaded in the multi-purpose tray.
When [Paper Size] is set to [Free], the paper feed direction for a print job is automatically registered to memory on completion of the print job.
When you have loaded the paper in landscape orientation, select the [Feed Custom Paper Horizontally] check box in the [Paper Source] tab of the printer driver before proceeding to printing.
[Paper Type]
Select the paper type matching the loaded paper. Paper Type and Printer Driver Paper Settings
Select the paper type matching the loaded paper. Paper Type and Printer Driver Paper Settings
About [Free]
If you frequently change paper to use, you can select the [Free] setting so that you can save time and labor for changing the settings every time. In this case, however, some attention is needed because you will be printing without checking the paper type specified on the printer driver.