
Installing the Paper Feeder
This section describes the procedure for installing an optional paper feeder(s). Before starting, read the safety instructions in Installation. Packing materials may be changed in form or placement, or may be added or removed without notice.
 |
|
Do not touch the connector (
 ) of the paper feeder. Doing so may result in damage to the machine or paper misfeed. ) of the paper feeder. Doing so may result in damage to the machine or paper misfeed.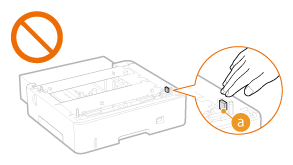 |
1
Turn OFF the machine and computer.
When you turn OFF the machine, data that is waiting to be printed is deleted.
2
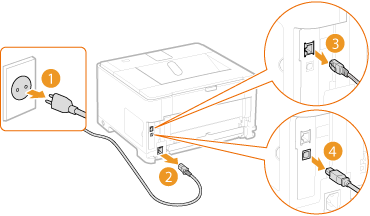
Disconnect the cables and cord from the machine in numerical order as in the illustration below.
Whether or not a LAN cable ( ) and USB cable (
 ) are connected depends on your environment.
 ) and USB cable (
 ) are connected depends on your environment.
 Power plug Power plug Power cord Power cord LAN cable LAN cable USB cable USB cable |
 |
3
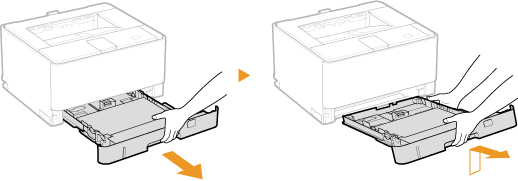
Pull out the paper drawer until it stops, and remove it while lifting the front side.
4
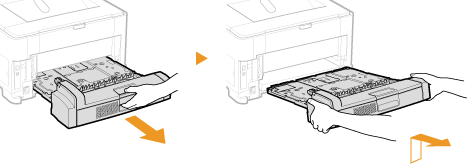
When an optional duplex unit is set in the machine, pull out it until it stops, and remove it out of the machine while lifting the front side of the duplex unit.
5
Close all the open covers including the multi-purpose tray.
6
Take out the paper feeder from the box.
7
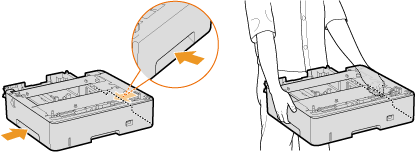
Place the paper feeder at the installation site.
When carrying the paper feeder, hold it by the left and right side lift handles with both hands.
8
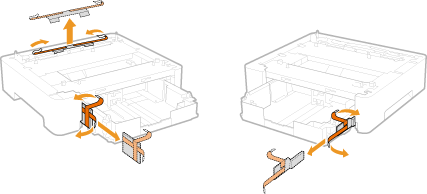
Remove the packing materials by pulling the tape. To remove the two packing materials through the rear side, carry out the operation facing toward the rear side.
9
Pull out the paper drawer until it stops, and remove it out of the paper feeder while lifting the front side of the drawer.

10
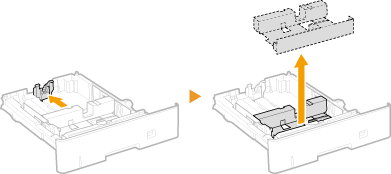
Remove the packing material from the paper drawer.
While lightly pressing the lock release lever against the paper guide, slide the paper guide toward the rear side of the paper drawer.
11
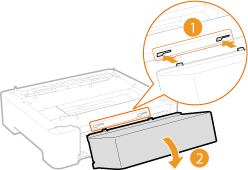
Attach the drawer protective cover to the rear of the paper feeder.
12
Put the paper drawer back into the paper feeder.
First insert the paper drawer downward at an angle and then push it in horizontally.
13
Install other paper feeders when you want to use multiple paper feeders.

If you are installing only one paper feeder, proceed to step 14.
|
1
|
Mount the additional paper feeder on top of the existing one.
Slowly place the additional paper feeder onto the existing one so that the front surfaces and left and right surfaces of the two paper feeders are flush with each other.
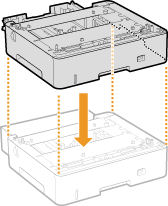 When the placement is proper, the positioning pins (
 ) and the connector ( ) and the connector ( ) are securely engaged with their counterpart. ) are securely engaged with their counterpart.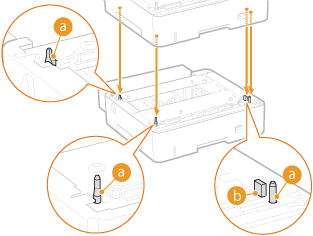  If you do not think that the additional paper feeder has been placed properly
Lift it up and make sure of its position, then try placing it again. Do not try to mount it forcibly. Doing so may cause damage to the connector and positioning pins.
|
|
2
|
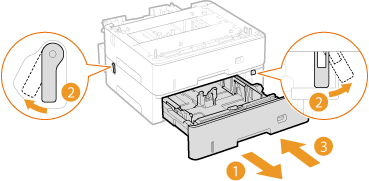
Lock the additional paper feeder.
To use the front side lock lever, first pull out the paper drawer, then turn the lever into the lock position.
By referring to the steps 8 to 12, remove the packing materials from the additional paper feeder.
 |
14
Slowly place the machine onto the paper feeder so that their front surface and left and right surfaces are flush with those of the paper feeder.
Use the lift handles on both sides of the machine, and have at least two people carry it.
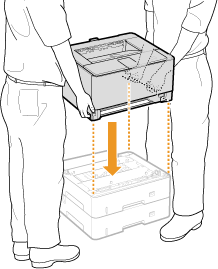
When the placement is proper, the positioning pins ( ) and the connector (
 ) are securely engaged with their counterpart.
 ) and the connector (
 ) are securely engaged with their counterpart.
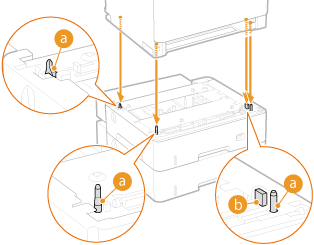

If you do not think that the machine has been properly placed on the paper feeder
Lift up the machine and make sure of its position, then try placing it again. Do not try to mount the machine forcibly. Doing so may cause damage to the connector and positioning pins on the paper feeder.
15
Lock the machine and the paper feeder.
To use the front side lock lever, first pull out the paper drawer, then turn the lever into the lock position.
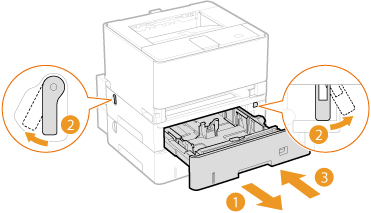
16
Put the paper drawer back into the machine.
First insert the paper drawer downward at an angle and then push it in horizontally.
17
If an optional duplex unit had been installed in the machine and it was removed in step 4, put it back into the machine.
Insert the duplex unit horizontally until it stops.

Securely set the duplex unit in position.
If there is space between the machine and the duplex unit, it may cause paper jams.
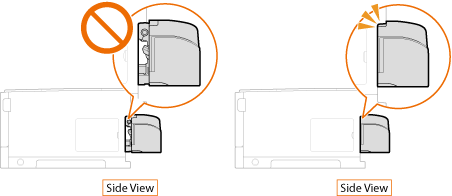
 |
|
Before loading paper in the paper drawer of the paper feeder for the first time after installing the paper feeder, be sure to turn ON the machine once.
|
 |
|
Make sure that all the packing materials have been removed from the paper feeder.
 |
Configuring the Settings for the Paper Feeder
When you have installed a paper feeder after installing the printer driver, you need to configure the settings for the paper feeder in the printer driver. When Using Optional Accessories