Reducing a Received Document
You can set the machine to automatically reduce received documents so that the whole document is printed within the printable area of the paper.
1.
Press  .
.
 .
.2.
Press [Function Settings] → [Receive/Forward] → [Common Settings].
3.
Press [Reduce Fax RX Size].
4.
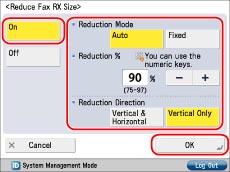
Press [On] → select each item → [OK].

<Reduction Mode>:
|
[Auto]:
|
The image is automatically reduced by a suitable reduction ratio. This ratio can range from the value set for <Reduction %>, up to 100% of the received document size.
|
|
[Fixed]:
|
The image is reduced by the reduction ratio set for <Reduction %>.
|
<Reduction %>:
Press [-] or [+] to specify the reduction ratio.
<Reduction Direction>:
|
[Vertical & Horizontal]:
|
The image is reduced in both the vertical and horizontal directions.
|
|
[Vertical Only]:
|
The image is reduced in the vertical direction only.
|
If you select [Off], the received document is not automatically reduced to fit the size of the paper. If the size of the received document exceeds the printable area, the image is divided into equal sections and printed onto separate sheets of paper.
|
IMPORTANT
|
|
If the area of the image which exceeds the printable area is less than 12 mm, the image will not be printed, regardless of the settings you set for Reduce Fax RX Size.
|