Flow of the Job Confirmation Operation
Print jobs can be operated from the Secured Print screen in the Main Menu.
The table below describes the icons that are displayed on the screen.
|
Icon (Job Status)
|
Description
|
 |
Executing
|
 |
Waiting
|
 |
Error
|
 |
Cancelling
|
 |
Paused
|
 |
Secured Print
|
 |
Encrypted Secured Print
|
Operating Jobs from the My Job Status or Job Status Screen
1.
Press [Secured Print].
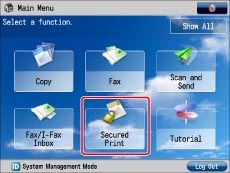
If the desired function is not displayed on the Main Menu screen, press [Show All].
2.
Press [Job Status].
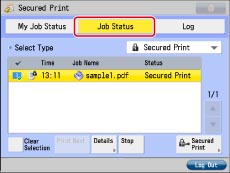
3.
Select the operation to perform.
You can select the following operations.
|
[Print Next]:
|
You can change the printing priority of the selected job, so that it is printed right after the current job is complete.
|
|
[Stop]:
|
Cancels the selected job. Press [Stop] → [Yes] to cancel the job.
|
|
[Details]:
|
Displays detailed information for the selected job. Check the detailed information → press [OK] to return to the Job Status or My Job Status screen.
|
If you select a print job and display its detailed information, you can perform the following operations.
Press [Pause] to temporarily stop the job.
Press [Paper Feed] to forcibly print the print data remaining in the memory.
Press [Skip Error] to temporarily disable errors and continue printing.
|
IMPORTANT
|
|
To cancel multiple jobs, select the jobs in the order you want to stop them → press [Stop].
|
|
NOTE
|
|
If jobs sent by other users are included in the selected jobs, those jobs are not stopped. However, you can cancel jobs sent by other users if you are logged in as an administrator.
[Pause] changes to [Resume] when you pause a print job. Press [Resume] to resume printing.
For information on the errors that can be temporarily disabled by pressing [Skip Error] after you select a job, see "When a Message Appears."
The cancelled job is displayed as <NG> (No Good) on the Log screen.
|
Checking Jobs from the Job Log Screen
1.
Press [Secured Print].
If the desired function is not displayed on the Main Menu screen, press [Show All].
2.
Press [Log].
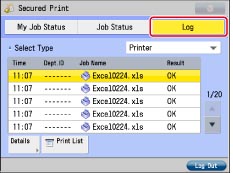
3.
Select the operation to perform.
You can select the following operations.
|
[Details]:
|
Displays detailed information for the selected job. Check the detailed information → press [OK] to return to the Send screen.
|
|
[Print List]:
|
Prints the job status list. Press [Print List] → [Yes] to print the list.
|
|
IMPORTANT
|
|
If [Display Log] in [Management Settings] (Settings/Registration) is set to 'Off', the job log for each screen is not displayed.
|
|
NOTE
|
|
You can set the Secured Print screen to be the initial screen, when the main power is turned ON or after an Auto Clear, with [Default Screen at Startup] in [Preferences] (Settings/Registration). (See [Default Screen at Startup] in "Default Screen at Startup.")
|