Setting the Paper Size and Type
If you have to change the paper size and type loaded in the drawer, follow the procedure in this section to adjust the paper size and type settings.
You can also register a default paper size and paper type for the multi-purpose tray, which is convenient if you always load paper of the same size and type.
1
Press [ ] (Paper Selection/Settings).
] (Paper Selection/Settings).To specify the paper source:
For the imageRUNNER 2202N/2002N
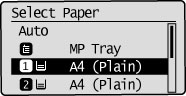
Press [ ] or [
 ] to highlight <Auto>, <MP Tray>, or a drawer, and then press [OK].
] or [] to highlight <Auto>, <MP Tray>, or a drawer, and then press [OK].If paper is loaded into the multi-purpose tray at this point, step 2 begins automatically.
|
NOTE
|
|
<Auto> is displayed in the following cases:
When the optional feeder (DADF-AM1) is attached
When <On> is set for two or more paper sources in [Drawer Auto Selection On/Off]
|
For the imageRUNNER 2002
Press [] or [] to highlight <MP Tray> or <Drawer 1>, and then press [OK].
] or [] to highlight <MP Tray> or <Drawer 1>, and then press [OK].If paper is loaded into the multi-purpose tray at this point, step 2 begins automatically.
To specify the paper size and paper type for each paper source:
Press [] or [] to highlight <Paper Settings>, and then press [OK].
] or [] to highlight <Paper Settings>, and then press [OK].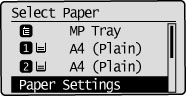
Press [] or [] to highlight a paper source, and then press [OK].
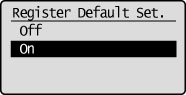
] or [] to highlight a paper source, and then press [OK].To register the default paper size and paper type for the multi-purpose tray, select <MP Tray>, press [OK], and then select <On> on the [Register Default Set.] screen.
2
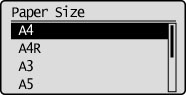
Press [] or [] to highlight a paper size, and then press [OK].
] or [] to highlight a paper size, and then press [OK].For information on setting [Custom] for the multi-purpose tray, see "Setting a Custom Paper Size."
3
Press [] or [] to highlight the desired paper type, and then press [OK].
] or [] to highlight the desired paper type, and then press [OK].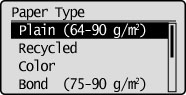
4
Press [] (Paper Selection/Settings) to close the <Paper Settings> screen.
] (Paper Selection/Settings) to close the <Paper Settings> screen.