Setting the Dedicated Port for Scanning
To scan using the network connection, you need to set the dedicated port settings <On>.
1
Press [ ] (Settings/Registration).
] (Settings/Registration).2
Press [ ] or [
 ] to highlight <System Management Settings>, and then press [OK].
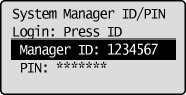
] or [] to highlight <System Management Settings>, and then press [OK].If System Manager Information Settings are specified:
Use the numeric keys to enter the System Manager ID and PIN, and then press [OK].
Press  (Log In/Out).
(Log In/Out).3
Press [] or [] to highlight <Network Settings>, and then press [OK].
] or [] to highlight <Network Settings>, and then press [OK].
4
Press [] or [] to highlight <Dedicated Port Settings>, and then press [OK].
] or [] to highlight <Dedicated Port Settings>, and then press [OK].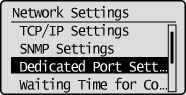
5
Press [] or [] to highlight <Off> or <On>, and then press [OK].
] or [] to highlight <Off> or <On>, and then press [OK].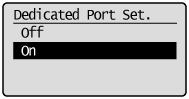
|
<Off>
|
Do not use the dedicated port
|
|
<On>
|
Use the dedicated port
|
6
Press [] (Settings/Registration) to close the Settings/Registration screen.
] (Settings/Registration) to close the Settings/Registration screen.7
Restart the machine.
It is necessary to restart the machine to take effect the settings.
Turn OFF the machine and wait for at least 10 seconds before turning it back ON.
Turn OFF the machine and wait for at least 10 seconds before turning it back ON.