Setting Department ID Management(imageRUNNER 2202N/2002N Only)
You can set the machine to only be usable if numbers are entered that correspond to the department ID (seven digits) and the PIN that were set for the department. This function is called Department ID Management. Up to 100 department IDs/PINs can be registered, and copy/scan/print count information can be checked separately for each department.
Department ID Management settings are performed from the Remote UI. You can only enable/disable settings from the operation panel.
This section describes how you can set/register the following items and check the count information in the Remote UI.
Setting Whether to Use Department ID Management
Registering a Department ID and PIN
Setting Page Restrictions for Copying/Scanning/Printing
Checking the Counter Information for Copies/Scans/Prints
Setting from the Remote UI
1
Start the Remote UI, and then log on in System Manager Mode.
2
Click [Settings/Registration].
3
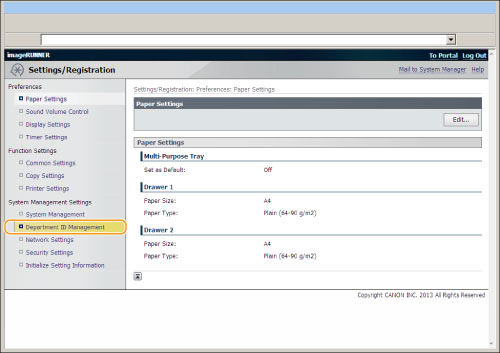
Click [Department ID Management] for <System Management Settings>.
4
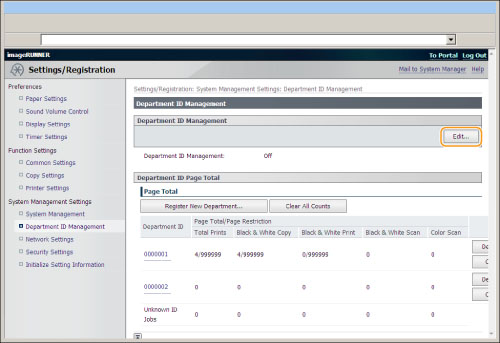
Click [Edit...] for <Department ID Management>.
5
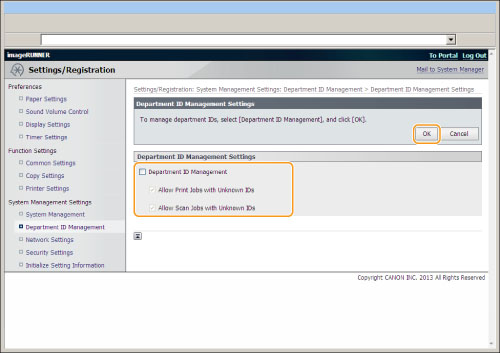
Set the required items, and then press [OK].
|
Department ID Management
|
This allows you to use Department ID Management. By selecting this check box, before using the copy function etc. of this machine, you must enter a department ID. You can also do things such as manage the counter and restrict printable pages by department.
|
|
|
Allow Print Jobs with Unknown IDs
|
Select this check box to enable printing for computers that use printer drivers that do not support Department ID Management. By clearing this check box, only computers with printer drivers that support Department ID Management can print.
|
|
|
Allow Scan Jobs with Unknown IDs
|
Select this check box to enable remote scanning for computers that use printer drivers that do not support Department ID Management. By clearing this check box, only computers with printer drivers that support Department ID Management can perform remote scanning.
|
|
6
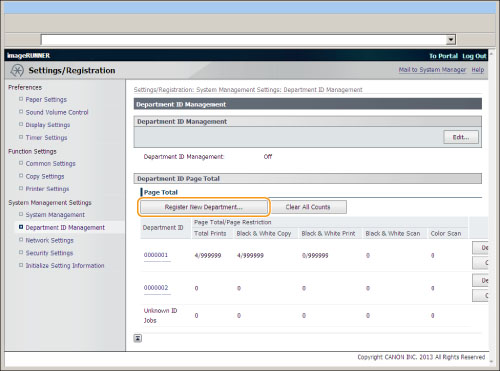
To register a department, click [Register New Department...] for <Department ID Page Total>.
7
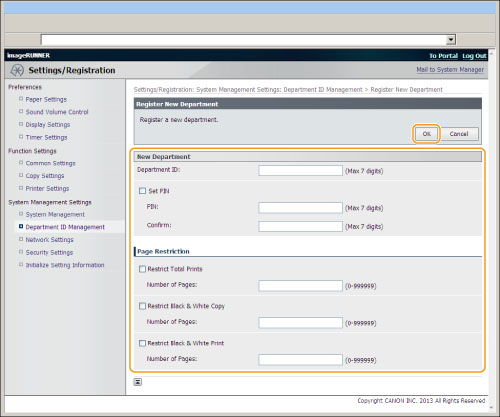
Set the required items, and then press [OK].
|
Department ID:
|
Enter a department ID of up to seven digits.
|
|
PIN:
|
Select the <Set PIN> check box, and then enter a PIN of up to seven digits.
|
|
Confirm:
|
Enter the same PIN again. An error dialog box is displayed if you entered a different PIN.
|
|
Page Restriction
|
Select the check boxes of the items you want to set, and then enter the maximum number of pages that can be copied/printed for those departments.
|
|
NOTE
|
|
Total Prints is the combined number of copies and prints that are allowed.
|
8
To delete a registered department ID, click [Delete] for <Department ID Page Total>.
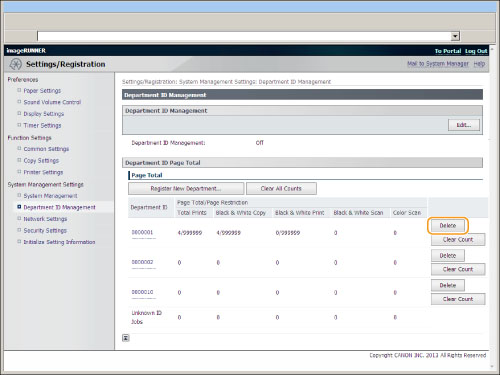
To return the count for a department ID to 0, click [Clear Count].
9
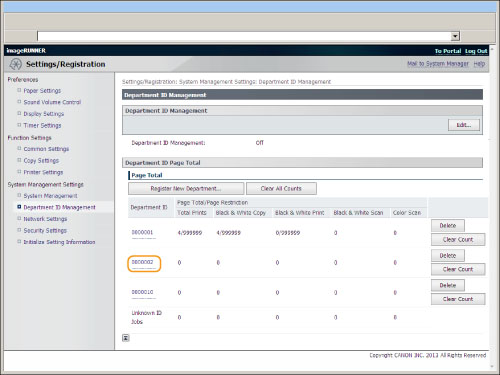
To change the PIN or the page restrictions, click the department ID, change the items on the [Edit Department] page, and then click [OK].
10
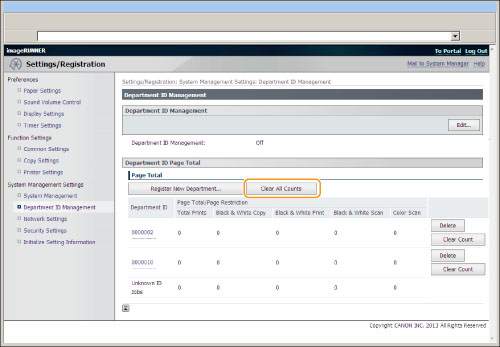
To return the count for all departments to 0, click [Clear All Counts] for <Department ID Page Total>.
Setting from the Operation Panel
1
Press [ ] (Settings/Registration).
 ] (Settings/Registration).
2
Press [ ] or [
 ] to highlight <System Management Settings>, and then press [OK].
 ] or [
 ] to highlight <System Management Settings>, and then press [OK].
 If System Manager Information Settings are specified:
Use the numeric keys to enter the System Manager ID and PIN, and then press [OK].

Press  (Log In/Out).
 (Log In/Out).
3
Press [ ] or [
 ] to highlight <Department ID Management On/Off>, and then press [OK].
 ] or [
 ] to highlight <Department ID Management On/Off>, and then press [OK].
4
Press [ ] or [
 ] to highlight <Off> or <On>, and then press [OK].
 ] or [
 ] to highlight <Off> or <On>, and then press [OK].
5
Press [ ] (Settings/Registration) to close the Settings/Registration screen.
 ] (Settings/Registration) to close the Settings/Registration screen.