Setting Up Print Server
With a print server, you can reduce the load on the computer that you print from. The print server also enables each computer to install the printer drivers over the network, which saves you the trouble of installing the drivers on each computer by using the CD-ROM. To set up a computer on the network as a print server, configure the settings for sharing the printer.
|
IMPORTANT
|
|
To perform the following procedure, log on to your computer with an administrator account.
You may be unable to install drivers over the network depending on the operating system and the bit architecture (32-bit or 64-bit) of the print server and client computers.
When implementing a print server in a domain environment, consult your Network Administrator.
The printer drivers for a 64-bit OS are available on the Canon website.
|
|
NOTE
|
Using Department ID Management with a print serverCanon Driver Information Assist Service must be added during the printer driver installation. For more information, see the MF Driver Installation Guide included with the User Software and Manuals CD-ROM.
|
1
Prepare the User Software and Manuals CD-ROM.
2
Open the printer folder. Displaying the Printer Folder
3
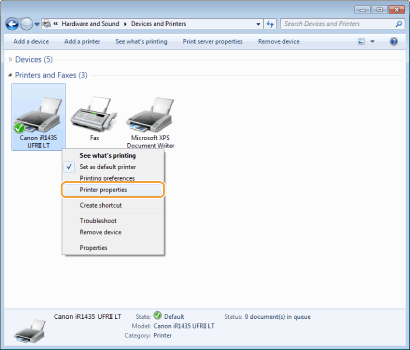
Right-click your printer icon and click [Printer properties] (or [Properties]).

4
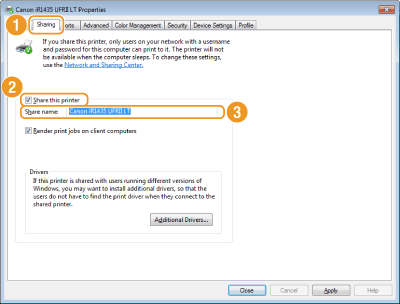
Click the [Sharing] tab, select [Share this printer], and enter the share name of the machine.

NOTE:
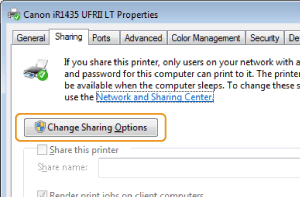
When [Change Sharing Options] is displayed
Click [Change Sharing Options]. If the [User Account Control] dialog box appears, click [Yes] (or [Continue]).
When [Change Sharing Options] is displayed
Click [Change Sharing Options]. If the [User Account Control] dialog box appears, click [Yes] (or [Continue]).

5
Install additional drivers as necessary.

This operation is required if you want to install the printer drivers in other computers running a different bit architecture via the print server.
|
1
|
Click [Additional Drivers].
|
||||||
|
2
|
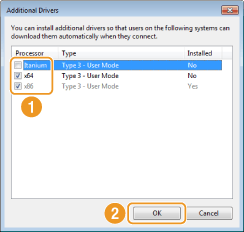
Select the check box for the bit architecture that other computers are running, and click [OK].
 Select additional drivers from the following, according to the operating system of the print server.
NOTE:
If you do not know whether your Windows Vista/7/8/8.1/Server 2008/Server 2012 is a 32-bit or 64-bit operating system, see Checking the Bit Architecture.
|
||||||
|
3
|
Insert the User Software CD-ROM into the drive on the computer, click [Browse] to specify the folder that contains the printer drivers, and then click [OK].
If the print server runs a 32-bit operating system, select [DRIVERS]
 [XXXXXX]* [XXXXXX]*  [32bit] [32bit]  [Driver] folders on the provided CD-ROM. [Driver] folders on the provided CD-ROM.If the print server runs a 64-bit operating system, select [DRIVERS]
 [XXXXXX]* [XXXXXX]*  [x64] [x64]  [Driver] folders that are saved in the computer. [Driver] folders that are saved in the computer.* For [XXXXXX], select your desired language.
|
||||||
|
4
|
Follow the on-screen instructions to install the drivers.
|
6
Click [OK].
Installing the printer drivers on a Computer via the Print Server
1
Locate the shared printer in the print server. Displaying Shared Printers in the Print Server
2
Double-click the shared printer.
3
Follow the on-screen instructions to install the drivers.