POD Deck-D1/Secondary POD Deck-D1
If the POD Deck-D1 is attached, it can provide three additional paper sources. If the Secondary POD Deck-D1 is also attached, it can provide a total of six additional paper sources.
Up to 1,000 sheets of paper (20 lb bond (80 g/m2)) each can be loaded into the upper and middle decks, and up to 2,000 sheets of paper (20 lb bond (80 g/m2)) can be loaded into the lower deck of the POD Deck-D1/Secondary POD Deck-D1.
IMPORTANT |
If the machine is in the Sleep mode (the touch panel is not displayed, and only  (Energy Saver) is lit), you may be unable to open the POD Deck-D1/Secondary POD Deck-D1. In this case, press (Energy Saver) to reactivate the machine, and then press the open button on the POD Deck-D1/Secondary POD Deck-D1. (Energy Saver) is lit), you may be unable to open the POD Deck-D1/Secondary POD Deck-D1. In this case, press (Energy Saver) to reactivate the machine, and then press the open button on the POD Deck-D1/Secondary POD Deck-D1. |
NOTE |
For information on the available paper, see "Available Paper Stock." |
Parts and Their Functions
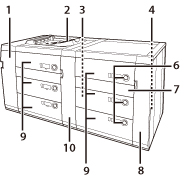 | 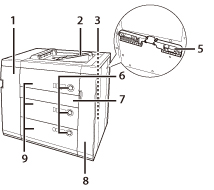 |
POD Deck-D1 + Secondary POD Deck-D1 | POD Deck-D1 |
1. | Front Cover (Buffer Pass) Open this cover to remove jammed paper. |
2. | Escape Tray Outputs any subsequent paper when a paper jam occurs. Minimizes the paper jam removal procedures. |
3. | Main Power Switch of the POD Deck-D1 Press to the "I" side to turn ON the POD Deck-D1. |
4. | Main Power Switch of the Secondary POD Deck-D1 Press to the "I" side to turn ON the Secondary POD Deck-D1 . |
5. | Tab Feeding Attachment-E1 Use the Tab Feeding Attachment-E1 to load the tab paper into the paper deck. |
6. | Open Button Press to open the paper deck when you need to load paper or check for a paper jam. The paper supply indicator enables you to check the amount of paper remaining in the paper deck. |
7. | Horizontal Pass Cover Open this cover to remove jammed paper. |
8. | Front Right Cover Open this cover to remove jammed paper. |
9. | Paper Deck Up to 1,000 sheets of paper (20 lb bond (80 g/m2)) each can be loaded into the upper and middle decks, and up to 2,000 sheets of paper (20 lb bond (80 g/m2)) can be loaded into the lower deck. |
10. | Tandem Pass Cover Open this cover to remove jammed paper. |