Switching the Colour Mode
You can set the colour mode to use for the scan.
Types of Colour Modes
Auto (Color/B&W)
If you select the Auto (Color/B&W) mode, the machine automatically recognizes whether the original is in colour or black-and-white. Colour originals are scanned in the Full Color mode, black-and-white originals are scanned in the Black & White mode.
Full Color
The machine scans originals in the Full Color mode, regardless of whether the originals are in colour or black-and-white.
Black & White
The machine scans originals in the Black & White mode, regardless of whether the originals are in colour or black-and-white.
1.
Press  (Main Menu) → [Scan and Store].
(Main Menu) → [Scan and Store].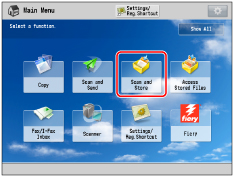
2.
Select the desired Mail Box → press [Scan].
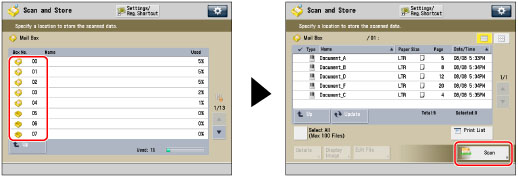
3.
Press [Select Color] → select the colour mode → press [OK].

IMPORTANT |
The default setting is Auto (Color/B&W). When [Auto (Color/B&W)] is set and your originals contain colour sections, the machine scans them in the Full Color mode. However, the machine may scan the colour originals in the Black & White mode under the conditions below. To avoid this, set the colour mode to [Full Color]. If the originals contain very few colour sections If the colour sections of the originals are close to black If the originals contain light colour densities If the colour sections are located only in the range indicated by the diagram below, when loading the originals in the feeder 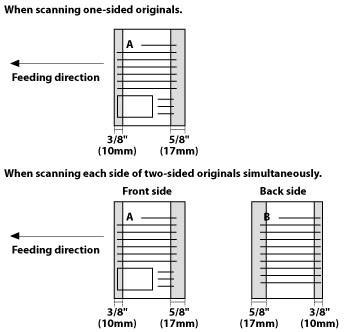 |
NOTE |
If a black-and-white original is scanned in the Full Color mode, it is counted as a colour scan. You can register a desired colour mode as the default setting by changing the default scan settings. (See "Specifying the Scan and Store Settings.") |