Adjusting Density and Image Quality
You can set the desired density and select the type of original before scanning the original.
Density
The machine automatically adjusts the copy density to the level best suited to the quality of the text original.
Also, you can manually adjust the copy density to the most appropriate level for the original.
Also, you can manually adjust the copy density to the most appropriate level for the original.
|
NOTE
|
|
The default setting is ‘A’ (Auto).
|
1
Place your originals.
2
Set the desired density.
If you want to adjust the copy density automatically:
|
1
|
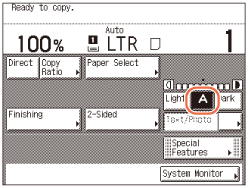
Make sure that [A] is highlighted on the touch panel display. If not, press [A].
 NOTE:
The automatic copy density adjustment may not work with transparencies. In this case, adjust the density manually by pressing [Light] or [Dark].
|
If you want to adjust the copy density manually:
|
1
|
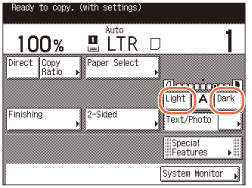
Press [Light] or [Dark] to adjust density.
Press [Light] to move the indicator to the left to make the density lighter, or press [Dark] to move the indicator to the right to make the density darker.
 NOTE:
You can adjust the density within nine levels.
|
3
Enter the desired copy quantity (from 1 to 999) using  -
-  (numeric keys).
 -
-  (numeric keys).
4
Press  (Start).
 (Start).
Copying starts.
Type of Original
You can manually select the type of original so that the machine reproduces copies as faithfully as possible to the original. The following three types of original modes are available:

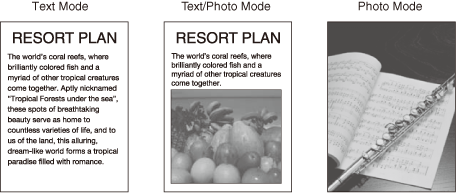
Text Mode
This mode is best suited for making copies of text originals. Blueprints or pencil drawn originals can also be copied clearly.
Text/Photo Mode
This mode is best suited for making copies of originals containing both text and images/photos, such as magazines or catalogues.
Photo Mode
This mode is best suited for making copies of photos printed on photographic paper, or images printed with halftone dots (i.e., printed photos).
|
IMPORTANT
|
|
No more than one of these three modes (Text, Text/Photo, and Photo) can be selected at a time. If you select one of these modes, the previously set mode is canceled.
If you make copies of an original containing halftones, such as a printed photograph, using the Photo mode, the moiré effect (a shimmering, wavy pattern) may occur. You can lessen this moiré effect by using the Sharpness mode. (Adjusting Sharpness)
|
|
NOTE
|
|
The default setting is ‘Text/Photo’.
When one of the three modes (Text, Text/Photo, and Photo) is selected, the automatic copy density adjustment is not available. Adjust the copy density manually, if necessary.
If the original is a transparency, adjust the density manually after selecting the type of original.
|
1
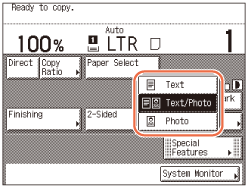
Place your originals → press the original type drop-down list box → select the original type ([Text], [Text/Photo], or [Photo]).

2
Enter the desired copy quantity (from 1 to 999) using  -
-  (numeric keys).
 -
-  (numeric keys).
3
Press  (Start).
 (Start).
Copying starts.