Setting up E-Mail / I-Fax Function
To set up the Scan to E-mail and I-fax functions, follow the procedure below.
|
IMPORTANT
|
|
To send e-mails or I-faxes, the Send function must be activated with the optional Color Send Kit-Y1.
Changes made to E-mail/I-Fax settings become effective when the machine is restarted. To restart the machine, turn it OFF, wait at least 10 seconds, and then turn it ON. For instructions on how to turn the machine ON and OFF, see Chapter 2, “Before You Start Using the Machine,” in the User’s Guide.
To enable TLS communications for sending/receiving e-mails and I-faxes, specify the TLS settings described in this section. Also, an TLS key pair must be generated and set as the default key. (Generating a Key Pair for TLS Communications, Setting the Default Key for TLS Communications)
|
|
NOTE
|
|
You can set the machine to verify the TLS server certificates for POP/SMTP. The settings are available only on the Remote UI. (Customizing Settings).
|
1
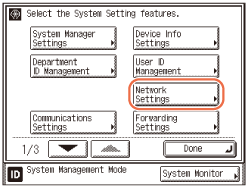
Press  (Additional Functions) → [System Settings] → [Network Settings].
 (Additional Functions) → [System Settings] → [Network Settings].
2
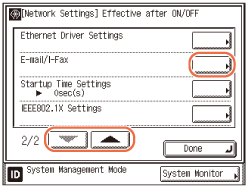
Press [ ] or [
 ] until [E-maiI/l-Fax] appears → press [E-mail/I-Fax].
 ] or [
 ] until [E-maiI/l-Fax] appears → press [E-mail/I-Fax].
3
Specify the mail server for receiving e-mails/I-faxes.
The machine supports both SMTP and POP3 functions.
|
NOTE
|
|
The machine can receive I-faxes, e-mail messages in text format, and TIFF-F and JPEG files attached to e-mail messages in text format.
|
If you want to receive e-mails/I-faxes using the machine’s own SMTP receiving function:
|
1
|
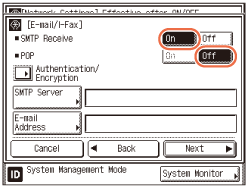
Press [Off] for <POP> → press [On] for <SMTP Receive>.
 |
|
2
|
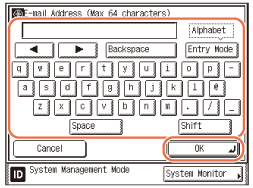
Press [E-mail Address] → enter the e-mail address your machine will use → press [OK].
 NOTE:
The machine can receive e-mails/I-faxes sent only to the specified e-mail address.
|
|
3
|
To specify the settings for TLS communications, proceed to the next step. To specify the settings for sending e-mails/I-faxes, proceed to step 4.
|
|
4
|
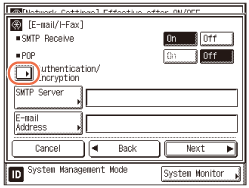
Press [Authentication/Encryption].
 |
|
5
|
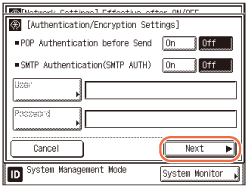
Press [Next].
 |
|
6
|
Press [TLS] or [On] for <Allow TLS (SMTP Receive)> depending on your network environment → press [OK].
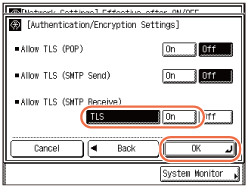 If you select [TLS] for <Allow TLS (SMTP Receive)>, the machine receives TLS-encrypted data only. (The machine does not receive unencrypted data.)
If you select [On] for <Allow TLS (SMTP Receive)>, the machine receives TLS-encrypted data, only when the client sends a request to the machine to do so.
IMPORTANT:
If the SMTP server does not support encryption, the data will not be encrypted, even if you select [TLS] or [On] for <Allow TLS (SMTP Receive)>.
To receive TLS-encrypted data using SMTP receiving, changing the port number for <SMTP Receive> may be required. (Setting Port Numbers) The proper port number differs depending on your network environment. For details, consult your network administrator or e-mail service provider.
|
|
7
|
Proceed to step 4 to specify the settings for sending e-mails/I-faxes.
|
If you want to receive e-mails/I-faxes using a POP server:
|
1
|
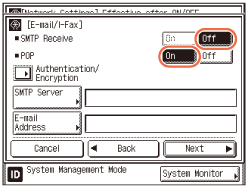
Press [On] for <POP> → press [Off] for <SMTP Receive>.
 |
|
2
|
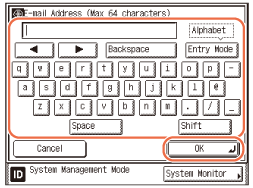
Press [E-mail Address] → enter the e-mail address your machine will use → press [OK].
 |
|
3
|
Press [Next].
|
|
4
|
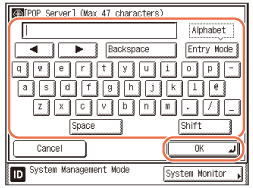
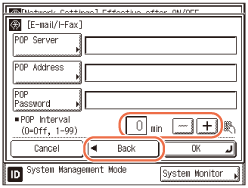
Press [POP Server] → enter the POP server IP address or name using the on-screen keyboard → press [OK].
 |
|
5
|
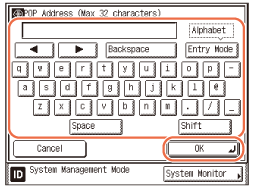
Press [POP Address] → enter the login name for access to the POP server → press [OK].
 |
|
6
|
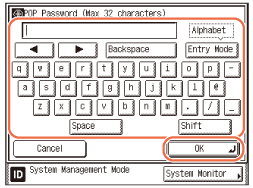
Press [POP Password] → enter the password for access to the POP server → press [OK].
 |
|
7
|
Use [-] or [+] to set [POP Interval] at the interval you want the POP server to check for incoming e-mails.
 NOTE:
You can also enter values using
 - -  (numeric keys). (numeric keys).If the interval is set to ‘0’, the POP server is not checked automatically. For instructions on how to manually check the POP server, see Checking / Changing the Status of Documents in Memory.
|
|
8
|
Press [Back].
|
|
9
|
To specify the settings for TLS communications, proceed to the next step. To specify the settings for sending e-mails/I-faxes, proceed to step 4.
|
|
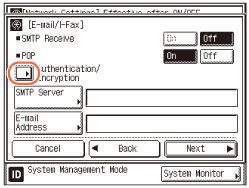
10
|
Press [Authentication/Encryption].
 |
|
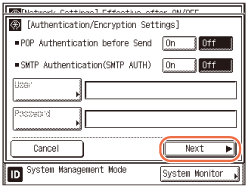
11
|
Press [Next].
 |
|
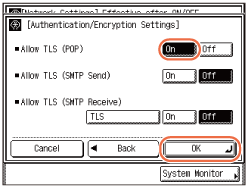
12
|
Press [On] for <Allow TLS (POP)> → press [OK].
 IMPORTANT:
If the POP server does not support encryption, the data will not be encrypted, even if [On] is selected for <Allow TLS (POP)>.
To receive TLS-encrypted data using POP, changing the port number for <POP3 Receive> may be required. (Setting Port Numbers) The proper port number differs depending on your network environment. For details, consult your network administrator or e-mail service provider.
|
|
13
|
Proceed to step 4 to specify the settings for sending e-mails/I-faxes.
|
4
Specify the mail server for sending e-mails/I-faxes.
NOTE:
If the screen <[Network Settings] Effective after ON/OFF> is displayed at this point, press [ ] or [
 ] until [E-mail/I-Fax] appears → press [E-mail/I-fax], and proceed to the steps below.
 ] or [
 ] until [E-mail/I-Fax] appears → press [E-mail/I-fax], and proceed to the steps below.
If you are using an SMTP server that requires POP before SMTP as the authentication method:
|
1
|
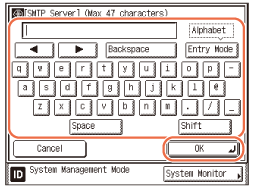
Press [SMTP Server] → enter the SMTP server IP address or name → press [OK].
Enter the SMTP server name if the SMTP server address is already registered in the DNS server.
Enter the IP address of the SMTP server if the SMTP server address is not registered in the DNS server.
 |
|
2
|
Press [Next].
|
|
3
|
Press [POP Server] → enter the POP server IP address or name using the on-screen keyboard → press [OK].
|
|
4
|
Press [POP Address] → enter the login name for access to the POP server → press [OK].
|
|
5
|
Press [POP Password] → enter the password for access to the POP server → press [OK].
|
|
6
|
Press [Back].
|
|
7
|
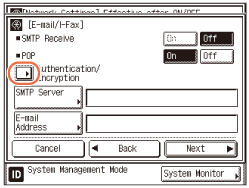
Press [Authentication/Encryption].
 |
|
8
|
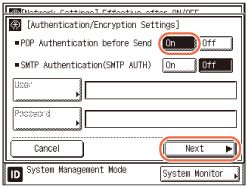
Press [On] for <POP Authentication before Send>.
 |
|
9
|
Press [Next].
|
|
10
|
To specify the settings for TLS communications, proceed to the next step. If you do not use TLS communications, press [OK] to return to the [E-mail/I-Fax] screen → press [Next] → [OK], and then proceed to step 5.
|
|
11
|
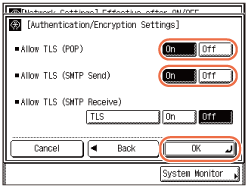
Press [On] for <Allow TLS (POP)> and/or <Allow TLS (SMTP Send)>, depending on your network environment → press [OK] to return to the [E-mail/I-Fax] screen.
 IMPORTANT:
If the POP server and/or SMTP server do not support encryption, the data will not be encrypted, even when [On] is selected for <Allow TLS (POP)> and/or <Allow TLS (SMTP Send)>.
To send TLS-encrypted data using POP before SMTP, changing the port number for <POP3 Receive> and/or <SMTP Sending> may be required. (Setting Port Numbers) The proper port number differs depending on your network environment. For details, consult your network administrator or e-mail service provider.
|
|
12
|
Press [Next] → [OK].
|
|
13
|
Proceed to step 5.
|
If you are using an SMTP server that requires SMTP Authentication:
|
1
|
Press [SMTP Server] → enter an SMTP server IP address or name → press [OK].
Enter the SMTP server name if the SMTP server address is already registered in the DNS server. Enter the IP address of the SMTP server if the SMTP server address is not registered in the DNS server. |
|
2
|
Press [Authentication/Encryption].
|
|
3
|
Press [On] for <SMTP Authentication (SMTP AUTH)>.
|
|
4
|
Select [On] or [Off] for <Disp Auth Screen When Sending> and <Carry Over Authentication>.
<Disp Auth Screen When Sending>
Specify whether to display the SMTP authentication screen each time you send e-mails and I-faxes. To always display the SMTP authentication screen when sending e-mails and I-faxes, select [On].
<Carry Over Authentication>
Specify whether to carry over the login information (user name only) from Authentication at Send to SMTP authentication. To use the same user name for SMTP authentication, select [On]. If you select [On], you do not need to specify the user name in the next step.
IMPORTANT:
<Disp Auth Screen When Sending> and <Carry Over Authentication> appear only when Authentication at Send is activated.
If you select [On] for both <Disp Auth Screen When Sending> and <Carry Over Authentication>, the user name used to log in to Authentication at Send is automatically inserted in the [User Name] text box of the SMTP authentication screen.
|
|
5
|
Press [User] → enter the user name used for logging in to the SMTP server → press [OK].
If you are using the server that requires the domain name to be included with your user name, enter a user name in [User] using the following format: user name @domain name. |
|
6
|
Press [Password] → enter the password used for logging in to the SMTP server → press [OK].
|
|
7
|
Press [Next].
|
|
8
|
To specify the settings for TLS communications, proceed to the next step. If you do not use TLS communications, press [OK] to return to the [E-mail/I-Fax] screen → press [Next] → [OK], and then proceed to step 5.
|
|
9
|
Press [On] for <Allow TLS (SMTP Send)> → press [OK] to return to the [E-mail/I-Fax] screen.
IMPORTANT:
If the SMTP server does not support encryption, the data will not be encrypted, even when [On] is selected for <Allow TLS (SMTP Send)>.
To send TLS-encrypted data using SMTP Authentication, changing the port number for <SMTP Sending> may be required. (Setting Port Numbers) The proper port number differs depending on your network environment. For details, consult your network administrator or e-mail service provider.
|
|
10
|
Press [Next] → [OK].
|
|
11
|
Proceed to step 5.
|
If you are using an SMTP server that does not require authentication for sending e-mails:
|
1
|
Press [SMTP Server] → enter an SMTP server IP address or name → press [OK]. Enter the SMTP server name if the SMTP server address is already registered in the DNS server.
Enter the IP address of the SMTP server if the SMTP server address is not registered in the DNS server. |
|
2
|
Press [Authentication/Encryption].
|
|
3
|
Press [Off] both for <SMTP Authentication (SMTP AUTH)> and <POP Authentication before Send> → press [Next].
|
|
4
|
To specify the settings for TLS communications, proceed to the next step. If you do not use TLS communications, press [OK] to return to the [E-mail/I-Fax] screen → press [Next] → [OK], and then proceed to step 5.
|
|
5
|
Press [On] for <Allow TLS (SMTP Send)> → press [OK] to return to the [E-mail/I-Fax] screen.
IMPORTANT:
If the SMTP server does not support encryption, the data will not be encrypted, even when [On] is selected for <Allow TLS (SMTP Send)>.
To send TLS-encrypted data using SMTP, changing the port number for <SMTP Sending> may be required. (Setting Port Numbers) The proper port number differs depending on your network environment. For details, consult your network administrator or e-mail service provider.
|
|
6
|
Press [Next] → [OK].
|
|
7
|
Proceed to step 5.
|
5
Restart the machine.
Turn OFF the machine, wait at least 10 seconds, and then turn it ON.