Scanning from a Computer (Remote Scan)
This section describes the basic operation procedure for scanning originals to load the scanned images to a computer.
† The screen shots shown below may differ from the ones displayed on your computer, depending on the application or operating system you are using.
1
Switch the Machine Online
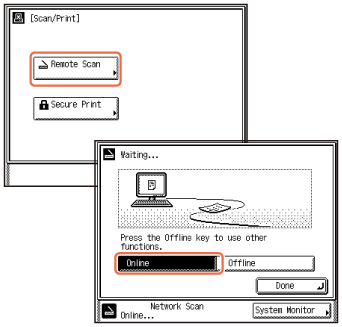
Press  (SCAN/PRINT) → to display the Scan/Print screen → press [Remote Scan] → [Online].
 (SCAN/PRINT) → to display the Scan/Print screen → press [Remote Scan] → [Online].
If the machine is in the Sleep mode, press  (Power).
 (Power).
Enter your ID and password or insert the control card if the screen prompts you to do so. For more information on logging in to the machine, see How to Log in to the Machine.
† If you want to use the machine as a network scanner, it must be connected to a computer over an IPv4 network.
2
Place Your Originals
Place your originals in the feeder or on the platen glass.
7-1.gif)
Close the feeder/platen cover after placing your originals on the platen glass.
3
Open the Color Network ScanGear
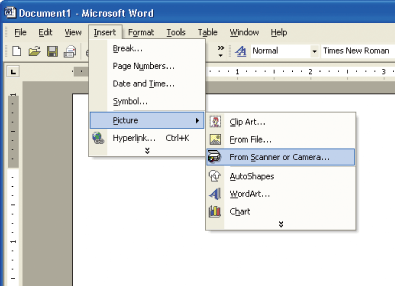
From the menu of the application, select the command* to start the scanning operation.

Make sure that the Color Network ScanGear is selected as the scanner to be used.
For more information, see the documentation that comes with your TWAIN-compliant application.
|
* Command names include [Scan New], [Acquire], and others, depending on the application you are using.
|
4
Start Scanning
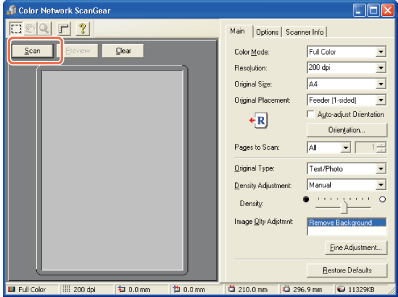
Specify the scan settings that suit your preferences → click [Scan].

On the Color Network ScanGear dialog box, specify the settings such as the color mode and resolution.
To cancel scanning, click [Cancel] in the dialog box that appears when the scan data is being processed.
When scanning is complete, switch the machine offline.
For instructions on how to specify the settings on the Color Network ScanGear dialog box, see the help on the Color Network ScanGear.