
Routine Cleaning
If the original is not copied clearly, clean the following parts of the machine:
Platen glass
Underside of the feeder/platen cover
Feeder scanning area and rollers
For high-quality printouts, we recommend that you clean these parts regularly.
 |
|
When cleaning the machine, first turn OFF the main power switch, then disconnect the power cord. Failure to observe these steps may result in a fire or electrical shock.
Do not use alcohol, benzine, paint thinner, or other solvents for cleaning. Doing so may damage the plastic parts.
Disconnect the power cord from the power outlet regularly, and clean the area around the base of the power plug’s metal pins and the power outlet with a dry cloth to ensure that all dust and grime is removed. If the power cord is connected for a long period of time in a damp, dusty, or smoky location, dust can build up around the power plug and become damp. This may cause a short circuit and result in a fire.
|
|
IMPORTANT
|
|
Do not dampen the cloth too much, as excess water may damage the machine.
Turning the main power OFF will erase all jobs in the machine’s memory.
|
Platen Glass and Cover
Clean the platen glass and the underside of the feeder/platen cover as described below.
|
IMPORTANT
|
|
If the platen glass or the underside of the feeder/platen cover is dirty, the original may not be scanned clearly, or the size of the original may be incorrectly detected.
|
1
Clean the platen glass and the underside of the feeder/platen cover with a water-moistened cloth, and then wipe them clean with a soft, dry cloth.

|
IMPORTANT
|
|
Do not dampen the cloth too much, as excess water may damage the machine.
|
Feeder Scanning Area and Rollers
Clean the feeder scanning area and rollers regularly as described below. If streaks appear on originals fed through the feeder, or if smudges appear on printouts, or if a paper jam occurs frequently, then perform feeder cleaning.
|
IMPORTANT
|
|
Do not dampen the cloth too much, as excess water may damage the machine.
|
|
NOTE
|
|
The Feeder (DADF-AB1) is optional for the imageRUNNER 2525/2520.
|
1
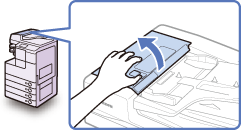
Open the feeder cover.
2
Clean the rollers (a total of three places) inside the feeder cover with a water-moistened cloth. Then, wipe the area with a soft, dry cloth.
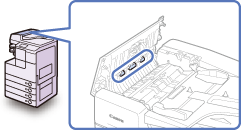
Spin the rollers with your hand while cleaning them.
3
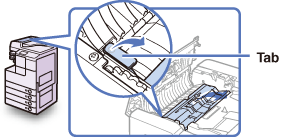
Open the inner cover, holding it by the front tab.
4
Clean the rollers (a total of three places) inside the inner cover with a water-moistened cloth. Then, wipe the area with a soft, dry cloth.
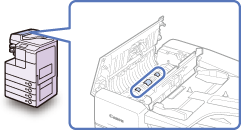
Spin the rollers with your hand while cleaning them.
5
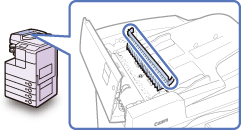
Clean the transparent plastic part of the inner cover with a water-moistened cloth. Then, wipe the area with a soft, dry cloth.
6
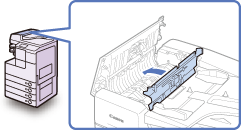
Close the inner cover.
 |
|
When closing the cover, be careful not to get your fingers caught, as this may result in personal injury.
|
7
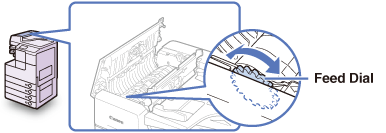
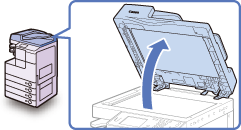
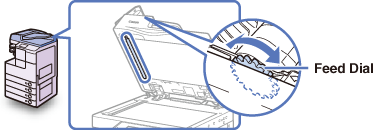
Place your index finger on the feed dial. Without releasing the finger from the feed dial, open the feeder.
8
While using the feed dial to turn the resin roller, wipe the resin roller and its surroundings with a water-moistened cloth. Then, wipe the area with a soft, dry cloth.
|
NOTE
|
|
If the feed dial cannot be reached while the feeder is opened, close the feeder → turn the feed dial slightly → open the feeder → clean the roller. Repeat these steps until the roller surface is completely clean.
|
9
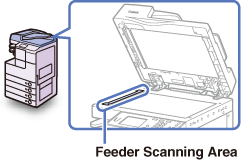
Clean the feeder scanning area (the left side of the platen glass) with a water-moistened cloth. Then, wipe the area with a soft, dry cloth.
10
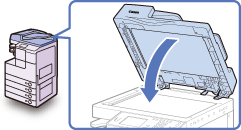
Close the feeder.
 |
|
When closing the feeder, be careful not to get your fingers caught, as this may result in personal injury.
Be aware that the light emitted from the platen glass may be very bright when closing the feeder.
|
11
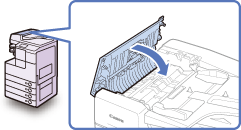
Close the feeder cover.
 |
|
When closing the cover, be careful not to get your fingers caught, as this may result in personal injury.
|
Automatic Feeder Cleaning
If the originals fed through the feeder have black streaks or appear dirty, clean the feeder rollers by repeatedly feeding blank sheets of paper through the feeder.
|
NOTE
|
|
The Feeder (DADF-AB1) is optional for the imageRUNNER 2525/2520.
|
1
Press  (Additional Functions).
 (Additional Functions).
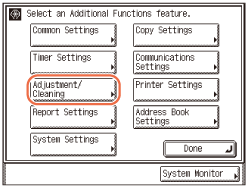
The Additional Functions menu appears.
2
Press [Adjustment/Cleaning].
3
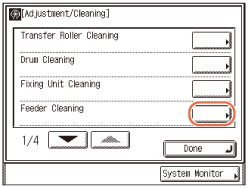
Press [Feeder Cleaning].
4
Place 10 sheets of blank A4 paper (64 to 90 g/m2) into the feeder.
Make sure to fan the sheets of paper well.
5
Press [Start] to start cleaning the feeder.
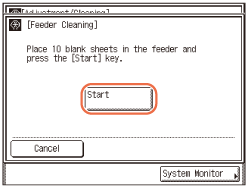
To quit, press [Cancel].
|
NOTE
|
|
Automatic feeder cleaning takes approximately 15 seconds for the imageRUNNER 2545i and 30 seconds for the imageRUNNER 2530i/2525/2520.
|
After the cleaning is completed, try scanning again.
Transfer Roller Cleaning
If the back side of printed paper is smudged, the transfer roller in the main unit may be dirty. In this case, use the Transfer Roller Cleaning function to clean the transfer roller.
1
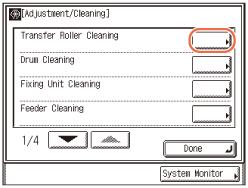
Press  (Additional Functions) → [Adjustment/Cleaning] → [Transfer Roller Cleaning].
 (Additional Functions) → [Adjustment/Cleaning] → [Transfer Roller Cleaning].
2
Press [Start] to start cleaning the roller.
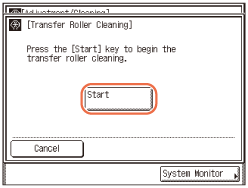
To quit, press [Cancel].
|
NOTE
|
|
The cleaning process cannot be canceled once it begins. Please wait until it is completed.
|
Drum Cleaning
If print quality decreases, the drum in the main unit may be dirty. In this case, use the Drum Cleaning function to clean the drum.
1
Press  (Additional Functions) → [Adjustment/Cleaning] → [Drum Cleaning].
 (Additional Functions) → [Adjustment/Cleaning] → [Drum Cleaning].
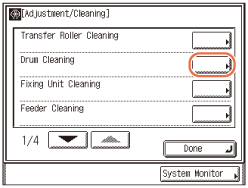
2
Press [Start] to start cleaning the drum.
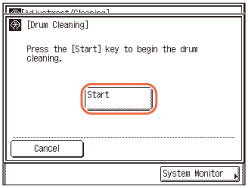
To quit, press [Cancel].
|
NOTE
|
|
The cleaning process cannot be canceled once it begins. Please wait until it is completed.
|
Fixing Unit Cleaning
If black streaks appear on the printed page, the fixing unit may be dirty. Use the Fixing Unit Cleaning function to print the cleaning pattern on A4 paper to clean the Fixing Unit. You should also use the Fixing Unit Cleaning function every time the toner cartridge is replaced.
|
IMPORTANT
|
|
The cleaning pattern can be printed only when A4 paper is loaded.
|
1
Set the paper size and type for the stack bypass to ‘A4’ and ‘Plain’.
For help, see Standard Paper for the Stack Bypass.
2
Press  (Additional Functions) → [Adjustment/Cleaning] → [Fixing Unit Cleaning].
 (Additional Functions) → [Adjustment/Cleaning] → [Fixing Unit Cleaning].
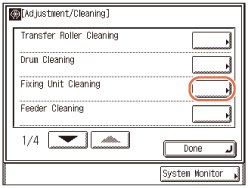
3
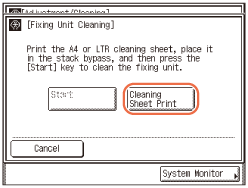
Press [Cleaning Sheet Print] to print the cleaning sheet.
|
IMPORTANT
|
|
Before printing the cleaning sheet, make sure that A4 paper is loaded in any one of the machine’s paper sources.
The cleaning sheet cannot be printed when an error has occurred in the machine. Clear errors before printing the cleaning sheet.
|
The cleaning sheet is printed.
4
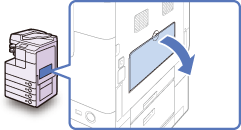
Open the stack bypass.
5
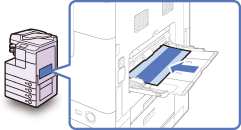
Load the cleaning sheet with the printed side facing up, inserting the white edge into the stack bypass first.
6
Press [Start] to start cleaning the fixing unit.
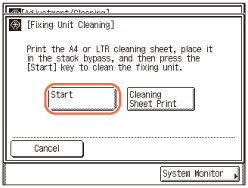
To quit, press [Cancel].
|
NOTE
|
|
Fixing unit cleaning takes approximately 100 seconds.
The cleaning process cannot be canceled once it begins. Please wait until it is completed.
If the cleaning sheet jams while cleaning, the error indicator flashes. Remove the jammed cleaning sheet and try again.
|