Loading Paper in the Stack Bypass
If you are making prints on transparencies, labels, nonstandard-sized paper, or envelopes, load the paper stock in the stack bypass.
Paper loaded in the stack bypass must meet the requirements outlined below.
|
NOTE
|
|
For more information, see Available Paper Stock.
|
|
Paper Size
|
Standard Size:
A4, A4R, A3, A5R, B4, B5, or B5R Free Size:
99 mm × 148 mm to 297 mm × 432 mm Envelope:
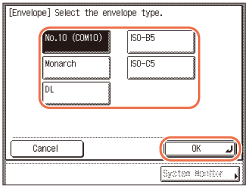
No.10 (COM10), ISO-B5, Monarch, ISO-C5, or DL |
|
Paper Weight
|
64 to 128 g/m2
|
Standard Size
You can select ISO paper sizes (such as A4 and B5) or North American paper sizes (such as LTR and LGL) by switching the paper size group when you specify the paper size.
Free Size
You can load nonstandard paper sizes ranging from 99 mm × 148 mm to 297 mm × 432 mm.
Envelope
The following envelopes can be loaded in the stack bypass:
No.10 (COM10): 104.7 mm × 241.3 mm
ISO-B5: 176 mm × 250 mm
Monarch: 98.4 mm × 190.5 mm
ISO-C5: 162 mm × 229 mm
DL: 110 mm × 220 mm
|
IMPORTANT
|
|
To feed paper from the stack bypass with the APS/ADS mode, the stack bypass must be enabled for each function. (Auto Paper Selection/Auto Drawer Switching)
Rolled or curled paper must be straightened out prior to use so that it can be fed smoothly through the stack bypass (allowable amount of curling: less than 10 mm for normal paper and less than 5 mm for heavyweight paper).
The stack bypass may not accept paper that has absorbed moisture.
Do not load a mixture of different paper sizes and types.
Make sure that the paper type setting is correct. An incorrect paper type setting may adversely affect the image quality, damage the fixing unit, and cause paper jams.
Feed label sheets one sheet at a time, and remove each sheet as it is delivered to the output tray. Loading several label sheets together may cause paper jams.
Loading multiple sheets of heavyweight paper in the stack bypass may result in a paper jam. In this case, load only one sheet at a time.
When printing on envelopes, empty the output tray once 10 envelopes have accumulated in the tray.
Envelopes may become creased in the printing process.
|
|
NOTE
|
|
If you want to use Foolscap size paper, contact your local authorized Canon dealer.
For high-quality printouts, use paper recommended by Canon.
|
1
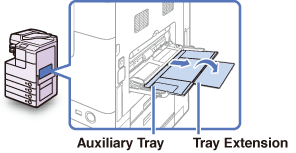
Open the stack bypass.
If the paper size/type you are going to load in the stack bypass differs from the default paper size/type set for the stack bypass, disable the default paper size/type settings. (Standard Paper for the Stack Bypass)

If you are loading large size paper, pull out the auxiliary tray and extend the tray extension.
2
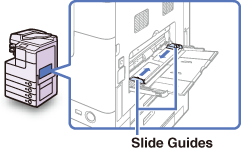
Adjust the slide guides to match the size of the paper.
3
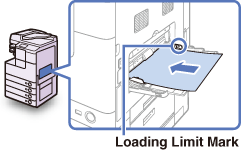
Load the paper into the stack bypass.
When the paper is loaded in the stack bypass, the side facing down is the one printed on.
Make sure that the height of the paper stack does not exceed the loading limit mark ( ).
).
 ).
).
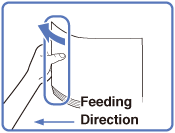
Straighten out curled paper prior to use. Curled paper may cause a paper jam.

If you find it difficult to straighten out curled paper, curl the front edges of the paper upward.
To print on the back side of preprinted paper, load the preprinted side face up in the stack bypass.

IMPORTANT:
When loading paper in the stack bypass, align the paper stack neatly between the slide guides.
If you are loading heavyweight paper or envelopes, curl the feeding edge upward approximately 3 mm. Curling the feeding edge enables the rollers to grip the paper or envelopes as they are fed into the stack bypass.
NOTE:
Follow the instructions on the paper package about which side of paper to print on.
If paper becomes jammed, try turning the paper stack over and reloading it.
If you are loading envelopes into the stack bypass:
|
1
|
Take five envelopes, loosen them as shown, and then stack them together. Repeat this step five times for each set of five envelopes.
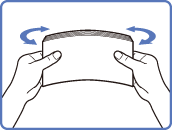 |
|
2
|
Place the envelopes on a clean, level surface and press all the way around the envelopes in the direction of the arrows to remove any curls. Repeat this step five times for each set of five envelopes.
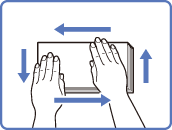 Take particular care to spread the envelopes out in the direction that they will be fed.
|
|
3
|
Hold down the top edge of the envelopes firmly, so that the flaps stay flat.
 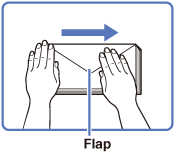 NOTE:
If the envelopes become filled with air, flatten them by hand before loading them in the stack bypass.
If you feed envelopes that have glue attached to their flaps, the glue may melt due to the heat and pressure of the fixing unit.
|
|
4
|
Load the envelopes face down.
Make sure that the height of the envelopes does not exceed the loading limit mark (
 ). ). IMPORTANT:
Do not print on the back side of the envelopes (the side with the flap).
Envelopes may become creased in the printing process.
|
4
Specify the paper size and type.
NOTE:
When Stack Bypass Standard Settings is enabled, the screens for specifying the paper size and type shown in the following steps are not displayed even if you load paper or envelopes. Disable Stack Bypass Standard Settings to display the setting screens. (Standard Paper for the Stack Bypass)
If you want to select a standard paper size:
|
1
|
Select the paper size → press [Next].
IMPORTANT:
Make sure that the paper size setting is correct. If the paper size loaded on the stack bypass and the paper size setting do not match, a paper jam may occur.
 NOTE:
To select an inch paper size, press [Inch-size].
|
|
2
|
Select the paper type → press [OK].
 IMPORTANT:
Make sure that the paper type setting is correct. An incorrect paper type setting may adversely affect the image quality, damage the fixing unit, and cause paper jams.
NOTE:
[Transparency] can be selected only when [A4] is selected as the paper size.
For more information on paper sizes/types, see Available Paper Stock.
|
If you want to select a nonstandard paper size:
|
1
|
Press [Irreg. Size].
 |
|
2
|
Press [X] → enter the length along the horizontal axis of the paper using the numeric keys.
The horizontal length can be set between 148 mm and 432 mm.
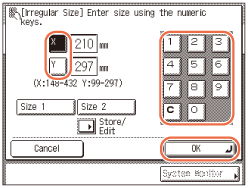 |
|
3
|
Press [Y] → enter the length along the vertical axis of the paper using the numeric keys.
The vertical length can be set between 99 mm and 297 mm.
|
|
4
|
Press [OK].
IMPORTANT:
Make sure that the paper size setting is correct. If the paper size loaded on the stack bypass and the paper size setting do not match, a paper jam may occur.
NOTE:
If you make a mistake when entering values, press [C] (Clear) → enter the correct values.
When entering values in millimeters, you can also use
 - -  (numeric keys) and (numeric keys) and  (Clear) on the control panel. (Clear) on the control panel.To enter values in inches, the Inch Entry setting must be enabled. (Entering Values in Inches)
When entering the length in inches, an underbar (_) must be entered between integer and fraction.
You can store up to two sets of frequently used sizes. Press [Store/Edit] → [Size 1] or [Size 2] → enter the value for <X> and <Y> → press [OK].
To recall the stored size, press [Size 1] or [Size 2] → press [OK] and proceed to the next step to specify the paper type.
|
|
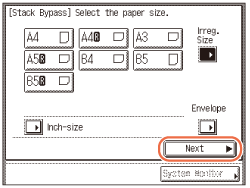
5
|
Press [Next].
 |
|
6
|
Select the paper type → press [OK].
 IMPORTANT:
Make sure that the paper type setting is correct. An incorrect paper type setting may adversely affect the image quality, damage the fixing unit, and cause paper jams.
NOTE:
[3-hole punch] and [Transparency], cannot be selected for a nonstandard paper size.
For more information on paper sizes/types, see Available Paper Stock.
|
If you want to select an envelope type:
|
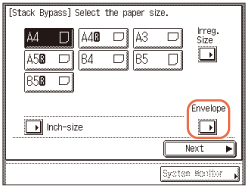
1
|
Press [Envelope].
 |
|
2
|
Select the envelope type → press [OK].
 IMPORTANT:
Make sure that the envelope type setting is correct. If the envelopes loaded on the stack bypass and the envelope type setting do not match, a paper jam may occur.
|
|
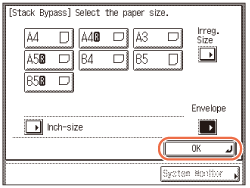
3
|
Press [OK].
 |
5
Press [Done].
The paper size and type you specified are displayed on the key for the stack bypass.

NOTE:
To change the paper size and type settings, remove the paper from the stack bypass, again load the paper, and reset the settings from step 4.