
Replacing the Toner
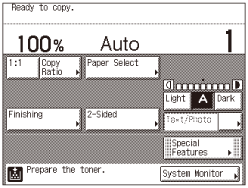
When only a small amount of toner is left inside the machine, the message <Prepare the toner.> is displayed on the screen. Although you may continue printing, it is highly recommended that you prepare to install a new toner cartridge before the toner completely runs out.
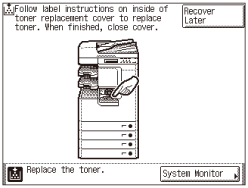
When toner runs out completely and prints can no longer be made, the message <Replace the toner.> appears on the touch panel display. Pressing [Recover Later] enables you to continue operations. However, you have to replace the toner cartridge to make further prints.
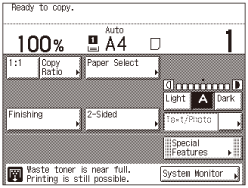
When the waste toner container nears capacity, the message <Waste toner is near full. Printing is still possible.> appears on the touch panel display. In this case, you should prepare a new waste toner container.
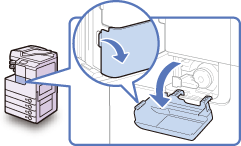
Even if you do not replace the waste toner container immediately, you can perform printing for a while.
Even if you do not replace the waste toner container immediately, you can perform printing for a while.
When the waste toner container is full, the message <Waste toner is full.> appears on the touch panel display. Follow the label instruction on inside of front cover or the manuals to replace the waste toner container.
|
|
|
Do not burn or throw used toner cartridges into open flames, as this may cause the toner remaining inside the cartridges to ignite, resulting in burns or a fire.
Do not store toner cartridges or paper in places exposed to open flames, as this may cause the toner or paper to ignite, resulting in burns or a fire.
If you accidentally spill or scatter toner, carefully gather the toner particles together or wipe them up with a soft, damp cloth in a way that prevents inhalation. Never use a vacuum cleaner that does not have safeguards against dust explosions to clean up spilled toner. Doing so may cause a malfunction in the vacuum cleaner, or result in a dust explosion due to static discharge.
|
 |
|
Keep toner out of the reach of small children. If toner is ingested, consult a physician immediately.
Take care not to allow toner to come into contact with your hands or clothing. If toner gets onto your hands or clothing, wash it off immediately with cold water. Washing with warm water may set the toner permanently, making the stains impossible to remove.
When discarding used toner cartridges, put the cartridges in a bag to prevent the toner remaining inside the cartridges from scattering, and dispose of them in a location away from open flames.
|
|
IMPORTANT
|
|
Use only toner cartridges intended for use with the machine. (See “Consumables,” in the User’s Guide.)
Do not replace toner cartridges until the message prompting you to do so appears.
Do not attempt to replace the toner cartridge while the machine is printing.
|
|
NOTE
|
|
If toner runs out during a print job, the remaining prints are completed after you replace the toner cartridge.
|
1
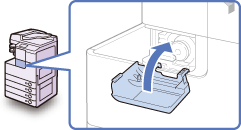
Open the toner replacement cover.
2
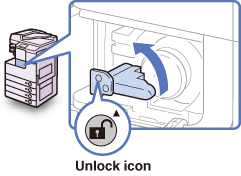
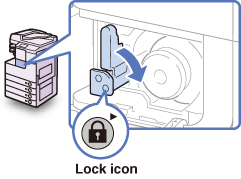
Turn the locking lever counterclockwise until it becomes vertical.
|
IMPORTANT
|
|
Make sure that the down arrow (
 ) on the locking lever is aligned with the up arrow ( ) on the locking lever is aligned with the up arrow ( ) of the Unlock icon position before proceeding. ) of the Unlock icon position before proceeding. |
3
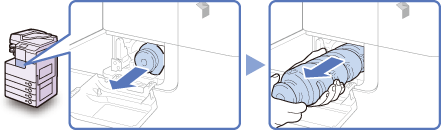
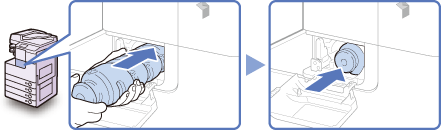
Pull the toner cartridge out of the toner supply port.
Pull the toner cartridge out halfway with one hand, support it with the other hand from underneath, and then remove it completely while keeping it level.
|
|
|
Do not burn or throw used toner cartridges into open flames, as this may ignite the toner remaining inside the cartridge, and result in burns or a fire.
|
|
IMPORTANT
|
|
If the toner cartridge cannot be pulled out, check that the knob is turned all the way to the appropriate position.
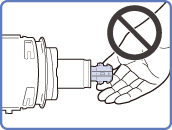
Do not touch the opening of the toner cartridge or subject it to shock by hitting it. Doing so may cause the toner to leak out of the cartridge.
|
4
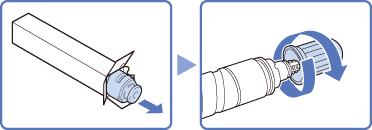
Take the new toner cartridge out of the package and uncap it.
|
IMPORTANT
|
|
Use only toner cartridges intended for use with the machine. (See “Consumables,” in the User’s Guide.)
Do not touch the opening of the toner cartridge or subject it to shock by hitting it. Doing so may cause the toner to leak out of the cartridge.
|
5
Insert the new toner cartridge in the toner supply port as far as it will go.
Support the new toner cartridge with one hand from underneath while pushing it into the machine with the other hand.
6
Return the locking lever to its original position.
|
IMPORTANT
|
|
Make sure that the down arrow (
) on the locking lever is aligned with the right arrow ( ) of the Lock icon position. ) of the Lock icon position. |
7
Close the toner replacement cover.
|
|
|
When closing the cover, be careful not to get your fingers caught, as this may result in personal injury.
|
|
IMPORTANT
|
|
Make sure that you clean the fixing unit every time you replace the toner cartridge. (Fixing Unit Cleaning)
|