Settings Menu
This section provides detailed information on the Printer Settings.
|
NOTE
|
|
The default settings are indicated in bold.
|
Default PaperSize
|
A4, A3, A5, 11 × 17, LGL, LTR, STMT, EXECUTIV, ISO-B5, ISO-C5, No. 10 (COM10), MONARCH, DL
|
This setting defines the default paper size used when the paper size cannot be set from the printer driver in the computer, or when no paper source is specified.
|
IMPORTANT
|
|
If you are printing from a computer that does not have the appropriate printer driver for the machine, make sure that the paper loaded in the paper drawer matches the paper size selected for this setting. If paper of the selected size is missing in any of the paper sources, the machine displays an error message on the touch panel display and suspends further printing. If no paper source has been selected through the application, the machine automatically selects the default printer setting for the paper size. (Configuring the Machine's Basic Settings)
|
Default PaperType
|
Plain, Color, Recycled, Heavy Paper 1, Heavy Paper 2, Heavy Paper 3, Bond, 3HOLE PUNCH PAPER, Transparency, Labels, ENVELOPE
|
This setting sets the default paper type to be used for print jobs. This machine has internally defined optimal print modes for each specified paper type. For more information on the paper types, see Appendix.
|
IMPORTANT
|
|
If you are printing from a computer that does not have the appropriate printer driver for the machine, make sure that the paper loaded in the paper drawer matches the paper type selected for this setting. If paper of the selected type is missing in any of the paper sources, the machine displays an error message on the touch panel display and suspends further printing. If no paper source has been selected through the application, the machine automatically selects the default printer setting for the paper type. (Configuring the Machine's Basic Settings)
|
Copies
|
1 to 999; 1
|
This setting enables you to specify the number of copies printed. The default setting is ‘1’, but you can specify up to 999 copies.
2-Sided Printing
|
Off, On
|
This setting selects one- or two-sided printing. In the 2-Sided Printing mode, the document is printed on both sides of the paper.
|
NOTE
|
|
In the 2-Sided Printing mode, you can use A4, A3, A5R, A4R, B4, B5, B5R, LTR, LTRR, LGL, 11" × 17", STMTR, or EXEC paper.
The paper types and weight available for two-sided printing are as follows:
Paper type: Plain, Recycled, 3-hole punch paper (Only A4, A4R, LTR, or LTRR is available.), Color
Paper weight: 64 to 90 g/m2
|
Print Quality
Image Refinement
|
On, Off
|
This setting smoothes the jagged outlines of characters and graphics.
If [On] is selected, smoothing is performed before printing.
If [Off] is selected, jobs are printed without being smoothed.
|
NOTE
|
|
The effects of image refinement may vary depending on the types of characters and graphics on the printed document.
|
Density
|
9 levels; 5
|
This setting adjusts the print density.
Pressing [ ] or [
 ] makes the print image lighter or darker, respectively. You can select from nine levels, with level ‘5’ (middle) being the default setting.
] or [] makes the print image lighter or darker, respectively. You can select from nine levels, with level ‘5’ (middle) being the default setting.|
IMPORTANT
|
|
This setting applies only to print jobs sent from a computer via the printer driver. To adjust the density when printing from USB memory media, use the Printer Density setting in Common Settings. (Configuring the Machine's Basic Settings)
|
Toner Save
|
Off, On
|
This setting enables or disables the toner saving feature. When this feature is enabled, less toner is used to print documents, resulting in a longer toner life.
|
IMPORTANT
|
|
This setting applies only to print jobs sent from a computer via the printer driver. To save toner when printing from USB memory media, enable the Toner Save Mode in Common Settings. (Configuring the Machine's Basic Settings)
|
|
NOTE
|
|
If [On] is selected for Toner Save, very light or finely detailed images may not be printed clearly.
|
Line Refinement
|
On, Off
|
This setting enables you to make clearer prints of documents containing fine lines and small characters.
Horizontal Line
|
Off, Level 1, Level 2, Level 3, Level 4
|
This setting adjusts the thickness of horizontal lines to produce fine lines and small characters more clearly. The higher the level number, the thicker the horizontal lines printed.
|
NOTE
|
|
This setting is also available when the Line Refinement is set to [On] in the printer driver.
With this setting, horizontal lines are based on the direction in which the paper is fed.
Selecting [Level 2] or higher for this setting may result in abrupt changes in gradation with halftone images.
|
Vertical Line
|
Off, Level 1, Level 2, Level 3, Level 4
|
This setting adjusts the thickness of vertical lines to produce fine lines and small characters more clearly. The higher the level number, the thicker the vertical lines printed.
|
NOTE
|
|
This setting is also available when the Line Refinement is set to [On] in the printer driver.
With this setting, vertical lines are based on the direction in which the paper is fed.
Selecting [Level 2] or higher for this setting may result in abrupt changes in gradation with halftone images.
|
Layout
Binding Location
|
Long Edge, Short Edge
|
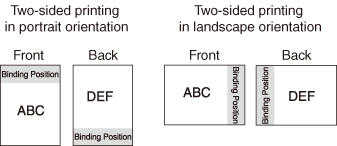
This setting determines whether the binding position is along the long edge or the short edge of the paper. When binding for two-sided printing, the image orientation is automatically adjusted to produce the correct layout.
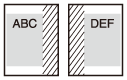
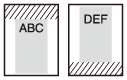
When the binding position is on the long edge of the paper:
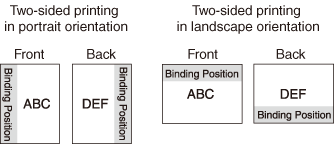
When the binding position is on the short edge of the paper:
|
NOTE
|
|
You cannot create a binding margin with this setting alone. Use this setting in combination with the Margin setting (described below) to create a binding margin.
For two-sided printing, the orientation of the image on the back side of the page may be changed using this setting.
|
Margin
|
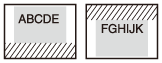
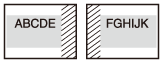
-50.0 to +50.0mm (in increments of 0.5 mm); 0.0mm
|
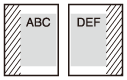
This setting sets the page margin in millimeters or inches.
Press [] to increase the width of the outside margin. (Example 1)
] to increase the width of the outside margin. (Example 1)Press [] to increase the width of the inside margin. (Example 2)
] to increase the width of the inside margin. (Example 2)
You can specify the edge along which the margin will be created in the Binding setting. To create a margin along one of the edges of the paper, use this setting in combination with the Binding setting.
|
IMPORTANT
|
|
If this setting moves the image outside the printable area, part of the image may be cut off.
|
|
NOTE
|
|
Holding down [
] or [] makes the values change faster. |
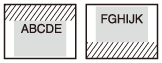
Combining the Binding and Margin Settings
The figures below illustrate how the Binding and Margin settings are combined. You can set the paper orientation using the printer driver. (See the help on the printer driver.)
Binding and Margin Settings
|
Portrait printing
|
Landscape printing
|
|||||
|
Front
|
Back (Two-sided printing)
|
Front
|
Back (Two-sided printing)
|
|||
|
Binding Location
|
Long Edge
|
Margin [+]
|
 |
 |
||
|
Margin [–]
|
 |
 |
||||
|
Short Edge
|
Margin [+]
|
 |
 |
|||
|
Margin [–]
|
 |
 |
||||
|
The shaded parts (
 ) indicate the binding margin. ) indicate the binding margin. |
||||||
Auto Continue
|
Off, On
|
This setting enables you to automatically clear an error and continue printing when an error occurs (Error skip).
If [Off] is selected, you must perform error skips from the touch panel display.
If [On] is selected, error skips are performed automatically.
|
NOTE
|
|
Error skip only temporarily clears an error, so the data may not print correctly.
This setting is valid even if multiple errors have occurred.
|
Timeout
|
On (5 to 300sec), Off; 15sec
|
The Timeout setting enables the machine to discard a print job that remains in the machine’s memory after a specified period of time.
This setting is useful when the data for the current job has some error and prevents the machine from performing further printing. In this case, the machine will not receive other print commands because it performs printing in chronological order (jobs are printed in the order they are received).
If the Timeout setting is enabled, the current job is discarded automatically after the specified period of time. For example, if the Timeout is enabled at ‘20 sec’, the data for the current job will be erased from the machine’s memory 20 seconds after the machine starts processing the data.
If [Off] is selected, the machine will not discard jobs automatically.
|
IMPORTANT
|
|
This setting applies only for PCL and PS data.
If a job that consists of a large amount of data is sent from a computer, the function may cause the machine to end the print job before all of the data is received. In this case, set a longer timeout period (in seconds).
If [Off] is selected, you will not be able to make copies until print jobs that use the Staple mode are complete.
|
|
NOTE
|
|
When a job is being processed, the Processing/Data indicator blinks on the control panel.
|
Finishing
|
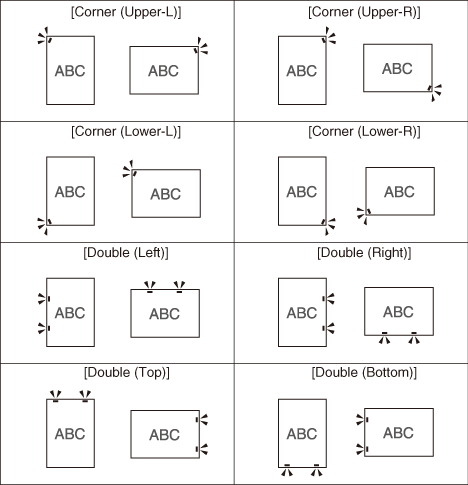
Off, Collate, Rotate+Collate, Rotate+Group, Offset+Collate, Offset+Group, Staple+Collate (Corner (Upper-L), Corner (Upper-R), Corner (Lower-L), Corner (Lower-R), Double (Left), Double (Right), Double (Top), Double (Bottom))
|
This setting enables you to make printouts in sets arranged in page order, or in groups of each page as required. You can also staple printouts.
|
IMPORTANT
|
|
The table below shows all the Finishing modes that are available with the optional Inner Finisher-B1, and the paper sizes that can be used.
|
 : Available
N/A: Not Available
|
When the Inner Finisher-B1 Is Not Attached
|
When the Inner Finisher-B1 Is Attached
|
|
|
Off
|
|
|
|
Collate
|
|
|
|
Rotate+Collate
|
|
N/A
|
|
Rotate+Group
|
|
N/A
|
|
Offset+Collate
|
N/A
|
|
|
Offset+Group
|
N/A
|
|
|
Staple+Collate
|
N/A
|
|
You can select from several features when collating printed documents.
Off
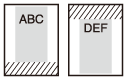
This setting prints all copies of the same page before printing the next page.
Collate
This setting prints all pages of each copy before printing the next copy.
Rotate+Collate
This setting prints all pages of each copy (collating), and rotates every other complete copy 90 degrees to indicate where each copy starts.
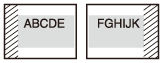
Rotate+Group
This setting prints all copies of the same page before printing the next page. It rotates every other complete set of pages to indicate where each new set starts.
Offset+Collate
This setting prints all pages of each copy (collating), and offsets every other complete copy to indicate where each copy starts.
Offset+Group
This setting prints all copies of the same page before printing the next page. It offsets every other complete set of pages to indicate where each new set starts.
Staple+Collate
This setting prints all pages of each copy (collating), and staples them together before printing the next copy.
Examples of each Finishing option when printing three copies of a three page document are provided below.

|
NOTE
|
|
Rotate+Collate and Rotate+Group are available for selection if the paper size is A4, A4R, B5, B5R, LTR, or LTRR.
If Rotate+Collate and Rotate+Group is selected, part of the print image may be cut off when the image is rotated. You need to load the same size paper as the original in the paper drawers in both landscape and portrait positions. If you do not, all the sheets will be printed in the orientation that the loaded paper is in.
Offset+Collate and Offset+Group are available for the following paper sizes:
A4, A4R, A3, B4, B5, LTR, LTRR, LGL, or 11" × 17". When you select Staple, you can select the stapling position.
The Staple+Collate mode is available for selection if the paper size is A4, A4R, A3, B4, B5, LTR, LTRR, LGL, or 11" × 17".
You can use the 64 to 128 g/m2 paper for stapling. The maximum number of sheets that can be stapled when you are using the 80 g/m2 paper is as follows:
- A4, B5, and LTR: 50 sheets - A4R, A3, B4, LTRR, LGL, and 11" × 17": 30 sheets When you are stapling paper in landscape orientation, the image orientation and the staple position may not match, as shown below.
|
Personality
|
Auto, PCL, PS
|
This setting enables the machine to process data received from the host computer in the specified data format. Setting the ‘Personality’ to [Auto] makes the machine determine the type of data received from the host on a job-by-job basis. If you are printing from applications on a computer, we recommend that you use the [Auto] setting.
|
NOTE
|
|
The Personality function is available only when the optional PCL printer function and PS printer function are activated.
If the machine does not correctly switch to the appropriate personality when 'Personality' is set to [Auto], change the setting manually to match the data you are sending from the host computer.
|
Mode Priority
|
Off, PCL, PS
|
This setting determines which personality should be used if a job is received without a specified command language. ‘Mode Priority’ is available only when ‘Personality’ is set to [Auto].
|
[Off]:
|
Applies the current Personality setting if the machine cannot detect a command language.
|
|
[PCL]:
|
Assigns priority to the PCL personality.
|
|
[PS]:
|
Assigns priority to the PS personality.
|
Auto Select
|
PCL: On, Off
PS: On, Off
|
This setting determines which personality should be used when [Auto] is selected in the Personality setting.
If [On] is selected in each mode, the mode is available for the Personality setting.
If [Off] is selected in each mode, the mode is not available for the Personality setting.
Initialize
|
Off, On
|
The printer settings can be returned to the factory defaults by initializing the printer settings.
If [On] is selected, the settings are initialized. If [Off] is selected, the settings are not initialized.
|
IMPORTANT
|
|
Do not turn OFF the machine while the settings are being initialized, as this may damage the machine’s memory.
|