Specifying Proxy Settings
Follow the procedure below to specify Proxy Settings according to your network environment.
|
IMPORTANT
|
|
Changes made to Proxy Settings become effective when the machine is restarted. To restart the machine, turn it OFF, wait at least 10 seconds, and then turn it ON. For instructions on how to turn the machine ON and OFF, see Chapter 2, “Before You Start Using the Machine,” in the User’s Guide.
|
|
NOTE
|
|
The default setting is ‘Off’.
|
1
Press  (Additional Functions) → [System Settings] → [Network Settings].
(Additional Functions) → [System Settings] → [Network Settings].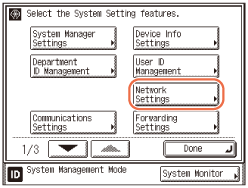
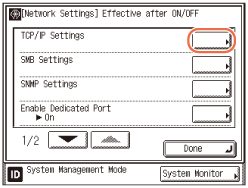
2
Press [TCP/IP Settings].
3
Press [ ] or [
 ] until [Proxy Settings] appears → press [Proxy Settings].
] or [] until [Proxy Settings] appears → press [Proxy Settings].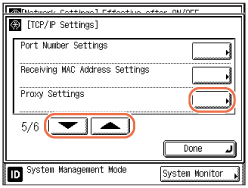
4
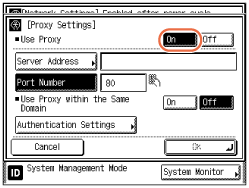
Specify proxy settings.
If you want to use a proxy:
|
1
|
Press [On] for <Use Proxy>.
 |
|
2
|
Press [Server Address] → enter a proxy server IP address or FQDN (for example, starfish.company.com) → press [OK].
|
|
3
|
Press [Port Number] → enter the port number of a proxy server.
|
|
4
|
If you want to use a proxy in the same domain, press [On] for <Use Proxy within the Same Domain>. Otherwise, press [Off].
|
|
5
|
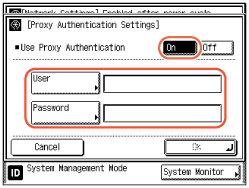
If you want to use proxy authentication, press [Authentication Settings] → press [On] for <Use Proxy Authentication> → enter the user name to use for proxy authentication in [User], and the password to use for proxy authentication in [Password].
 |
|
6
|
Press [OK] → [OK].
|
If you do not want to use a proxy:
|
1
|
Press [Off] for <Use Proxy> → [OK].
|
5
Restart the machine.
Turn OFF the machine, wait at least 10 seconds, and then turn it ON.