Registering a Personal Button/Shared Button
The number of Personal and Shared buttons that can be registered is as follows:
Personal button: Each user can register a maximum of 15 buttons (maximum total of 3,000 buttons per machine)
Shared button: A maximum of 15 buttons per machine
1.
Press the function button that you want to register → specify the settings to register.
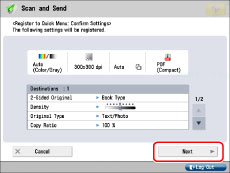
For example, if you want to scan two-sided originals and send the document as a Compact PDF via e-mail to your client:
Press [Scan and Send].
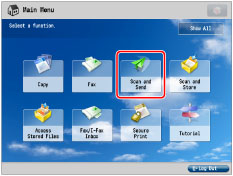
If the desired function is not displayed on the Main Menu screen, press [Show All].
|
NOTE
|
|
For information on the Scan and Send function, see "Scan and Send."
|
Select [New Destination].
Press [E-Mail].
Enter your client's e-mail address → press [OK] → [OK].
Press the file format button.
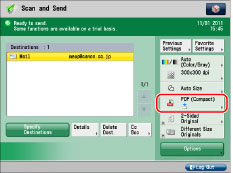
Press [PDF] for <File Format> → [Compact] → [OK].
Press [Options] → [2-Sided Original].
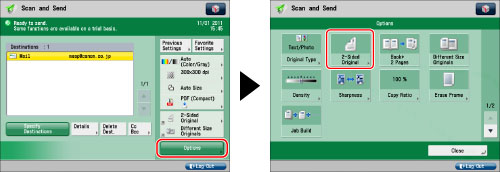
Select the type of two-sided original → press [OK] → [Close].
2.
Press  .
.
.
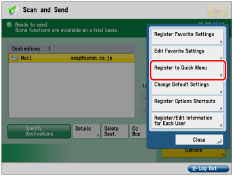
3.
Press [Register to Quick Menu].
|
IMPORTANT
|
|
If you select [Device Login Auth. Info.] for [Info. Used for File TX/Browsing Auth.] in [Function Settings] (Settings/Registration), a password for a file destination is not stored in a personal button or a shared button in the Quick Menu. For more information on settings for [Info. Used for File TX/Browsing Auth.], see "Specifying Authentication Method for File Server."
|
|
NOTE
|
|
You can select whether to include the following password when registering settings in a Personal button or Shared button in the Quick Menu:
A password required to access to the file server when registering a file destination
If you want to recall the registered button without entering a password, include a password when registering.
If you want to set password in the settings stored in the registered button, as you often import settings in a Personal button or Shared button to another machine and you want to prevent users from pretending to be other users, exclude a password when registering.
|
4.
Press [Next].
5.
Specify the recall settings for the button to register → press [Next].
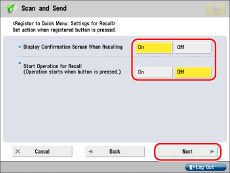
<Display Confirmation Screen When Recalling>
If you select [On], when the registered button is recalled, the confirmation dialog box for the settings is displayed. For more information on the confirmation dialog box for the settings, see "Recalling a Personal Button/Shared Button."
<Start Operation for Recall (Operation starts when button is pressed.)>
If you select [On], operations registered in the button start without confirmation of settings when you press the registered button. You do not have to press  (Start) to start the job.
(Start) to start the job.6.
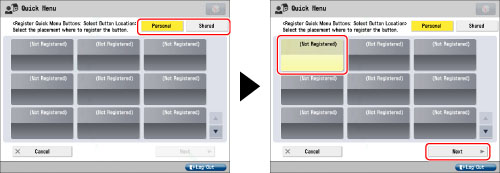
Select [Personal] or [Shared] → select the button you want to register → press [Next].
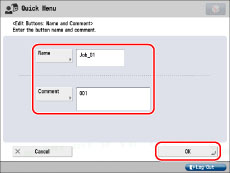
7.
Enter a button name and comment.
Press [Name] → enter a name → press [OK].
Press [Comment] → enter a comment → press [OK].
8.
Press [OK] → [Close].
If you want to change the name or comment, press [Rename].
|
NOTE
|
|
The number of Personal buttons that can be registered may be less than the maximum, depending on the memory usage of the Quick Menu function.
For instructions on using a Personal button/Shared button, see "Recalling a Personal Button/Shared Button."
If authentication is not set, the Personal buttons are not displayed.
|