Managing Department IDs
You can manage Department IDs with the Remote UI.
Follow the procedure below to specify Department ID Management settings from the Remote UI.
1.
Click [Settings/Registration] → select [User Management] for <Management Settings> → click [Department ID Management].
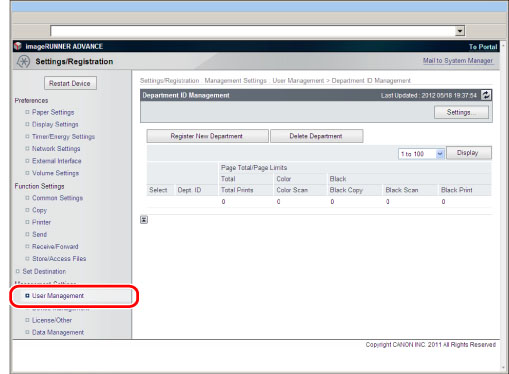
The list of Department IDs registered in the machine appears in groups of 100. If you want to display another group, select a group other than [1 to 100] from the drop-down list → click [Display].
|
IMPORTANT
|
|
Department ID Management is set automatically if the Copy Card Reader-F1 is attached to the machine. If the Copy Card Reader-F1 is attached, [Register New Department] and [Delete Department] do not appear.
|
2.
To set the method for managing Department IDs, click [Settings...] → specify the desired settings → click [OK].
Details of each item are shown below.
|
Enable Department ID Management:
|
If you select this check box, Department ID Management is enabled. When Department ID Management is enabled, the user must enter the Department ID to be able to use functions, such as the Copy and Send functions. (This enables you to keep track of the total number of prints by department and set impression limits.) In addition, when Department ID Management is enabled, the user must enter the Department ID and PIN to be able to execute jobs and perform operations on the Memory RX Inbox or Confidential Fax Inboxes.
If the Copy Card Reader-F1 is attached, this check box does not appear.
|
|
Limit Functions:
|
This setting enables you to set Department ID Management for [Scan and Store], [Access Stored Files], [Fax/I-Fax Inbox], [Scan and Send], [Fax], [Scanner], and [Web Access] functions. If SSO-H is set as the login service, the Limit Functions mode will not be available.
Store/Access Files, Fax/I-Fax Inbox:
Select this check box to set Department ID Management for [Scan and Store], [Access Stored Files], and [Fax/I-Fax Inbox] functions.
Send/Fax:
Select this check box to set Department ID Management for [Scan and Send] and [Fax] functions.
Other:
Select this check box to set Department ID Management for [Scanner] and [Web Access] functions.
|
|
Allow Printer Jobs with Unknown IDs:
|
Select this check box to enable printing for computers that use printer drivers that do not support Department ID Management. If you do not select this check box, only computers with printer drivers that support Department ID Management can print.
|
|
Allow Remote Scan Jobs with Unknown IDs:
|
Select this check box to enable remote scanning for computers that use printer drivers that do not support Department ID Management. If you do not select this check box, only computers with printer drivers that support Department ID Management can perform remote scanning.
|
|
Count Each Page as 2 (Large Size Only):
|
Select to count one large sheet (A3) as two sheets in the print total.
|
|
Clear All Counts:
|
Click this button to reset the counter to zero for all departments.
|
|
NOTE
|
|
For more information on the Limit Functions, see "Limiting Functions."
|
3.
To register a department, click [Register New Department] → specify the desired settings → click [OK].
Details of each item are shown below.
|
Department ID:
|
Enter a number (seven digits maximum).
|
|
PIN:
|
Enter a number (seven digits maximum).
|
|
Confirm:
|
Enter the PIN again. If the number you enter here is different from the number entered for <PIN>, an error dialog box appears.
|
|
Page Limits:
|
Enter the maximum number of prints the department is allowed to make.
|
|
IMPORTANT
|
|
If the Copy Card Reader-F1 is attached, you cannot register a new department.
|
|
NOTE
|
|
[Total Prints] is the sum of copy and print jobs.
|
4.
To delete a department, click the department that you want to delete → click [Delete Department].
5.
Click [OK].
6.
To change the PIN and page limit setting, click the desired Department ID → change the necessary fields on the <Edit Department> screen → click [OK].
|
NOTE
|
|
To clear the print total for the department, click [Clear Count]. Click [OK] when the confirmation dialog box appears.
The Department ID Management settings are the same as those that you can access from the control panel of the machine by pressing [User Management] (Settings/Registration) → [Department ID Management]. For instructions on using the control panel to specify Department ID Management settings and more information on Department ID Management, see "Department ID Management."
|