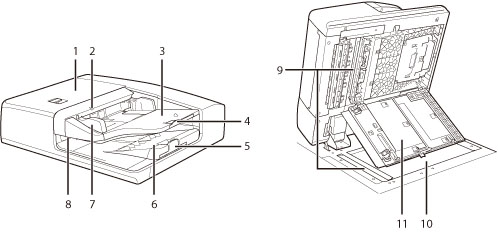
Duplex Color Image Reader Unit-K1
Originals placed in the feeder are automatically fed sheet by sheet to the platen glass for scanning. You can scan documents such as books, thick originals, thin originals, and transparencies on the platen glass of the Duplex Color Image Reader Unit-K1.
Parts and Their Functions

1. | Feeder Cover Open this cover to remove jammed paper. (See "Duplex Color Image Reader Unit-K1 (Optional).") |
2. | Original Set Indicator Lights when originals are placed in the original supply tray. |
3. | Original Supply Tray Originals placed here are automatically fed sheet by sheet into the feeder. Place originals into this tray with the surface that you want to scan face up. |
4. | Auxiliary Original Supply Tray Pull out this tray when feeding large sized paper. |
5. | Auxiliary Original Output Tray Pull out this tray when outputting large sized paper. |
6. | Original Output Tray Originals that have been scanned from the original supply tray are output into the original output tray in the order that they are fed into the feeder. |
7. | Slide Guides Adjust these guides to match the width of the original. |
8. | Original Output Indicator Lights when originals are being output and starts blinking in a specified period after outputting originals is complete. |
9. | Document Feed Scanning Area Scans documents sent from the feeder. |
10. | Platen Glass Use the platen glass when scanning books, thick originals, thin originals, transparencies, etc. |
11. | Document Scan Cover Open this cover to clean the document feed scanning area. (See "Maintenance.") |
 CAUTION CAUTION |
Do not insert your fingers into the gaps around the original supply tray, as your fingers may get caught. Also, be careful not to drop objects, such as paper clips into the gaps, as doing so may cause damage to the machine or cause it to break down. |
IMPORTANT |
When using the platen glass to copy or scan thick originals, such as books or magazines, do not press down hard on the feeder. If the original output area is blocked, originals may get damaged, and printing may not be performed correctly. Therefore, do not place any objects in the original output area. |
NOTE |
If the platen glass or original feeding belt is dirty, print quality may deteriorate. In this case, clean the feeding belt and platen glass. (See "Routine Cleaning.") |