Registering User Information in the Local Device
 |
|
The User Authentication login service performs personal authentication based on the information registered for each user, enabling you to limit the users who can access the machine. User information registration (authentication) can be performed on this machine and on an external server. You can configure the authentication system to use only this machine as the authentication device, or you can additionally specify an Active Directory or LDAP authentication server on the network as an authentication device to utilize the existing user information registered on the server (). Administrators can also specify which functions are available to each individual user, such as "user A is prohibited from making copies" or "user B is allowed to use all machine functions." For the user login method, you can enter authentication information, select a user, use an IC card, or use a mobile device Bluetooth function (). Before configuring the user authentication settings, decide the authentication device and login method.
|
1
Start the Remote UI. Starting the Remote UI
2
Click [Settings/Registration] on the portal page. Remote UI Screen
3
Click [User Management]  [Authentication Management].
 [Authentication Management].
Disabling "Administrator"
"Administrator" is registered as the default administrator name (user name). This user cannot be deleted but it can be disabled after adding a user with "Administrator" privileges. Logging in as an Administrator
4
Click [Add User].

To edit user information
Click [Edit] for the user information that you want to edit, make the necessary changes, and click [Update].
To delete user information
Select the check box for the user information that you want to delete, and click [Delete]  [OK].
[OK].
 [OK].
[OK].5
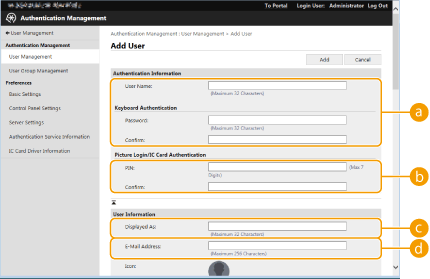
Enter the necessary information.

 [User Name:] / [Password:] / [Confirm:]
Enter the user name and password. For confirmation, enter the password again in [Confirm:].
 [PIN:] / [Confirm:]
If users are required to enter a PIN when using IC card authentication, enter the PIN here. For confirmation, enter the PIN again in [Confirm:].
 [Displayed As:]
Enter the name of the user. When sending e-mail, the recipient will see the display name as the sender's name.
 [E-Mail Address:]
Enter the e-mail address that the user is using on devices such as computers. When sending scanned documents, this address will be displayed along with the sender's name. This address is also used when sending documents by using <Send to Myself>.

It is also possible for general users to change their own password and PIN.
Selecting the [Allow e-mail address settings] check box enables general users to specify e-mail addresses. Configuring the User Login Methods and Authentication Devices
The following data can be imported as an icon image.
Image size: Maximum 54 x 54 pixels
File extension: .jpg, .jpeg, or .png
File size: 10 KB or smaller
6
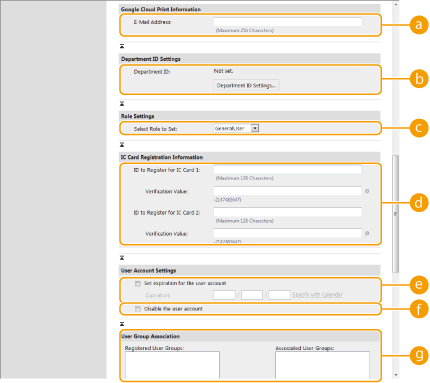
Specify other required settings.

 [E-Mail Address:]
If [Settings/Registration]  [Network Settings]
  [Google Cloud Print Settings] is enabled, a Google Cloud Print e-mail address can be specified for linking with Google Cloud Print.
 [Network Settings]
  [Google Cloud Print Settings] is enabled, a Google Cloud Print e-mail address can be specified for linking with Google Cloud Print.
 [Department ID:]
When using Department ID Management, you must click [Department ID Settings...] and select the Department ID from the list to assign to the user. First, register the necessary Department IDs in [Register New Department...] on the list screen. If the Department ID that you specify here is later deleted, make sure to change this setting. Configuring the Department ID Management Settings
 [Select Role to Set:]
The user privileges (roles) listed below can be selected. The available setting items vary depending on the privileges (Settings/Registration). In addition, you can create your own roles. Using ACCESS MANAGEMENT SYSTEM
|
[Administrator]
|
Allows access to all machine operations.
|
|
[GeneralUser]
|
Allows general user privileges.
|
|
[DeviceAdmin]
|
Allows operations that are available to general users, along with the ability to change settings related to basic functions such as copying, printing, sending, and receiving.
|
|
[NetworkAdmin]
|
Allows operations that are available to general users, along with the ability to change network-related settings.
|
 [ID to Register for IC Card 1:] / [ID to Register for IC Card 2:] / [Verification Value:]
When using IC card authentication, specify the card ID and validity value (number of reissues).
 [Set expiration for the user account]
When setting a period of validity for the account, select the check box and enter a value for [Expiration].
 [Disable the user account]
Select the check box to temporarily disable the account.
 [User Group Association]
When you want to assign the user to a group, select a registered user group from the list and click [Add]. This setting is not displayed when using Department IDs as user groups. Configuring the User Login Methods and Authentication Devices
7
Click [Add].
 |
Configuring settings via the control panelYou can also register user information by pressing
  <Management Settings> <Management Settings>  <User Management> <User Management>  <Authentication Management> <Authentication Management>  <Register/Edit Authentication User>. <Register/Edit Authentication User> <Register/Edit Authentication User>. <Register/Edit Authentication User>Creating user groupsAddress Lists in the Address Book can be shared between users who are registered in a user group. Registering User Groups
|
|
TIPS
|
Check for unregistered Department IDsIf you click [Check Unregistered Department ID...] on the screen displayed in step 4, you can find out Department IDs that are not registered in the machine by checking Department IDs assigned to the users against Department IDs registered in the machine.
Batch settings for Department IDsIf you click [Batch Settings for Department ID...] on the screen displayed in step 4, you can create new Department IDs and apply settings for all users.
|
Associating Google Cloud Print E-Mail Addresses with Users Using a CSV File
1
Start the Remote UI. Starting the Remote UI
2
Click [Settings/Registration] on the portal page. Remote UI Screen
3
Click [User Management]  [Authentication Management]
  [Google Cloud Print Settings].
 [Authentication Management]
  [Google Cloud Print Settings].
4
Click [Start Export].
If no Google Cloud Print e-mail addresses are registered in the user information, click [Start Export] after adding a Google Cloud Print e-mail address and user name from [Add Association...].
5
Enter the registered user name in the "gcp_uid" column of the exported CSV file and the Google Cloud Print e-mail address you want to associate in "gmail_address".
6
Specify the file edited in step 5, and click [Import...].