Setting Scheduled Updates
 |
|
You can set the machine to regularly check for new applicable firmware and automatically update the firmware of the machine.
|
 |
|
This operation can only be performed by a user with the required privileges.
If the downloading of the firmware is not complete, or the downloaded firmware has not been applied, you cannot perform a scheduled update.
|
1
Start the Remote UI. Starting the Remote UI
2
Click [Settings/Registration] on the portal page. Remote UI Screen
3
Click [License/Other]  [Register/Update Software].
 [Register/Update Software].
4
Click [Scheduled Update Settings]  [Edit...].
 [Edit...].
5
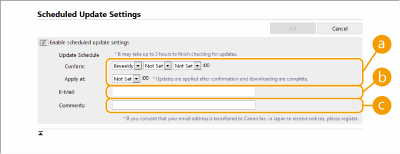
Select the check box for [Enable scheduled update settings], and configure the necessary settings.

 [Update Schedule]
[Confirm]
Select the cycle ([Biweekly] or [Weekly], a day ([Sun] to [Sat]), and the time). The time is displayed in 24-hour notation. The firmware check may take up to 3 hours to complete from the specified time.
Select the cycle ([Biweekly] or [Weekly], a day ([Sun] to [Sat]), and the time). The time is displayed in 24-hour notation. The firmware check may take up to 3 hours to complete from the specified time.
[Apply at]
Select the time to apply downloaded firmware.
Select the time to apply downloaded firmware.
 [E-Mail]
Enter the e-mail address of the administrator. You can receive e-mails regarding the update status that is sent from the distribution server.
 [Comments]
Enter the comment that will automatically be added to the e-mail. If the model name is entered, you can identify which device status the e-mail is about.
 |
|
If previously downloaded firmware has not been applied by scheduled update, the next scheduled update is not performed.
If Scheduled Update is set, a firmware update is applied at the specified time after the new firmware is downloaded from the distribution server. After application is complete, the machine automatically restarts.
|
6
Click [Set].