Setting E-mail/I-Fax Communication
0YRY-017 0UUY-00Y 0UW1-00Y 1100-017 0X7F-017 0X7H-017 10XJ-017 0X6E-017 0X6W-017 1106-017 0X7C-017 0X7A-017 10YY-017 0WXY-017 0X7E-017 10H3-017 0WR6-017 0WR7-017 108A-017 1116-017 10H4-017 0WR5-017 0WR8-017 0YWJ-016 0YWH-017 0YWR-016 0YWK-017 0YWE-017 0YWF-017 0YAS-017
To directly send scanned documents via e-mail/I-fax without going through a computer, you need to configure communication settings such as a mail server, authentication methods, etc. Generally, an SMTP server is used for sending, and an SMTP server or a POP3 sever is used for receiving. You can set encoding and other parameters. For details about necessary settings, contact the Internet service provider or network administrators.
1
Press  (Settings/Registration).
 (Settings/Registration).
2
Press <Function Settings>  <Send>
  <E-Mail/I-Fax Settings>
  <Communication Settings>.
 <Send>
  <E-Mail/I-Fax Settings>
  <Communication Settings>.
3
Set communication.

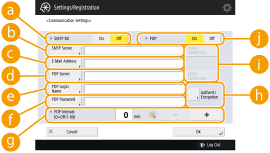
 <SMTP RX>
Press <On> when you want to make the machine an SMTP server to receive e-mails and I-faxes. Be aware that you cannot receive via SMTP if you don't register the host name of the machine on the DNS server.
 <SMTP Server>
Enter an SMTP server name (or an IP address).
 <E-Mail Address>
Enter the machine's e-mail address.
You can specify any name as the user name (part at the left of @ mark). Enter the registered host name at the right of the @ mark.
 <POP Server>
Enter a POP3 server name (or an IP address).
 <POP Login Name>
To use a POP3 server, enter the user name of the specified mail account using alphanumeric characters.
 <POP Password>
To use a POP3 server, enter the password of the specified mail account.
 <POP Interval>
You can set the interval to automatically issue POP in minutes.
 <Authent./Encryption>
Display the screen to set authentication and encryption.
 <Check Connection>
Press this button to check the connection for <SMTP Server> and <POP Server> after specifying the settings.
 <POP>
<POP>Press <On> when you want to receive e-mails and I-faxes using a POP3 server.
 Setting POP authentication before sending and encryption communication to/from the POP server
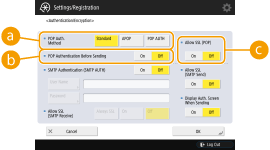
POP authentication before sending (POP before SMTP) is a confirmation of users by the POP server (reception mail server) before sending, which is a function to block unauthorized e-mails sent by third parties. When the POP server supports TLS, communication can be encoded.
1 | Press <Authent./Encryption>. |
2 | Specify each item.   <POP Auth. Method> <POP Auth. Method>Set the authentication methods of the POP3 server. To encode the password during authentication, select <APOP>. To authenticate users when receiving mail (POP), select <POP AUTH>.  <POP Authentication Before Sending> <POP Authentication Before Sending>To perform authentication using the POP3 server, press <On>.  <Allow TLS (POP)> <Allow TLS (POP)>To encode the communication to/from the POP3 server using TLS, press <On>. When <On> is set, you can confirm the TLS server certificate during communication with the server and add CN to the verification items. <E-Mail/I-Fax Settings>  <Confirm TLS Certificate for POP RX> <Confirm TLS Certificate for POP RX> |
3 | Press <OK>. |
 Setting SMTP authentication and encryption communication to/from the SMTP server
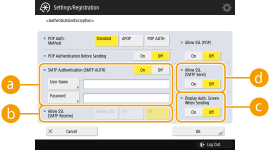
SMTP authentication (SMTP AUTH) verifies users by checking user names and passwords when e-mails are sent. It can also encode SMTP communication (sent and received). To encode SMTP reception using TLS, prepare key pairs beforehand. Configuring the Key and Certificate for TLS
1 | Press <Authent./Encryption>. |
2 | Specify each item.   <SMTP Authentication (SMTP AUTH)> <SMTP Authentication (SMTP AUTH)>To use SMTP authentication, press <On>, enter the user name and password of the specified mail accounts in <User Name> and <Password>.  User name and password <User Name> and <Password> for <SMTP Authentication> are also used when forwarding received documents. Forwarding is performed as "Fixed Device Authentication" regardless of the <Information Used for SMTP Server Authentication> settings. (<Information Used for SMTP Server Authentication>)  <Allow TLS (SMTP RX)> <Allow TLS (SMTP RX)>To encode communication using TLS when receiving e-mails and I-faxes using the SMTP server, press <Always TLS> or <On>. When you don't want to receive data other than encoded data, select <Always TLS>.  <Display Auth. Screen When Sending> <Display Auth. Screen When Sending>When sending e-mails and I-faxes, to display the user name and password entry screen, press <On>.  <Allow TLS (SMTP TX)> <Allow TLS (SMTP TX)>To encode the communication to/from the SMTP server using TLS, press <On>. When <On> is set, you can confirm the TLS server certificate during communication with the server and add CN to the verification items. <E-Mail/I-Fax Settings>  <Confirm TLS Certificate for SMTP TX> <Confirm TLS Certificate for SMTP TX> When setting SMTP authentication Specify the authentication method using one of the following three methods. Fixed Device Authentication Entering the authentication information when sending Registering information for each user Fixed Device Authentication: When <User Name> and <Password> entered into <SMTP Authentication (SMTP AUTH)> are used and the authentication screen (<Log in to SMTP Server>) is not displayed when sending Specify the settings as follows. <SMTP Authentication (SMTP AUTH)>: <On> <User Name>: Enter the user name. <Password>: Enter the password. <Display Auth. Screen When Sending>: <Off> <Information Used for SMTP Server Authentication>: <Device Settings> Entering the authentication information when sending: When <User Name> and <Password> entered into <SMTP Authentication (SMTP AUTH)> are used and the authentication screen (<Log in to SMTP Server>) is displayed when sending <User Name> and <Password> entered into <SMTP Authentication (SMTP AUTH)> are entered as the authentication information when sending. When <User Name> and <Password> for <SMTP Authentication (SMTP AUTH)> are not entered (blank), the authentication information when sending is also blank. Specify the settings as follows. <SMTP Authentication (SMTP AUTH)>: <On> <User Name>: Enter the user name. <Password>: Enter the password. <Display Auth. Screen When Sending>: <On> <Information Used for SMTP Server Authentication>: <Device Settings> Registering information for each user: When <Register Info. for Each User> is used and the authentication screen (<Log in to SMTP Server>) is not displayed when sending SMTP authentication is performed using the user name and password registered in the local device. Specify the settings as follows. <SMTP Authentication (SMTP AUTH)>: <On> <Display Auth. Screen When Sending>: <Off> <Information Used for SMTP Server Authentication>: <Register Info. for Each User> |
3 | Press <OK>. |
4
Press <OK>.
 |
Depending on your environment, you might need to specify the SMTP/POP3 port number. For details, contact the Internet service provider or the network administrators. |