How to Replace Toner Cartridges
Read the precautions in Maintenance and Inspections and Consumables before replacing the toner cartridges.
1
Lift the operation panel.
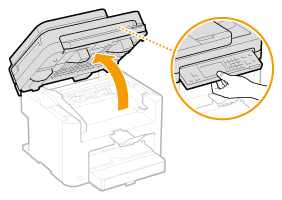

If you cannot lift the operation panel
Make sure the feeder is completely closed. If a thick original such as a book is placed on the platen glass, remove the original. Forcing the operation panel up may cause damage.
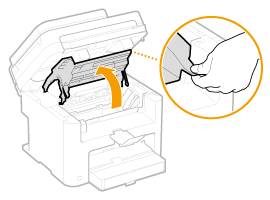
2
Open the toner cover by the grip at the front right of the toner cover.
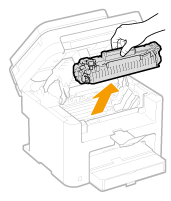
3
Pull the toner cartridge out of the machine.
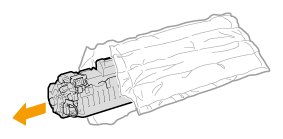
4
Remove the replacement toner cartridge from the protective bag.
5
Shake the toner cartridge 5 or 6 times as shown below to evenly distribute the toner inside the cartridge, and then place it on a flat surface.
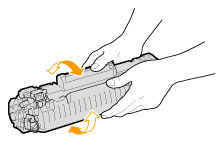
6
Pull the sealing tape straight out.
The full length of the sealing tape is approximately 19 3/4" (50 cm).


When pulling out the sealing tape
If the sealing tape remains inside the toner cartridge, the quality of printouts, including faxes, may deteriorate. Also note that it will not be possible to reprint a fax because the fax function automatically deletes data once it is printed.
Do not pull out the sealing tape at an angle or sideways. If the tape breaks, you may not be able to pull it out completely.
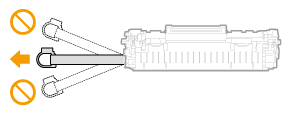
If the sealing tape becomes stuck when pulling it out, keep pulling until it is completely removed.
7
Install the toner cartridge.
Align the right and left projections ( ) with the toner cartridge guides, and push securely all the way in.
) with the toner cartridge guides, and push securely all the way in.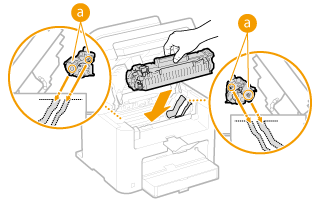
8
Close the toner cover, and lower the operation panel.
If you cannot close the toner cover
Make sure that the toner cartridge is inserted properly. Forcing it closed may cause damage.