Specifying the Authorized Send Settings
You can specify the Authorized Send settings on the Remote UI only.
|
IMPORTANT
|
|
Specifying the Authorized Send settings is available only when the Remote UI is in the System Manager Mode.
|
1
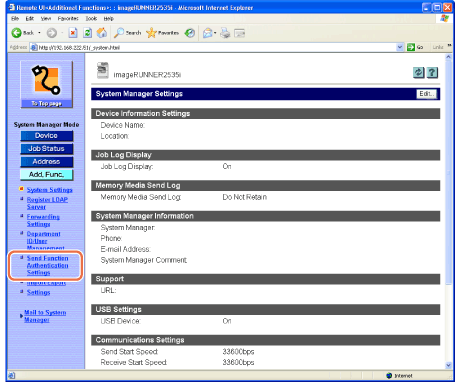
Click [Add.Func.] → [Send Function Authentication Settings] in the [Add.Func.] menu.

The Send Function Authentication Settings page is displayed.
2
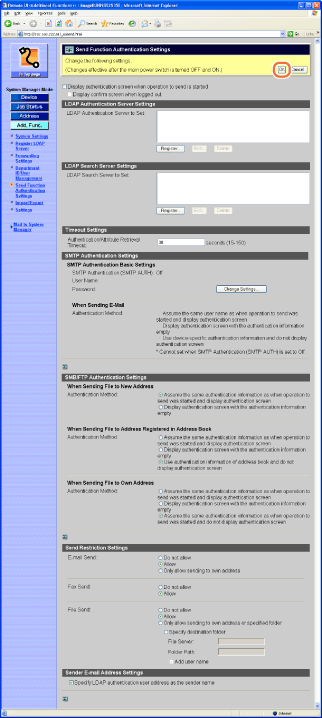
Specify the necessary settings → click [OK].

The setting descriptions are as follows:
|
|
Display authentication screen when operation to send is started:
|
Select this check box to activate Authorized Send and authenticate users who send documents from the machine. To enable the settings in the Send Function Authentication Settings page, this check box must be selected.
|
|
Display confirm screen when logged out:
|
Select this check box to display the confirmation screen when a user logs out of Authorized Send. The log out options are [Send] and [Device]. (Verzenden van documenten)
[Send]: Logs out of Authorized Send only.
[Device]: Simultaneously logs out of other security features such as Department ID Management.
|
IMPORTANT:
The confirmation screen appears only if the machine is locked with security features such as Department ID Management. If the machine is locked with security features and [Display confirm screen when logged out] is not selected, the machine works as if [Device] is pressed when the user logs out of Authorized Send.
<LDAP Authentication Server Settings>
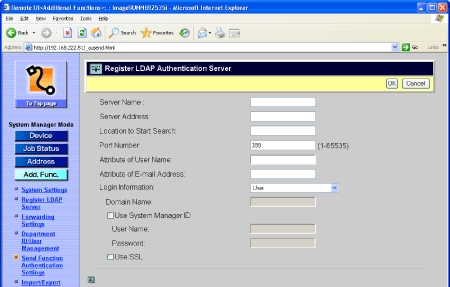
Press [Register] and specify the authentication server settings in the machine, according to the server used. Up to five authentication servers can be registered. To change or delete the registered server settings, select the desired server name and press [Edit] or [Delete].

|
|
Server Name:
|
Enter the name of the authentication server.
|
|
Server Address:
|
Specify the IP address or DNS name of the authentication server. If log in to an authentication server uses the Kerberos authentication method, the DNS name needs to be in a Fully Qualified Domain Name (FQDN) format.
|
|
|
Location to Start Search:
|
Specify the location of the directory tree to start searching for user entries.
|
|
|
Port Number:
|
Specify the port number for accessing the authentication server. The default port number is ‘389’ (non-TLS) or ‘636’ (TLS).
|
|
|
Attribute of User Name:
|
Specify the user attribute name such as ‘sAMAccountName’ and ‘uid’. The specified attribute is used to validate the user name entered when the user logs in to Authorized Send.
|
|
|
Attribute of E-mail Address:
|
Specify the mail attribute name such as ‘mail’. The specified attribute is used to obtain the currently logged on user’s e-mail address from the authentication server. The obtained address is specified as destination when the user presses [Send Mail To Self]. (Verzenden van documenten)
|
|
|
Login Information:
|
Specify the authentication method used when the machine communicates with the authentication server. Select [Use] to use the Simple authentication method, or [Use (Security Authentication)] to use the Kerberos authentication method. The Kerberos authentication method is available for Active Directory.
|
|
|
Domain Name:
|
If you select [Use (Security Authentication)] for <Login Information>, enter the directory tree name of the Active Directory, such as <team1.salesdept.canon.co.jp>.
|
|
|
Use System Manager ID:
|
This setting is available only when [Use] is selected from [Login Information] as the authentication method. Select this check box to use the administrator’s ID and password for the authentication server when performing the first bind of the simple binding process. If you use anonymous binding, deselect this check box.
|
|
|
User Name:
|
This text box is available only when [Use System Manager ID] is selected. Enter the administrator’s user name.
|
|
|
Password:
|
This text box is available only when [Use System Manager ID] is selected. Enter the administrator’s login password.
|
|
|
Use TLS:
|
This setting is available only when [Use] is selected from [Login Information] as the authentication method. Select this check box to use the Transport Layer Security (TLS) protocol when the machine communicates with the authentication server. If you select this check box, the value for <Port Number> automatically changes to ‘636’.
|
IMPORTANT:
For your network server settings, consult your network administrator.
<Location to Start Search> can be left blank. In this case, the value of the defaultNamingContext attribute is retrieved and used as the location of the directory tree to start searching. When no value is available, the attribute value with the shortest length in the namingContexts attributes is selected instead. If this fails, <Location to Start Search> is left blank.
<Attribute of User Name> cannot be specified when the Kerberos authentication method is selected in <Login Information>. If this method is selected or <Attribute of User Name> is left blank, ‘sAMAccountName’ is automatically used as the user attribute name.
If <Attribute of E-mail Address> is left blank, ‘mail’ is automatically used as the mail attribute name.
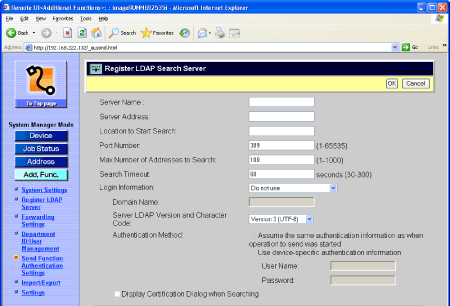
<LDAP Search Server Settings>
Press [Register] and specify the search server settings in the machine, according to the server used. Up to five search servers can be registered. To change or delete the registered server settings, select the desired server name and press [Edit] or [Delete].

For information on the settings other than the one below, see Setting up the Machine for Your Network Environment.
|
|
Authentication Method:
|
This setting is available only when Authorized Send is activated. Specify whether to carry over the login information (user name and password) from Authorized Send to the authentication information used when users search for e-mail addresses and fax numbers via the LDAP server. To use the same user name and password for LDAP search authentication, select [Assume the same authentication information as when operation to send was started]. If not, select [Use device-specific authentication information].
|
IMPORTANT:
For your network server settings, consult your network administrator.
<Timeout Settings>
|
|
Authentication/Attribute Retrieval Timeout:
|
Specify the time that the machine takes to authenticate a user against the authentication server and to retrieve attributes about the user from the server.
|
IMPORTANT:
Depending on the conditions such as authentication methods you are using, the timeout time may be shorter than designated.
<SMTP Authentication Settings>
|
|
SMTP Authentication Basic Settings:
|
To edit the SMTP authentication settings, press [Change Settings]. For instructions on how to specify the SMTP authentication settings, see Setting up the Machine for Your Network Environment.
|
|
Authentication Method:
|
You can specify whether to carry over the login information (user name only) from Authorized Send to SMTP authentication. Select the desired option from the following:
[Assume the same user name as when operation to send was started and display authentication screen]: Displays the authentication screen with the user name for Authorized Send automatically inserted in the [User Name] text box of the SMTP authentication screen.
[Display authentication screen with the authentication information empty]: Displays the authentication screen with no entries in the [User Name] text box of the SMTP authentication screen. Users need to enter the user name each time they send e-mails and I-faxes.
[Use device-specific authentication information and do not display authentication screen]: Does not display the authentication screen. The user name and password specified for the machine are used as the login information.
|
<SMB/FTP Authentication Settings>
You can specify whether to carry over the login information (user name and password) from Authorized Send to the authentication information used when users send documents to a file server. Specify the settings below to suit your needs.
|
|
When Sending File to New Address:
|
This setting is used when users specify the destination by pressing [File] on the top screen (Send) and specifying the file server address manually. Select the desired option from the following:
[Assume the same authentication information as when operation to send was started and display authentication screen]: Displays the authentication screen with the user name and password for Authorized Send automatically inserted in the [User] text box and the [Password] text box of the screen.
[Display authentication screen with the authentication information empty]: Displays the authentication screen with no entries in the [User] text box and the [Password] text box of the screen. Users need to enter the user name and password each time they send documents to a file server.
|
|
When Sending File to Address Registered in Address Book:
|
This setting is used when users specify the destination by selecting the file server address from the Address Book list. Select the desired option from the following:
[Assume the same authentication information as when operation to send was started and display authentication screen]: Displays the authentication screen with the user name and password for Authorized Send automatically inserted in the [User] text box and the [Password] text box of the screen.
[Display authentication screen with the authentication information empty]: Displays the authentication screen with no entries in the [User] text box and the [Password] text box of the screen. Users need to enter the user name and password each time they send documents to a file server.
[Use authentication information of address book and do not display authentication screen]: Does not display the authentication screen. The user name and password of each address in the Address Book are used as the login information.
|
|
|
When Sending File to Own Address:
|
This setting is used when users specify the destination by pressing [Send File To Self] on the top screen (Send). Select the desired option from the following:
[Assume the same authentication information as when operation to send was started and display authentication screen]: Displays the authentication screen with the user name and password for Authorized Send automatically inserted in the [User] text box and the [Password] text box of the screen.
[Display authentication screen with the authentication information empty]: Displays the authentication screen with no entries in the [User] text box and the [Password] text box of the screen. Users need to enter the user name and password each time they send documents to a file server.
[Assume the same authentication information as when operation to send was started and do not display authentication screen]: Does not display the authentication screen. The user name and password for Authorized Send is used as the login information.
|
<Send Restriction Settings>
You can enable and disable sending functionalities. Specify the settings below to suit your needs.
|
|
E-mail Send:
|
[Do not allow]: Disables user from sending e-mails and I-faxes from the machine.
[Allow]: Enables user to send e-mails and I-faxes from the machine.
[Only allow sending to own address]: Restricts the destination of sending documents to the e-mail address of a logged on user. With this setting, users also cannot send I-faxes from the machine. For instructions on how to send documents to the e-mail address of a logged on user, see Verzenden van documenten.
|
|
Fax Send:
|
[Do not allow]: Disables user from sending faxes from the machine.
[Allow]: Enables user to send faxes from the machine.
|
|
|
File Send:
|
[Do not allow]: Disables user from sending documents to a file server.
[Allow]: Enables user to send documents to a file server.
[Only allow sending to own address or specified folder]: Restricts the destination of sending documents to the folder of a logged on user or to the specified folder. If Active Directory is used as an authentication server, the home directory (folder) of a logged on user is used as the destination. If not, or you want to manually specify the destination folder, select [Specify destination folder], then enter the name of the file server and the folder name in [File Server] and [Folder Path]. Selecting [Add user name] enables you to use the user name of a logged on user to specify the destination of sending documents under the specified folder. For example, if <share> is entered in [Folder Path] and the user name of a logged on user is ‘john’, the [john] folder in the [share] folder is specified as the destination. For instructions on how to send documents to the folder of a logged on user, see Verzenden van documenten.
|
<Sender E-mail Address Settings>
|
|
Specify LDAP authentication user address as the sender name:
|
Select this check box to use the e-mail address of a logged on user as the sender information when sending e-mails or I-faxes. The e-mail address is displayed or printed as the sender information at the recipient’s machine, instead of the unit name. (Kennismaking met de verzend- en faxfuncties)
|