Communication Environment Settings
Specify the SNMP (Simple Network Management Protocol) and dedicated port settings so that you can configure and browse machine settings from a computer on the network.
This machine supports SNMPv1, and SNMPv3 with enhanced security and authentication. You can enable both SNMPv1 and SNMPv3 at the same time, depending on your needs.
|
IMPORTANT
|
|
If you are configuring the settings for the first time, use the machine’s control panel. After configuring the settings, you can change them using the Remote UI. For instructions, see Using the Remote UI.
Changes made to SNMP Settings and Enable Dedicated Port become effective when the machine is restarted. To restart the machine, turn it OFF, wait at least 10 seconds, and then turn it ON. For instructions on how to turn the machine ON and OFF, see Chapter 2, “Before You Start Using the Machine,” in the User’s Guide.
If you want to use a Canon printer driver or utility, select ‘On’ for both [Use SNMP v. 1] and [Enable Dedicated Port] (for IPv4 only).
You can restrict the IP addresses and/or MAC addresses of computers on which items can be set or browsed. If you restrict these addresses, it is not possible to use the Remote UI to set or browse detailed information from computers other than those whose IP addresses are allowed, regardless of the SNMP and dedicated port settings. For details, see Restricting Access from Computers on the Network.
The settings for SNMPv3 can be specified only on the Remote UI. (Customizing Settings)
The settings for SNMPv3 can be specified only when TLS communication is enabled. See the following information on the TLS communication settings.
|
|
NOTE
|
|
For instructions on how to enter characters using the on-screen keyboard, see Alapvető műveletek.
|
1
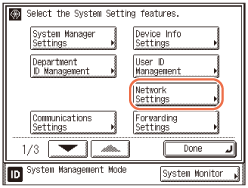
Press  (Additional Functions) → [System Settings] → [Network Settings].
 (Additional Functions) → [System Settings] → [Network Settings].
2
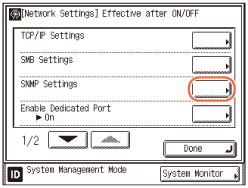
Press [SNMP Settings].
3
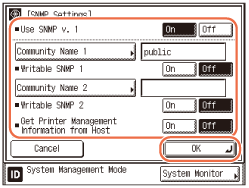
Select whether or not to use SNMP.
If you want to set or browse the machine’s settings from a computer:
|
1
|
Press [On] for <Use SNMP v. 1>.
|
|
2
|
To change the community name, press [Community Name 1] or [Community Name 2] → enter the community name using the on-screen keyboard → press [OK].
|
|
3
|
If you want to allow the computers on the network to access the machine and modify its settings, press [On] for [Writable SNMP 1] or [Writable SNMP 2].
|
|
4
|
If you are using Windows Vista/7 and set [Standard TCP/IP port] for the printer driver port, and want to enable the SNMP port monitoring function to automatically obtain printer management information such as information on application protocols and printer ports, press [On] for <Get Printer Management Information from Host>. Otherwise, press [Off].
|
|
5
|
Press [OK].
|
IMPORTANT:
If you want to use SNMPv3, specify the settings on the Remote UI. The settings for SNMPv3 can be specified only on the Remote UI. (Customizing Settings)
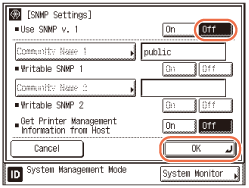
If you do not want to set or browse each item of the machine with a utility that uses SNMP to obtain information:
|
1
|
Press [Off] for <Use SNMP v. 1> → [OK].
|
IMPORTANT:
If you do not want to use SNMP, make sure that the SNMPv3 is also disabled on the Remote UI. (Customizing Settings)
4
Press [Enable Dedicated Port].
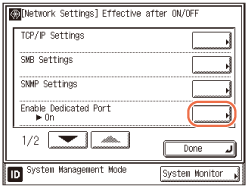
If you want to set or browse the machine’s settings from a computer:
|
1
|
Press [On] → [OK].
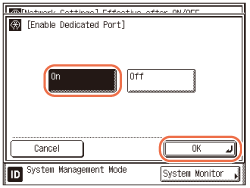 |
If you do not want to set or browse the machine’s settings from a computer:
|
1
|
Press [Off] → [OK].
|
5
Restart the machine.
Turn OFF the machine, wait at least 10 seconds, and then turn it ON.