Enabling IPP/IPPS
To set the printing protocol to IPP or IPPS, you need to install the printer driver by using the procedure shown below. The printer driver is included on the User Software DVD-ROM that comes with the machine. Insert the User Software DVD-ROM into the drive on the computer before starting the procedure.
 |
|
To perform the following procedure, log on to your computer with an administrator account.
|
 |
|
Configure the IPP print settings by using the Remote UI before staring the procedure.
Configuring Printing Protocols and WSD Functions Close the setup screen that is displayed when the DVD-ROM is inserted.
|
1
Open the Printer Folder. Displaying the Printer Folder
2
Click [Add a printer].
3
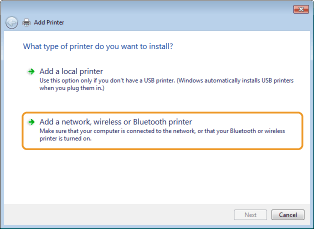
If you are using Windows Vista/7/Server 2008, click [Add a network, wireless or Bluetooth printer].
4
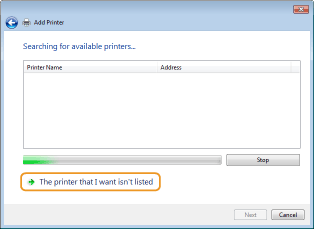
Click [The printer that I want isn't listed].
5
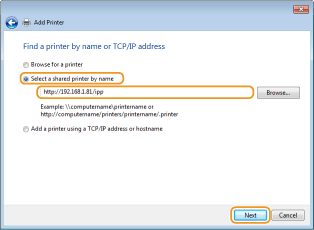
Select [Select a shared printer by name], enter a connection destination, and click [Next].
To use IPP, enter "http://<IP address of the machine>/ipp" for the connection destination.
Example: http://192.168.1.81/ipp
Example: http://192.168.1.81/ipp
To use IPPS, enter "https://<IP address of the machine>/ipp" for the connection destination.
Example: https://192.168.1.81/ipp
Example: https://192.168.1.81/ipp

When you are using a DNS server, enter "<host name of the machine>.<domain name>" instead of "IP address of the machine" (example: https://my_printer.example.com/ipp).
6
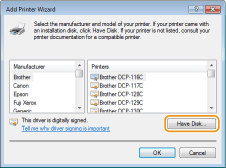
Click [Have Disk].
7
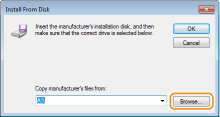
Click [Browse].
8
Specify the folder where the printer drivers are contained, select the INF file, and then click [Open].
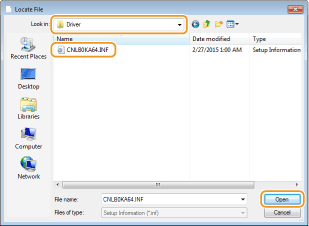
Specify the folder as shown below according to the operating system of your computer. If you are not sure whether the operating system of your computer is a 32-bit or 64-bit version, see Checking the Bit Architecture.
32-bit operating systems
Select [UFR II]-your language-[32BIT]-[Driver] folder on the User Software DVD-ROM.
Select [UFR II]-your language-[32BIT]-[Driver] folder on the User Software DVD-ROM.
64-bit operating systems
Select [UFR II]-your language-[x64]-[Driver] folder on the User Software DVD-ROM.
Select [UFR II]-your language-[x64]-[Driver] folder on the User Software DVD-ROM.

If using the IPP authentication function
When you are prompted to enter the password, enter the user name and password, and click [OK]. Configuring Printing Protocols and WSD Functions
9
Proceed with the setting procedure by following the on-screen instructions.
The printer driver is installed. To use IPPS, install public keys of the machine in the computer.
Installing Public Keys of the Machine
Using IPPS additionally requires installing the public keys of the machine on the computer.
 |
|
The [Common Name] of key pairs must be set in advance to be the "IP address" or "<host name>.<domain name>" used when connecting to the machine. Generating Key Pairs
|
1
Start the Web browser.
2
Enter "https://<IP address of the machine>/" in the address field, and press the [ENTER] key.
Example: https://192.168.1.81/

When you are using a DNS server, enter "<host name of the machine>.<domain name>" instead of "IP address of the machine" (example: https://my_printer.example.com/).
3
Click [Continue to this website (not recommended).].
Login Page is displayed.
4
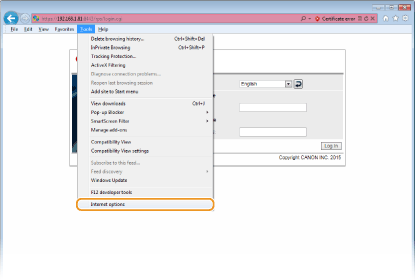
Click [Tools]  [Internet options].
 [Internet options].
5
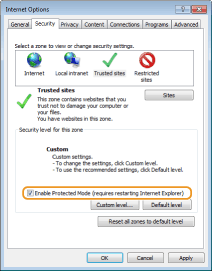
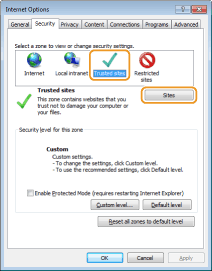
Select [Trusted Sites] in the [Security] tab, and click [Sites].
6
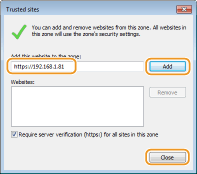
Make sure that "https://<IP address of the machine> or <host name of the machine>.<domain name>/" is displayed, and click [Add]  [Close].
 [Close].
7
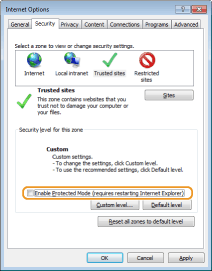
Clear the [Enable Protected Mode (requires restarting Internet Explorer)] check box when it is selected.
8
Click [OK].
The screen returns to the Remote UI screen.
9
Exit the Web browser.
10
Repeat steps 1 to 3 to start the Remote UI.
11
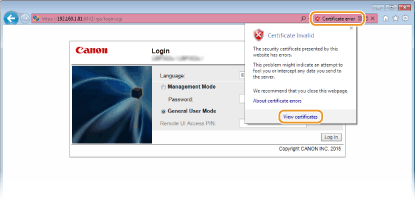
Click [Certificate error]  [View certificates] in the right of the address field.
 [View certificates] in the right of the address field.
12
Click [Install Certificate].
13
Click [Next].
14
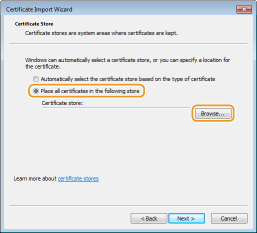
Select [Place all certificates in the following store] and click [Browse].
15
Select [Trusted Root Certification Authorities], and follow the on-screen instructions to complete the certificate import wizard.
16
If you have cleared the [Enable Protected Mode (requires restarting Internet Explorer)] check box in step 7, select the check box.
