
Area Designation
 | You can extract a single part of an original for copying, like when trimming photos or cutting out articles from a newspaper. Since you can specify the area to copy while checking the preview screen, it is not necessary to cut the original. |
1
Place the original. Placing Originals
2
Press <Copy>. <Main Menu> Screen
3
Press <Options> on the Copy Basic Features screen. Copy Basic Features Screen
4
Press <Area Designation>.
5
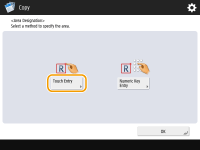
Press <Touch Entry>.
6
Press <Start Scanning>.
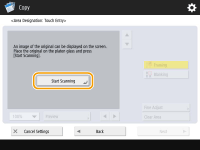
The original is scanned, and the preview screen is displayed.
7
Specify the area to copy.
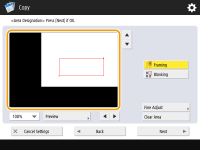
Touch two diagonally opposite points to specify a rectangle area with those points as reference points. Specify an area that encloses the area you want to copy in a rectangle.
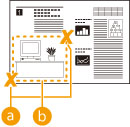
 Two opposing points to enter
 The area to copy
To cancel a point you have specified, press <Delete Point>. To delete the area after you have specified it, press <Clear Area>.

If it is difficult to specify the area because the image displayed on the preview screen is small, press <100% > to enlarge it. You can press
  ,
,  ,
,  , or
, or  after selecting the zoom ratio to move to the location you want to display.
 > to enlarge it. You can press
  ,
,  ,
,  , or
, or  after selecting the zoom ratio to move to the location you want to display.
If it is difficult to specify an area because the space between text or images is small, press <Fine Adjust> to perform fine adjustment of the area. You can move the position of an individual point by selecting the desired <Move Point> button after selecting one of the corner points by pressing the <Select Point>.
If the area of a specified area is too small, the color information of the original may not be correctly detected, and the copy may be output in black and white.
8
Press <Framing>  <Preview>.
 <Preview>.
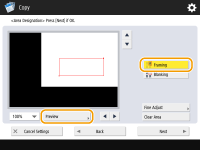

If you press <Framing>, the specified areas are copied.
If you press <Blanking>, the contents outside the specified areas are copied.
If you press <Blanking>, the contents outside the specified areas are copied.
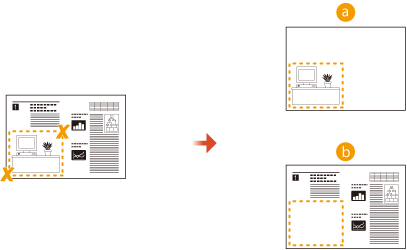
 Framing
 Blanking
9
Confirm whether the areas are specified correctly, and press <OK>.
To adjust an area, press <OK> to return to step 7, press <Clear Area> or <Fine Adjust>, and specify the area again.

If you select <Blanking> in step 8, press <OK> and proceed to step 12.
10
Press <Next >  <Center Shift> or <Do Not Center Shift>.
 <Center Shift> or <Do Not Center Shift>.
To move the specified area to the center of the paper, press <Center Shift>.
11
Press <OK>  <Close>.
 <Close>.
12
Press  (Start).
 (Start).
Copying starts.
 |
Specifying a more accurate area Since areas are specified on the preview screen, they may shift when actual copies are made. If you want to specify more accurate areas, enter dimensions that you have measured in advance. As indicated in the diagram, measure the distance between the right edge of the area and the original's right edge (X1), the left edge of the area and the original's right edge (X2), the top edge of the area and the original's top edge (Y1), and the bottom edge of the area and the original's top edge (Y2), press <Numeric Key Entry> in step 5, and enter the dimensions of X1, X2, Y1, and Y2 using the numeric keys. 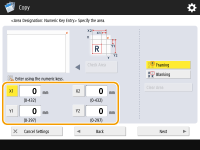 Combining with the Image Repeat mode If you want to use <Framing> and <Repeat Images> at the same time, set <Repeat Images> first, and then set <Framing>. |