Recalling Previously Used Settings for Sending/Saving (Recall Settings)
 | You can select a destination from among the past destinations. When you specify a previously used destination, the machine also sets the same scan settings such as density you used the last time you sent documents to that destination. |
 |
When <Restrict Resending from Log> is set to <On>, you cannot use this feature. Disabling Use of Previously Used Destinations Turning OFF the machine or setting <Restrict New Destinations> to <On> deletes the past destinations, and disables this feature. Restricting New Destinations that Can Be Specified |
 |
When you specify a destination using this feature, any destinations that you have already specified are deleted. |
1
Place the original(s). Placing Originals
2
Select <Scan> in the Home screen. Home Screen
When the login screen appears, enter your user name and password and set up the authentication server. Logging in to Authorized Send
3
Select <E-Mail>, <I-Fax>, or <File> in the Scan Basic Features screen. Scan Basic Features Screen
4
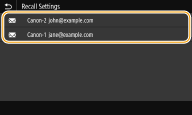
Select <Recall Settings> in the <Specify Destination> tab.
5
Select a destination.
When you transmit to multiple destinations, only the address specified for the first transmission is displayed in the log, but all the destinations are specified.
 |
The selected destination and its scan settings are specified. You can also change the settings before sending.
 To delete destinations (e-mail/I-Fax)
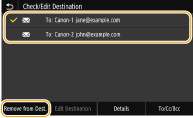
If you specified multiple destinations, you can delete destinations as necessary.
1 | Select <Confirm Destination>. | |
2 | Select the check box for the destination to be deleted, and select <Remove from Dest..>.
 If you select the Group check box, you can view the destinations registered in the group by selecting <Details>  <Destination>. <Destination>. | |
3 | Select <Yes>. |
6
Select <Start>.
If the <Confirm Destination> screen is displayed, check whether the destination is correct, and then select <Start Scanning>.
Scanning of the original starts.
If you want to cancel, select <Cancel>  <Yes>. Canceling Sending Documents
 <Yes>. Canceling Sending Documents
 When placing originals in the feeder in step 1
When scanning is complete, the sending/saving process starts.
 When placing originals on the platen glass in step 1
When scanning is complete, follow the procedures below (except if you selected JPEG as a file format).
1 | If there are additional pages of originals to be scanned, place the next original on the platen glass, and select <Scan Next>. Repeat this step until you finish scanning all of the pages. When there is only one page to be scanned, proceed to the next step. |
2 | Select <Start Sending>. The sending/saving process starts. |

If the <File Authentication> screen or <SMTP Authentication> screen appears
Enter the user name and password, and then select <Apply>.
