Registering Destinations in the Address Book
Destinations can be edited or deleted after they have been registered. You can register up to 300 destinations (including 19 destinations in the one-touch keys) in the Address Book.
1
Press  or
or  .
.
or .If a logon screen appears, see Logging on to Authorized Send (imageRUNNER 1435iF / 1435i Only).
2
Press  (Address Book).
(Address Book).3
Use  /
/ to select <
 >.
>.
/ to select <>.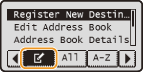
4
Use  /
/ to select <Register New Destination to Address Book>, and press
  .
.
/ to select <Register New Destination to Address Book>, and press .
If a screen appears prompting you to enter a PIN, enter the correct PIN using the numeric keys, and press . Setting a PIN for Address Book
. Setting a PIN for Address Book5
Select <Coded Dial>, and press .
.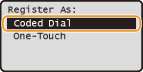
6
Select <Fax> or <E-Mail>, and press .
.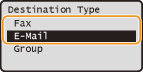
Select <Fax> when registering a fax number, or select <E-Mail> when registering an e-mail address.
The types of destinations that can be selected vary depending on the machine model.
 Registering destinations with the LDAP server
NOTE:
If your office has an LDAP server installed, you can register destinations searched from the server in the Address Book. You need to specify the settings for connecting to an LDAP server beforehand. Registering LDAP Servers (imageRUNNER 1435iF / 1435i Only)
|
1
|
Select <Specify from LDAP Server>, and press
. |
|
2
|
Search for the destination to register.
See steps 3 to 8 on Specifying Destinations in an LDAP Server (Fax) for the procedure.
According to the content registered in the LDAP server, the user name and the fax number/e-mail address of the specified destination that is registered on the LDAP server will be automatically input.
|
|
3
|
Select a destination, and press
. |
|
4
|
Proceed to step 11.
|
7
Select <Name>, and press .
.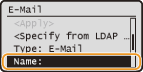
Registering <Name> is optional. If you register <Name>, the destination can be searched alphabetically.
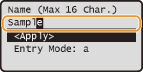
8
Enter the name using the numeric keys, select <Apply>, and press .
.
9
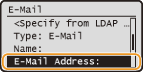
Select <Fax Number> or <E-Mail Address>, and press .
.
10
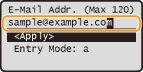
Enter the number or address using the numeric keys, select <Apply>, and press .
.
11
Select <Apply>, and press .
.A three-digit number is automatically set to destinations. The number can be edited after it has been registered.
Editing the Content of Registered Destinations
After registering destinations, you can change the content of destinations such as numbers, names, types, and coded dial numbers.
1
Press or .
or .If a logon screen appears, see Logging on to Authorized Send (imageRUNNER 1435iF / 1435i Only).
2
Press (Address Book).
(Address Book).3
Use / to select <>.
/ to select <>.4
Use / to select <Edit Address Book>, and press .
/ to select <Edit Address Book>, and press .If a screen appears prompting you to enter a PIN, enter the correct PIN using the numeric keys, and press . Setting a PIN for Address Book
. Setting a PIN for Address Book5
Select the tab containing the destination you want to edit.
6
Select the destination you want to edit, and press .
.7
Select the item you want to edit, press , and then perform editing.
, and then perform editing.8
Select <Apply>, and press .
.Deleting a Registered Destination
1
Press or .
or .If a logon screen appears, see Logging on to Authorized Send (imageRUNNER 1435iF / 1435i Only).
2
Press (Address Book).
(Address Book).3
Use / to select <>.
/ to select <>.4
Use / to select <Delete From Address Book>, and press .
/ to select <Delete From Address Book>, and press .If a screen appears prompting you to enter a PIN, enter the correct PIN using the numeric keys, and press . Setting a PIN for Address Book
. Setting a PIN for Address Book5
Select the tab containing the destination you want to delete.
6
Select the destination you want to delete, and press .
.7
Select <Yes>, and press .
.