Scanning (imageRUNNER ADVANCE Series When Using the [Scan and Send] Function)
You can receive scanned data on your mobile terminal using the [Scan and Send] function of the multi-function device.
Procedures
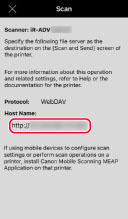
Checking the Mobile Terminal Host Name
1.Tap [ ] in the upper left corner of the Canon PRINT Business home screen and register/select the device to use.
2.In the Canon PRINT Business home screen, tap [Scan].
3.In the scan screen, check [Host Name].
Scanning an Original at the Device
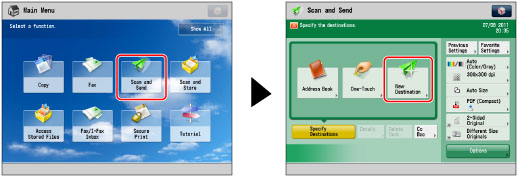
1.Set the original on the platen glass or feeder.
2.Press [Scan and Send] → [New Destination].
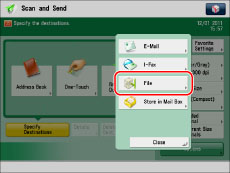
3.Press [File].
4.In the [File] screen, set the destination.
[Protocol]:
Select [WebDAV].
[Host Name]:
Enter the host name displayed in the [Scan] screen of Canon PRINT Business.
5.Press [OK].
6.Change the scan settings.
7.Press [ ] (Start).
Result
The scanned data is saved and the document preview screen is displayed.
JPEG/PDF
A preview is displayed in the document preview screen.
TIFF/OOXML/XPS
A file icon is displayed in the document preview screen.