Exporting Documents in the PDF Format
You can export documents in the PDF format (*.pdf) with the chapter number or range of pages specified in Desktop Editor.
|
NOTE
|
|
In the following cases, you cannot export documents in the PDF format with the chapter number or page range specified.
When [Booklet Printing] is selected in [Print Style]
When [For Insertion] is set
When you use Desktop to convert a document into a PDF document, the file size may become larger.
When you insert a sheet and then export a document as a PDF, all pages including the inserted sheet will be exported. For details on how to set the inserted sheet, see the following.
When a document is converted to a PDF document, the layout settings and the blank side of a 2-sided printing/booklet printing configured for the IWB document (such as [Output Size], [Output Paper Orientation], [Page Layout], and [Enlarge/Reduce Original Page]) will be applied to the PDF document. If the following are set to be printed, they too will be converted into PDF documents.
Annotations
Headers/Footers
The tab section of the tab paper
Watermarks
The page layout boundaries
The print settings specified for the IWB document are not reflected in the print settings of the exported PDF document.
|
1.
Open a document with Desktop Editor.
For information on how to open a document with Desktop Editor, see the following.
2.
Click [Export as PDF] on the ribbon.
Or, select the [File] menu > [Export] > [Export as PDF], and select one of the following.
[Export to Library]
[Export to Windows Folder]
[Export to Therefore]
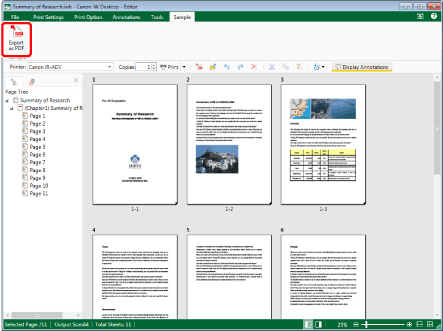
If [Select Export Destination] is displayed, proceed to step 3.
If [Export as PDF] is displayed, proceed to step 4.
|
NOTE
|
|
If commands are not displayed on the ribbon of Desktop Editor, see the following to display them.
The same operation can also be performed with the tool buttons. If tool buttons are not displayed on the toolbar of Desktop Editor, see the following to display them.
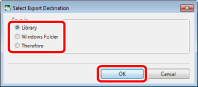
[Select Export Destination] is displayed if two or more of the following check boxes are selected in [Destination Displayed in Save Destination Dialog when Saving/Exporting] in [System Settings].
[Library]
[Windows Folder]
[Therefore]
[Export as PDF] is displayed if only one check box is selected.
[File] menu > [Option] > [System Settings] > [Editor] > [Options] > [Destination Displayed in Save Destination Dialog when Saving/Exporting]
For more information on the operations when you select the [File] menu > [Export] > [Export as PDF] > [Export to Therefore], see the following.
Exporting a Document Edited with Desktop Editor to Therefore (Administrator Guide)
|
3.
Select the export destination, and click [OK].
[Export as PDF] is displayed.
|
NOTE
|
|
For more information on the operations when [Therefore] is selected, see the following.
Exporting a Document Edited with Desktop Editor to Therefore (Administrator Guide)
|
4.
Select the library or Windows Folder to export the document to.
5.
Specify [Document Name] or [File name].
6.
To specify the chapter to export, select [Chapters] in [Export Range] and specify the chapter number in [Specify Range].
You can specify a range of chapters in the following format.
When exporting from chapter "a" to the last chapter: a-
("a" indicates the chapter number to start exporting)
When exporting from the first chapter to chapter "b": -b
("b" indicates the chapter number to end exporting)
When specifying and exporting continuous chapters: a-b
("a" and "b" indicate the chapter numbers to start and end exporting respectively)
When specifying and exporting discontinuous chapters: c,d
("c" and "d" indicate the individual chapter numbers to export, separated by commas)
|
NOTE
|
|
The entry order of [Specify Range] is not the order of chapters exported. Even when you enter "1,2" or "2,1", chapters are exported in the order "1,2".
|
7.
To specify the pages to export, select [Print Pages] in [Export Range] and specify the page number in the displayed [Specify Range].
You can use the following formats to specify a range of page numbers.
When exporting from page "a" to the last page: a-
("a" indicates the page number to start exporting)
When exporting from the first page to page "b": -b
("b" indicates the page number to end exporting)
When exporting continuous pages: a-b
("a" and "b" indicate the page numbers to start and end exporting respectively)
When exporting discontinuous pages: c,d
("c" and "d" indicate the individual page numbers to export, separated by commas)
|
NOTE
|
|
The entry order of [Specify Range] is not the order of pages of the document to be exported. Even when you enter "1,2" or "2,1", pages are exported in the order "1,2".
If 2-sided printing is set, both sides are exported even if only one side of the page to print is specified in the range.
|
8.
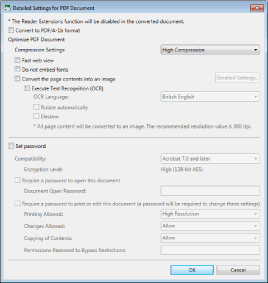
If you want to export with advanced settings specified, click [Detailed Settings].
[Detailed Settings for PDF Document] is displayed.
9.
Specify the detailed settings for the PDF document.
|
[Convert to PDF/A-1b format]
|
Select this check box to convert the document to a PDF document in the PDF/A-1b format.
|
|
[Compression Settings]
|
Set the compression level of the PDF document.
|
|
[Fast web view]
|
Select this check box to optimize the PDF document for display on the Web.
Converting a PDF document with this check box selected enables the document to be downloaded page by page (with byte-serving) when the PDF has been uploaded to the Web.
|
|
[Do not embed fonts]
|
Select this check box to convert without using embedded fonts when creating the PDF document.
Converting to a PDF document without using embedded fonts enables the size of the PDF document to be reduced.
|
|
[Convert the page contents into an image]
|
Select this check box to convert all pages in a document that will be converted to a PDF document into TIFF format images.
|
|
[Detailed Settings]
|
Enables you to configure how to convert images.
[Color Mode]: Specifies the color.
[Resolution]: Specifies the resolution.
|
|
[Execute Text Recognition (OCR)]
|
Select this check box to enable text searches for documents converted to TIFF images (OCR function).
When you convert a large size document, it may take time.
|
|
[OCR Language]
|
Select the language to use for the OCR function from the pull-down list.
|
|
[Rotate automatically]
|
If this check box is selected, the vertical orientation of the document is corrected. Select this check box when the document includes both vertically and horizontally-oriented pages.
|
|
[Deskew]
|
Select this check box to correct the skew of the document. Select this check box when the document is skewed.
|
|
[Set password]
|
If you want to restrict PDF access, printing, and editing for security reasons, select this check box.
|
|
[Compatibility]
|
Select security compatibility settings for the PDF document.
|
|
[Require a password to open this document]
|
Select this check box to set a password for opening the document.
|
|
[Document Open Password]
|
Enter the password for the PDF document.
|
|
[Require a password to print or edit this document (a password will be required to change these settings)]
|
Select this check box to restrict printing, editing, and copying of the PDF document.
|
|
[Printing Allowed]
|
Set print permission for the PDF document.
|
|
[Changes Allowed]
|
Set edit permission of the PDF document.
|
|
[Copying of Contents]
|
Set copy permission for the contents of the PDF document.
|
|
[Permissions Password to Bypass Restrictions]
|
Enter the password to release print and editing restrictions in the document.
|
|
IMPORTANT
|
|
If you create a PDF document with the [Do not embed fonts] check box selected, the content displayed in the document may change. To prevent changes, install the fonts used in the PDF document to the computer that will display the document. If the content displayed in the PDF document still changes, export the document in the PDF format again with the [Do not embed fonts] check box deselected.
If you export a PDF document in the PDF/A format without selecting the [Convert to PDF/A-1b format] check box, the document will not be in the PDF/A format.
When you export to a PDF document in the PDF/A format, the transparency attribute set for annotations is deleted and the annotations are filled in the exported PDF document in the PDF/A format. Also, the following annotations are deleted.
Text highlights
Text notes
Polygons
Polygon Lines
When converting a PDF document created in Adobe Acrobat to a PDF document in the PDF/A format, the following information is deleted.
Tags
Bookmarks
Redaction marking
Links
Carets of text annotations
If the [Execute Text Recognition (OCR)] check box is selected, even if [OCR Language] is correctly selected, different characters may be used, depending on the character and the format of document.
|
|
NOTE
|
|
If you select the [Convert to PDF/A-1b format] check box, you cannot set [Fast web view], [Do not embed fonts], or [Set password].
If you select the [Execute Text Recognition (OCR)] check box, be wary of the following.
If the output size exceeds A3 in the print settings, the document cannot be converted to a PDF document.
If the [Deskew] check box is selected, the paper size of the created PDF document may become larger than the paper size of the original document. In this case, if you print/fax using the same paper size as the original document, the created document may appear smaller.
Additional hard disk space is required along with free space for the created PDF document. If there is a large number of pages, up to 1 GB of free space will be used.
The [Convert the page contents into an image] check box is automatically selected.
The maximum value for [Resolution] in [Detailed Settings for Image] displayed when you click [Detailed Settings] is [300 dpi].
|
10.
Click [OK].
If you set a password for opening the document, [Confirm Document Open Password] is displayed. In this case, proceed to step 11.
If you set restrictions on printing and editing the document, [Confirm Permissions Password] is displayed. In this case, proceed to step 12.
If a password is not set, [Export as PDF] is displayed again. In this case, proceed to step 13.
|
NOTE
|
|
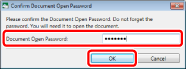
[Confirm Document Open Password] is displayed when the [Require a password to open this document] check box is selected.
[Confirm Permissions Password] is displayed when the [Require a password to print or edit this document (a password will be required to change these settings)] check box is selected.
|
11.
Enter the password in [Document Open Password] and click [OK].
If you set restrictions on printing and editing the document, [Confirm Permissions Password] is displayed. In this case, proceed to step 12.
If restrictions on printing and editing the document are not set, [Export as PDF] is displayed again. In this case, proceed to step 13.
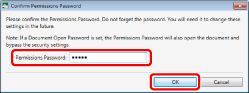
12.
Enter the password in [Permissions Password] and click [OK].
[Export as PDF] is displayed again.
13.
Click [Save].
The document is exported as a PDF document when a library other than a Therefore Library or Windows Folder is specified as the export destination.
[Specify Index Data] is displayed when a Therefore Library is specified as the export destination. Proceed to step 14.
|
IMPORTANT
|
|
When you overwrite an existing document using the PDF export process, depending on the access rights (Windows) to the existing document, the document to be overwritten may disappear after an error message is displayed. In this case, perform the PDF export process again.
|
|
NOTE
|
|
If the [Display a confirmation message when converting to PDF documents that meet the requirements of PDF/A] check box is selected in [System Settings], a confirmation message is displayed when converting to a PDF document in the PDF/A format. In this case, check the message and click [Yes]. Select the [Do not show this message again] check box to hide the confirmation message.
[File] menu > [Option] > [System Settings] > [Editor] > [Options] > [Display a confirmation message when converting to PDF documents that meet the requirements of PDF/A]
An error message is displayed if conversion to a PDF document in the PDF/A format fails. For information on the causes of errors, see the following.
If the following dialog box is displayed after saving, select the appropriate update process and then click [OK].
[Checked Out Document Confirmation]
[Modify Shared Document]
If the [Check in automatically after exiting the application that is editing documents] check box in [System Settings] is deselected, you need to perform check in/check out manually.
[File] menu > [Option] > [System Settings] > [Browser] > [Shared Document Management] > [Check in automatically after exiting the application that is editing documents]
|
14.
Specify the value of the index data, and click [OK].
The document is exported as a PDF document.