Registering a Network Library
A Network Library is a library that you register when you want to use a shared folder to share documents with other users.
1.
Click [Library Management] on the ribbon.
Or, follow one of the steps described below.
Right-click the Navigation Window and select [Library Management]
Select the [File] menu > [Library Management]
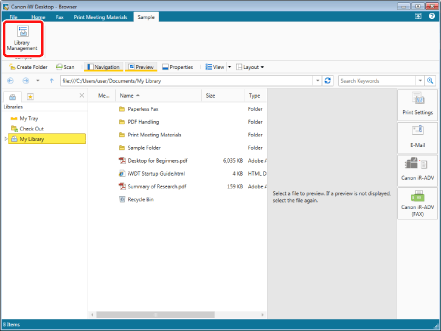
The [Library Management] is displayed.
|
NOTE
|
|
If commands are not displayed on the ribbon of Desktop Browser, see the following to display them.
This operation can also be performed with the tool buttons. If tool buttons are not displayed on the toolbar of Desktop Browser, see the following to display them.
|
2.
Click [Register Library].
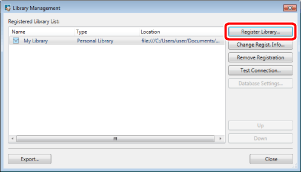
The [Select Library to Register] is displayed.
3.
Select [Network Library] and click [OK].

The [Register Network Library] is displayed.
4.
Click [Browse].
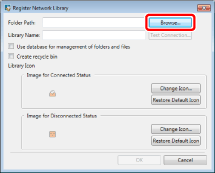
The [Browse For Folder] is displayed.
5.
Select a folder to use as a Network Library and click [OK].
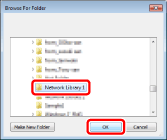
The path to the selected folder is displayed in [Folder Path].
The name of the selected folder is displayed in [Library Name].
|
IMPORTANT
|
|
The operations of Desktop are not guaranteed if you register a folder in the following location as a Network Library.
Folders at a level above or below a folder already registered as a DM Data Library
|
6.
To use a database to manage folders and files, select the [Use database for management of folders and files] check box.
For details on the [Use database for management of folders and files] check box, see the following.
7.
To create a Recycle Bin in the Network Library, select the [Create recycle bin] check box.
The Recycle Bin is created immediately below the Network Library.
|
NOTE
|
|
The access rights for the documents/folders that you have moved to the Recycle Bin are lost.
The Recycle Bin is created on the local computer. Therefore, when you use the Recycle Bin, the disk space of the local computer is used.
When moving a document/folder with a large file size to the Recycle Bin, it may take a long time.
If a Recycle Bin has not been created when you delete a document/folder, it is completely deleted.
If you create a Recycle Bin, a Recycle Bin mark is added to the Network Library icon.
Example of an icon:
|
8.
If necessary, change the library settings.
For information on how to change the name of the displayed library, see the following.
When setting the library icon, see the following.
The [Library Management] is displayed again.
9.
Click [OK].
|
NOTE
|
|
If you selected [Create recycle bin] in step 7, a confirmation message is displayed when moving a document to the Recycle Bin. If you click [Yes], the Network Library with the Recycle Bin is registered. If you click [No], return to step 7 and deselect [Create recycle bin].
Selecting [Do not show this message again] disables the confirmation message. Even if the confirmation message is disabled, it can be enabled again by selecting [Display a warning when moving documents to the recycle bin].
[File] menu > [Option] > [System Settings] > [Browser] > [Edit/Operation Documents] > [Display a warning when moving documents to the recycle bin]
|
10.
Test the connection to the registered library.
For more information on testing the connection to the library, see the following.
11.
Click [Close].