Specifying the Other Settings of Quick Printing Tool
This section describes how to configure settings other than the Quick Printing Tool display style and notification settings.
1.
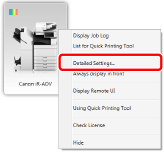
Right-click Quick Printing Tool and select [Detailed Settings].

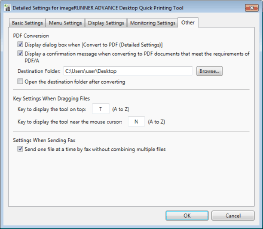
[Detailed Settings for imageRUNNER ADVANCE Desktop Quick Printing Tool] is displayed.
|
NOTE
|
|
You can also click [Detailed Settings] in the [List for Quick Printing Tool] to perform the same operation.
|
2.
Change the settings on the [Other] tab.

|
[PDF Conversion]
|
Configure settings such as the save destination when converting to a PDF document.
|
|
[Display dialog box when [Convert to PDF (Detailed Settings)]]
|
Select this check box to display [Detailed Settings for PDF Document] when converting to a PDF document (with detailed settings).
|
|
[Display a confirmation message when converting to PDF documents that meet the requirements of PDF/A]
|
Select this check box to display a confirmation message when converting a document to a PDF document in the PDF/A format.
|
|
[Destination Folder]
|
Enter the destination for saving converted PDF documents.
|
|
[Browse]
|
Select the destination for saving converted PDF documents.
|
|
[Open the destination folder after converting]
|
Select this check box to open the destination folder when the PDF document conversion is complete.
|
|
[Key Settings When Dragging Files]
|
Enables you to specify the key to change the display method of the Quick Printing Tool.
|
|
[Key to display the tool on top]
|
Enables you to specify the key for displaying the Quick Printing Tool at the front. Keys from A to Z can be assigned.
|
|
[Key to display the tool near the mouse cursor]
|
Enables you to specify the key for displaying the Quick Printing Tool near the mouse cursor. Keys from A to Z can be assigned.
|
|
[Settings When Sending Fax]
|
Enables you to specify fax send settings.
|
|
[Send one file at a time by fax without combining multiple files]
|
Select this check box to set separate fax destinations when faxing multiple files.
|
3.
Click [OK].