Customizing the Popup Menu of the Quick Printing Tool
You can change the popup menu displayed in the Quick Printing Tool.
1.
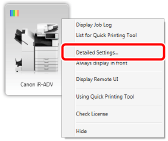
Right-click Quick Printing Tool and select [Detailed Settings].

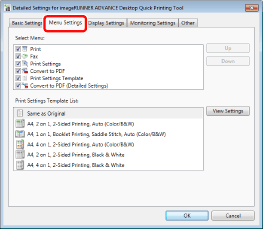
[Detailed Settings for imageRUNNER ADVANCE Desktop Quick Printing Tool] is displayed.
2.
Click the [Menu Settings] tab.

3.
Set the items to customize.

|
[Select Menu]
|
Select the check box of the items you want to display in the popup menu of the Quick Printing Tool.
[Print]
[Fax]
[Print Settings]
[Convert to PDF]
[Print Settings Template]
[Convert to PDF (Detailed Settings)]
|
|
[Up]
|
Changes the order of the displayed items. Selecting an item to move and clicking this moves the item up.
|
|
[Down]
|
Changes the order of the displayed items. Selecting an item to move and clicking this moves the item down.
|
|
[Print Settings Template List]
|
If the [Print Settings Template] check box is selected in [Select Menu], you can select a print settings template registered in Desktop Editor. Select a print settings template to use in [Print Settings Template] in the Quick Printing Tool.
|
|
[View Settings]
|
Enables you to check the settings of the print settings template selected in [Print Settings Template List].
|
|
NOTE
|
|
The following items cannot be selected in [Select Menu] unless you set the printer/fax to use in the Quick Printing Tool.
When a printer is not set: [Print], [Print Settings Template]
When a fax is not set: [Fax]
The order of the check boxes you selected in [Select Menu] is linked with the display of the popup menu.
|
4.
Click [OK].