Configuring the Display Style of Quick Printing Tool
You can change display related settings, such as the images and size of the icons displayed in the Quick Printing Tool.
1.
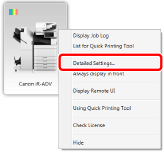
Right-click Quick Printing Tool and select [Detailed Settings].

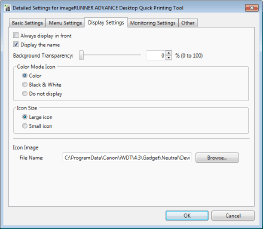
[Detailed Settings for imageRUNNER ADVANCE Desktop Quick Printing Tool] is displayed.
|
NOTE
|
|
You can also click [Detailed Settings] in [List for Quick Printing Tool] to perform the same operation.
|
2.
Change the display settings on the [Display Settings] tab.

|
[Always display in front]
|
Select this to always display Quick Printing Tool in front of other applications on the desktop screen of Windows.
|
|
[Display the name]
|
Select this to display the display name set in [Name] at the bottom of Quick Printing Tool.
|
|
[Background Transparency]
|
The slider position and the numeric value indicate the degree of transparency of the Quick Printing Tool. To change the degree of transparency, move the slider to left or right, or enter a numeric value.
|
|
[Color Mode Icon]
|
Enables you to specify the icon indicating the device color mode displayed at the top left of Quick Printing Tool.
|
|
[Color]
|
Displays the icon indicating a color device at the top left of the Quick Printing Tool.
|
|
[Black & White]
|
Displays the icon indicating a black-and-white device at the top left of the Quick Printing Tool.
|
|
[Do not display]
|
Does not display a color mode icon.
|
|
[Icon Size]
|
Sets the display size of Quick Printing Tool.
|
|
[Large icon]
|
Displays a large size Quick Printing Tool.
|
|
[Small icon]
|
Displays a small size Quick Printing Tool.
|
|
[Icon Image]
|
Sets the device icon of the Quick Printing Tool.
|
|
[File Name]
|
Displays the file path of the image to use for the device icon.
|
|
[Browse]
|
Enables you to select the image to use as the device icon of the Quick Printing Tool.
|
3.
Click [OK].