
Registering Address Book from Remote UI
You can register or edit the Address Book of the machine by using the computer. Specify the shared folder destination here.
|
|
|
You can change the settings only when you have logged on in System Manager Mode.
For imageRUNNER 2206N, this function can only be used when the optional Color Send Kit is attached.
|
1
Start the Remote UI. Starting Remote UI
2
Click [Address Book].
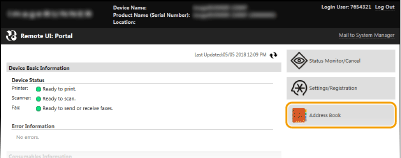

If the enter PIN page is displayed
The Address Book is protected by a PIN. Enter the [PIN] and click [OK].
3
Click [Coded Dial].
You can also register destinations in One-Touch. In this case, click [One-Touch] instead of [Coded Dial]. Registering in the Address Book

4
Click the text link under [Number], [Type], or [Name] for an item named "Not Registered."

You can edit a registered item by clicking the corresponding text link under [Number], [Type] or [Name].
You can delete a registered item by clicking the corresponding [Delete] button.
5
Select [Destination Type to Register] and click [OK].
To register the shared folder destination, select [File].

6
Specify the destination.
 To register the fax destination (imageRUNNER 2206iF)

[Name]
Enter the name of the destination.
[Fax Number]
Enter the fax number of the destination.
[ECM TX]
Select the check box to make the following possible: if an error occurs in an image that is being sent, the error is checked and corrected to prevent an improper image from being sent.
[Speed]
If it takes time for transmissions to start, such as when there is a poor telephone connection, you can adjust the transmission start speed downward incrementally starting from [33600 bps].
[Long Distance]
Specify [International (1)] to [International (3)] according to the transmission conditions when registering overseas fax numbers.
You can also specify [ECM TX] and [Speed] from <Fax Settings> (Fax Settings (imageRUNNER 2206iF)) on the control panel. However, settings made from <Address Book> are enabled for the detailed settings of destinations registered in the Address Book.
To register the e-mail destination

[Name]
Enter the name of the destination.
[E-Mail Address]
Enter the e-mail address of the destination.
To register the shared folder destination
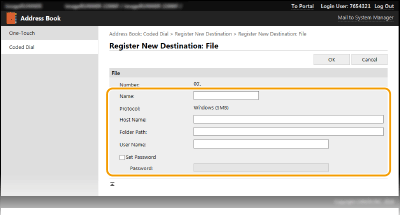
[Name]
Enter the name for the destination.
[Host Name]
Enter the computer name or IP address using up to 120 characters. You can include a path to the shared folder with the computer name or IP address (e.g. "\\swan\share" or "\\192.168.2.100\share").
Using a DNS server
You can also enter the host name (or FQDN) instead of the computer name or IP address (e.g. for a shared folder: "\\swan.organization.company.com\share").
[Folder Path]
Enter the location of the folder to which the data will be sent (up to 120 characters).
Use "\" as a separator. Specify the level that follows the path specified in [Host Name].
[User Name]
Enter the user name set for the shared folder (up to 32 characters).
[Set Password]
To set a password for the shared folder, select this check box and enter a [Password] of up to 32 characters.
 |
Ensure that the same display language is selected on both the computer and the Remote UI.[Host Name] and [Folder Path] may not be displayed correctly or may not be referenceable.
|
7
Click [OK].